Easy Cream Cheesey Chicken (4 Ingredients)

Easy Cream Cheesey Chicken (4 Ingredients)

A friend shared this Easy Cream Cheesey Chicken recipe with me years ago, but I tucked it away in my recipe box and forgot about it…until last week! My family RAVED when they tasted it and asked when I was going to make it again!!! With just 4 ingredients, easy to make AND delicious, this recipe goes straight to the top of my “Go To” recipes :). I hope you and your family enjoy it as much as we do!

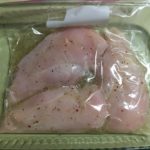
  • 3-4 Breasts Boneless, Skinless Chicken (Trimmed, rinsed and dried)
  • 4-6 Tablespoons Cream Cheese (I used about 2 Tablespoons per Chicken Breast, but you may increase or decrease as desired)
  • 2-3 Tablespoons Green Onions (Chopped, as many or as few as you want)
  • 3-4 Slices bacon (I used Thick Sliced Bacon)
  1. Lower oven rack to about 6″-8″ from the bottom. Turn oven to Broil and let heat up while you prepare the chicken.
  2. Line a baking sheet with foil and set aside. Gather the ingredients.
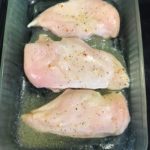
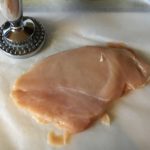
  3. Place a chicken breast between two sheets of wax paper and pound to desired thickness (I usually pound it to about 1/4-1/2 inch at the thickest part of chicken). Repeat with the other breasts. Set aside.
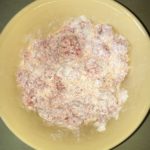
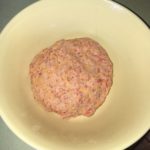
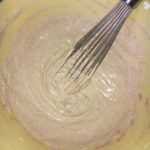
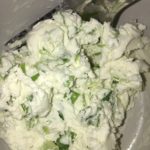
  4. Mix the cream cheese together with the chopped green onions, using a fork.
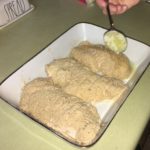
  5. Wrap each chicken breast around 1-2 tablespoons of the cream cheese and onion mix.
  6. Next, wrap one piece of bacon around each breast and secure with a toothpick.
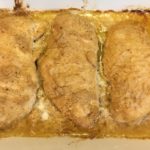
  7. Place the rolled chicken in the foil-lined baking sheet and broil for 20-25 minutes. Let rest for about 5 minutes before serving.
  8. Serve with rice and your favorite veggie. Enjoy!
Main Dish


Easy Italian Baked Chicken

Easy Italian Baked Chicken

This Chicken recipe is one of those go-to recipes in our house. Using only 5 ingredients, it’s not only easy to prepare, tender and juicy, but delicious! I often prepare this the night before and let the chicken really marinate in the Italian Dressing…Perfect for those busy weeknight dinners… Enjoy!

  • 3-4 Breasts Boneless, Skinless Chicken (Trimmed, rinsed & dried)
  • 1 Packet Italian Salad Dressing Mix (I used “Good Seasons”)
  • 1/4 Cup Vinegar
  • 1/2 Cup Vegetable Oil (I used “Wesson” Canola Oil)
  • 3 Tablespoons Water
  1. Gather the ingredients.

Make the Italian Dressing

  1. Using a Cruet or a container with a tight fitting lid, like a mason jar, combine the Vinegar, Oil, Water and the Italian Salad Dressing packet. Mix well.

Putting it Together

  1. Place the Chicken Breasts in a large Ziploc baggie and pour about 1/2 of the Italian Dressing into the baggie. Seal tightly and rotate around to coat the chicken thoroughly with the dressing. Place baggie in a baking dish and refrigerate for at least 1 hour.

Baking

  1. Preheat oven to 400 degrees.
  2. Take the baggie of marinating chicken out of the refrigerator and dump its contents into the baking dish.
  3. Spread the chicken out evenly in the dish to ensure even baking.
  4. Bake for 21-25 minutes (times will vary with different ovens) or until inside temperature of chicken measures 165 degrees. I cut my breasts in half at about the 20 minute mark to ensure that they are cooked thoroughly.
  5. Serve with your favorite side dish and a fresh veggie…yummy!

With Chicken Breasts being so enormous these days, I serve 1/2 breast per person. So, even though this recipe states that it makes 3-4 servings, it actually makes 6-8 servings.

Main Dish
Italian


3 Ingredient Sausage Balls

3 Ingredient Sausage Balls

This simple, spicy, yummy recipe takes me right back to my childhood! If you’ve visited “My Story” on my website, then you already know that I was raised by parents who LOVED to entertain, especially during the Holidays. Being the youngest, I was always given the “chore” of making the Sausage Party Balls, since it only involved 3 ingredients that I could “mush” together with my hands, like Play Doh! Not to mention, my parents were thrilled to see me using my fine motor skills. So, I hope you and your family have lots of fun creating memories with this simple, delicious recipe this Holiday Season :).

  • 1 Pound Ground Sausage (I used “Regular,” but use “Hot” if you want it spicier)
  • 1 3/4-2 Cups Bisquick Baking Mix (If too dry for your taste, use 1 3/4 cups)
  • 1 1/4-1/2 Cups Sharp Cheddar Cheese (Shredded; if you like cheese, use 1 1/2 cups)
  1. Preheat Oven to 400 degrees.
  2. Gather the Ingredients.
  3. In a Large mixing bowl, combine the Ground Sausage, Bisquick and cheese. I begin using 2 sturdy forks to break up the sausage.
  4. Using your hands, “mush” the ingredients together until well blended..like kneading bread dough or Play Doh ;).
  5. Once the ingredients are well blended, pinch off small portions with your fingers and roll into 1-2″ balls (I usually make them 2″). Place each ball onto an ungreased baking sheet.
  6. Bake for about 20 minutes.
  7. Serve warm with or without Ranch Dressing.
  8. Start popping them into your mouth and Enjoy!

I usually serve these with Homemade Ranch Dressing, since they tend to be a wee bit dry (I use 2 cups Bisquick, so they are a little on the dry side, but less greasy…the Ranch Dressing helps moisten them up).

Appetizers, Hors d’Oeuvres


Jobil’s Turkey Meatloaf

Jobil’s Turkey Meatloaf

When I was younger, I used to LOVE Wednesdays! The reason being, it meant that it was MEATLOAF NIGHT and I LOVED my Mother’s Meatloaf. My mother was named Jobil, after her mother, Josephine (Jo), and father, William (Bill)…thus, Jobil :). This recipe was one that she knew by heart and passed it on to me when I got married. I have tweaked it just a little by using Ground Turkey instead of Ground Beef, as my mother did back in the day when we didn’t have Ground Turkey readily available. I think my mother would approve! It’s simply delicious and the leftovers the next day are even better. I hope you enjoy Jobil’s Turkey Meatloaf :).

  • 2/3 Cup Vegetable Juice Cocktail (I used V8 Reduced Sodium)
  • 4 teaspoons Worcestershire sauce
  • 2 Large Eggs
  • 1 1/2 teaspoons Garlic Pepper
  • 1/2 teaspoon Garlic Powder
  • 1 1/2 Cups Bead Crumbs (Italian Style)
  • 1/2 Cup Parmesan cheese (Grated)
  • 1 Medium Onion, chopped (About 1 Cup)
  • 2 pounds Ground Turkey (Or Ground Beef or Ground Chicken)
  • 1/2 teaspoon Salt (Optional)
  1. Preheat Oven to 350 degrees.
  2. Gather the Ingredients.
  3. In a large bowl, combine the Vegetable Juice, Worcestershire Sauce, eggs and seasonings. Blend well using a whisk.
  4. Add the seasoned Bread Crumbs, Parmesan Cheese and Chopped Onions. Mix well with a sturdy spoon.
  5. Lastly, add the Ground Turkey and continue mixing until well blended.
  6. Press into an 8″ x 4″ loaf pan, leaving about an inch at the top.
  7. Bake for 60 minutes or until inside temperature measures 165-170 degrees.
  8. Remove from oven and let stand in pan for at least 15 minutes before slicing.
  9. Serve with your favorite vegetable and whatever side floats your boat…personally, Mashed Potatoes are the Perfect match for this yummy, tender dish 🙂

This meatloaf gets better and better as it sits. I always make two loaves, so we can have the 2nd loaf for leftovers.

Main Dish


Zucchini Bread

Zucchini Bread ~ Gluten-Free

Moist, delicious AND Healthy Zucchini Bread! Thankfully, this recipe is for 2 loaves, since my family gobbles up the first loaf within hours (okay, minutes!) of it coming out of the oven ;). The combination of spices and Lemon zest adds a wonderful flavor to this already tasty Sweet Bread. I bet your first loaf will also disappear within the first day! Enjoy :).

  • 3 Cups Zucchini (shredded)
  • 4 Cups All-Purpose Gluten Free Flour (I used Better Batter brand for this recipe)
  • 1 Cup Granulated Sugar
  • 2 Tablespoons Granulated Sugar (Divided, for the pans)
  • 1/4 Cup Light Brown Sugar (Firmly packed)
  • 5 teaspoons Baking Powder
  • 1 1/2 teaspoons Ground Cinnamon
  • 1/2 teaspoon Salt
  • 1/4 teaspoon Ground Nutmeg
  • 1 Tablespoon Lemon Zest
  • 1 1/2 Cups Skim Milk
  • 6 Tablespoons Vegetable Oil (I use Canola)
  • 2 teaspoons Vanilla Extract
  • 2 Large Eggs (Lightly beaten)
  • Non-Stick Cooking Spray (I use Pam’s Coconut Spray)
  • 1/2 Cup Walnuts or Pecans (Chopped (Optional))
  1. Preheat oven to 350 degrees.
  2. Gather all ingredients.
  3. Spray two 8″ x 4″ loaf pans with the non-stick cooking spray. Sprinkle each pan with 1 Tablespoon Granulated sugar. Set aside.

Flour Mixture

  1. In a large bowl, combine the flour, 1 cup granulated sugar, brown sugar and the next 5 ingredients (Note: if you’re adding Pecans or Walnuts, do so now).
  2. Form a well in the center of the flour mixture. Set aside.

Zucchini Mixture

  1. Using a food processor or handheld grater, shred the zucchini and place it in a strainer to drain the liquid – I use a wooden spoon to press zucchini against the strainer, as well as squeezing the shredded zucchini with my hands to get as much liquid out.

  2. In a large bowl, whisk the milk, vegetable oil, vanilla extract and eggs until well blended. Add the shredded zucchini and mix well.

Making the Batter

  1. Add the Zucchini Mixture to the center of the Flour Mixture.
  2. Mix well using a fork to start with to help break up the shredded zucchini. Then switch to a spoon to ensure that you get all of the ingredients off of the bottom of the bowl.

Baking the Bread

  1. Divide the batter between the two prepared loaf pans. If desired, you can also sprinkle the tops with more granulated sugar (I do not do this, as I find that the sprinkled sugar inside the pans is usually enough to satisfy our family’s sweet tooth).
  2. Bake for 50-60 minutes (time will vary with each oven). Start checking the loaves around 45 minutes with a wooden pick. Loaves are done when pick comes out clean.
  3. Cool in their pans on a wire rack for about 10 minutes.
  4. Remove loaves from pans and cool completely on wire rack before slicing…if you can keep the rest of your family from pouncing on them!
  5. Once completely cooled, slice and enjoy!
Desserts, Snacks, Sweet Breads
Gluten Free
dessert, gluten-free, snacks, sweet breads, sweets, zucchini


Easy Homemade Graham Cracker Crust

Graham Cracker Crust

This buttery Graham Cracker Crust is SO delicious and easy to make! It’s an excellent partner to just about any filling…just in time for the upcoming holiday season :).

  • 5 Tablespoons Butter (Melted)
  • 2 Tablespoons Granulated Sugar
  • 1 Sleeve Graham Crackers (Or 1 1/4 Cup Graham Cracker Crumbs)
  1. Preheat oven to 350 degrees.
  2. Gather ingredients.
  3. Lightly spray a 9″ pie dish with non-stick cooking spray and set aside (I use “Pam Coconut Cooking Spray” since its flavor does not compete with the other ingredients.
  4. In a food processor (or a medium-sized bowl), mix the Graham Crackers, Sugar and Butter until the mixture resembles wet sand.
  5. Press mixture into the bottom and sides of the prepared 9″ pie dish (I use a flat-bottomed measuring cup to do this, as it helps achieve a more even thickness of the crust.
  6. Bake the crust for 8-10 minutes for a golden, delicious crust every time!
  7. Fill with your desired fillings and enjoy :).

If you’re not using a Food Processor, use a large Ziploc baggie to crumble the Graham Crackers using your hands to “squish” the crackers until finely crumbled. Then, add this to the sugar and butter in a medium-sized bowl and mix well.

Desserts, Snacks


Old Bay Barbecued Chicken

Old Bay Barbecued Chicken

This barbecued chicken recipe is healthy, low in calories and oh, so tasty! The addition of Old Bay Seasoning to the sauce adds a nice kick…everyone always tries to guess the “mysterious flavor” that makes this recipe so tangy and delicious! So, let’s get out there and enjoys these last few days of Summer and Grill! Enjoy :).

  • 1 1/2 Cup Ketchup (I used the reduced sugar variety)
  • 1/4 Cup Chicken Broth
  • 1/2 Cup Onion (Finely chopped)
  • 1/4 Cup Light Brown Sugar (Firmly packed)
  • 2 Tablespoons Cider Vinegar
  • 2 Tablespoons Horseradish, prepared
  • 1 teaspoon Garlic Powder
  • 1 teaspoon Old Bay Seasoning
  • 6 Chicken Breasts (Boneless, Skinless, Trimmed and halved)
  • Cooking Spray (I use Coconut Spray)

Prepare Grill

  1. I always use aluminum foil and non-stick cooking spray for easier clean-ups.

Making the Barbecue Sauce

  1. Gather ingredients
  2. Combine the first 8 ingredients in a heavy saucepan.
  3. Mix ingredients thoroughly and bring to a boil over medium to medium high heat.
  4. Once sauce comes to a boil, reduce heat, cover and simmer for at least 15-20 minutes.

Grilling the Chicken

  1. Place the chicken breasts on prepared grill and baste each side with the Old Bay Barbecue Sauce. Continue to baste and turn chicken over until done…usually about 20-30 minutes, depending on your grill and how “charred” you want your chicken ;).
  2. Serve with corn on the cob and a fresh salad!
Main Dish


Sour Cream Chicken

Sour Cream Chicken

Tired of trying to find new ways to bake chicken? Look no more! This recipe for Sour Cream Chicken is SO easy to prepare and the chicken turns out moist and tender every time. The Sour Cream marinade gives it a delicious tangy flavor that’s unique and refreshing. Top it off with bread crumbs and butter for a nice crispy outside. So Yummy!

  • 2 Cups Sour Cream (I use Lite Sour Cream)
  • 1/4 Cup lemon juice (Fresh or bottled)
  • 4 teaspoons Worcestershire sauce
  • 2 teaspoons Celery Salt
  • 2 teaspoons Paprika
  • 1 clove Garlic, minced (I use store bought minced Garlic in a jar)
  • 2 teaspoons Pepper
  • 3 Large Chicken Breasts (Rinsed, trimmed and cut into halves)
  • 3/4 Cup Bread Crumbs (I used Plain)
  • 1/2 Cup Butter, melted

Prepare the Sour Cream Marinade

  1. Gather ingredients.
  2. In a Large bowl, combine the Sour Cream, Lemon Juice, Worcestershire Sauce and spices. Mix well.
  3. Add the prepared Chicken pieces to the Sour Cream marinade and submerge them, coating each piece well. Cover and refrigerate for at least 8 hours or overnight.

Prepare Chicken for Baking

  1. Preheat Oven to 350 degrees.
  2. When ready to cook, remove the chicken pieces from the marinade and coat evenly with the bread crumbs. Place the breaded chicken in a large, deep baking dish.
  3. Drizzle the melted butter over each chicken piece.
  4. Bake uncovered for 45 minutes or until inside temperature registers 165 degrees. The outside should be a nice golden brown.
  5. Serve with your favorite vegetable and enjoy :).

1. I used whole boneless Chicken Breasts in this recipe…however, I usually cut each breast in half, as the recipe states.

2. The photo of the Ingredients shows a bottle of Garlic Salt, but I decided not to use this…I only used the minced Garlic in the jar.

Main Dish


Oatmeal Lace Cookies

Homemade Soft & Buttery Oatmeal Lace Cookies ~ Gluten-Free

Oh my! These Oatmeal Lace Cookies are so soft, buttery and chewy that they just melt in your mouth! For a little bit of extra yumminess, add some Hersheys Milk Chocolate morsels. These make perfect after school treats :).

  • 1 Cup Butter (2 Sticks, softened)
  • 1 Cup Light Brown Sugar (Firmly packed)
  • 1 Cup Granulated Sugar
  • 2 Large Eggs
  • 1 Teaspoon Vanilla Extract
  • 1 1/2 Cups GF All-Purpose Flour (I used Krusteaz All-Purpose GF Flour)
  • 1 Teaspoon Baking Soda
  • 1 Teaspoon Salt
  • 3 Cups GF Oatmeal
  • 1 Cup Milk Chocolate Morsels ((optional) I use Hersheys Brand)
  1. Preheat oven to 350 degrees.
  2. Line two cookie sheets with Parchment Paper or Baking Mats and set aside.
  3. Gather Ingredients.

Butter Mixture

  1. Using a handheld or stand mixer, combine the softened butter and sugars until very well blended.
  2. Add eggs and vanilla to butter mixture, mixing well.

Flour Mixture

  1. In a Medium-sized bowl, combine the GF Flour, Salt and Baking Soda. Blend well.

Putting it All Together

  1. Slowly add the Flour mixture, 1/2 cup at a time, to the Butter Mixture, blending well.
  2. Lastly, add the oats, one cup at a time. Mix thoroughly.
  3. If adding chocolate chips, do so now.
  4. Using a medium-sized cookie scoop (which makes about 2″ balls), drop the dough onto the prepared baking pans, leaving PLENTY of space between each one…the dough spreads A LOT!
  5. Bake for 9-12 minutes (baking time will vary between ovens), checking often, until cookies are a rich golden brown color. Note: the longer they bake, the crispier they will become after they cool.
  6. After a couple of minutes, transfer the cookies to a wire rack and let cool completely.
  7. Serve with a tall glass of cold milk and enjoy :).
Desserts, Snacks
Gluten Free
butter, chewy, cookies, gluten-free, oatmeal, oats, snacks, soft, sweets


Broccoli Noodle Casserole

Broccoli Noodle Casserole

This delicious casserole is perfect as an Entree or as a Side Dish. It also gets tastier the longer it sits, making it great for leftovers! The combination of Broccoli, Mushrooms, Cheeses and Noodles makes it a winner for any crowd, young and old! Perfect for Back To School Meals served with crispy French Bread and a fruit salad…Enjoy 🙂

  • 3 Cups Mushrooms, roughly chopped (8 Oz. Container)
  • 1 Medium Onion, chopped
  • 4 Cups Chopped Broccoli (1 Bunch (2-3 Stalks))
  • 2-3 Tablespoons Butter (I use unsalted)
  • 1 Teaspoon Salt
  • 1/4 Teaspoon Ground Pepper
  • 3 Large Eggs
  • 3 Cups Cottage Cheese (I use Lite, Small Curd)
  • 1 Cup Sour Cream (I use Lite)
  • 3 Cups Raw Egg Noodles (Medium or wide)
  • 1/2 Cup Bread Crumbs (Divided)
  • 1 Cup Shredded Cheddar (Use 2 Cups if your gang loves cheese)
  1. Preheat oven to 350 degrees. Spray a 9″ x 13″ baking dish with nonstick spray and set aside.
  2. Gather ingredients.

Sauteed Vegetables

  1. Melt the butter in a large skillet.
  2. Add the chopped veggies and saute over Medium to Medium Low heat until tender. Season with salt and pepper.

Cheese Mixture

  1. While veggies are cooking…whisk the eggs, cottage cheese and sour cream in a large bowl until well combined.

Egg Noodles

  1. Also, while the veggies are cooking, prepare the Egg Noodles as indicated on the packaging. Drain and add a little butter (about 1 Tablespoon).

Putting it All Together

  1. Using a slotted spoon, add the veggies to the cheese mixture. Mix well.
  2. Next, add the cooked, buttered noodles and 1/4 cup breadcrumbs to the veggie and cheese mixture. Mix well.
  3. Spread the mixture into the prepared baking dish and top with the remaining 1/4 Breadcrumbs and 1-2 Cups Shredded Cheddar.
  4. Cover baking dish with foil and bake for 30 minutes.
  5. Uncover and bake for an additional 15 minutes.
  6. Serve warm as an Entree with some Crusty French Bread and a fresh Fruit Salad. Or serve as a side dish. Either way, it’s delicious! Enjoy!
Main Dish, Side Dish