Homemade Vanilla Marshmallows
Homemade Vanilla Marshmallows

There’s nothing better than a Hot Cup of Cocoa with Homemade Marshmallows, a good Book and a Crackling Fire on a cold Winter’s night! This recipe can be easily tweaked by adding different flavored Gelatins or Extracts, adding hot cocoa powder to the powdered sugar to make chocolate marshmallows and cutting the marshmallows into fun designs using cookie cutters! Let your imagination soar 🙂 Thank you to dinnerthendessert.com for this awesome recipe!
- 3 1/4 oz. packets Unflavored Gelatin (3/4 oz. Total)
- 1/2 + 1/2 Cup Water (1 Cup Total)
- 1 1/2 Cups Granulated Sugar
- 1 Cup Light Corn Syrup
- 1/8 tsp Salt
- 1 Tablespoon Vanilla Extract (Can substitute different extract flavors)
- 1/2 Cup Confectioner’s Sugar (Divided)
- 1 Candy Thermometer (I know this isn’t an ingredient, but please make sure you have one of these before beginning)
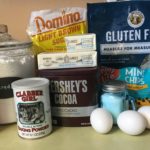
- Gather the ingredients.

- Sprinkle 1/4 Cup of the Confectioner’s Sugar into a 9″ x 13″ baking dish. Set aside.
- Add the 3 Packets of Gelatin and 1/2 cup Water to the bowl of your Standing Mixer.
- Meanwhile, in a medium heavy saucepan, fitted with the Candy Thermometer, combine the Sugar, Corn Syrup, Salt and 1/2 Cup Water. Heat over Medium Heat, whisking until all of the Sugar is dissolved. Continue cooking until temperature reaches 240 degrees F. (Note: you do not need to whisk the entire time…let the mixture boil on its own after the sugar has dissolved, but do not leave unattended).
- Once the Sugar mixture has reached 240 degrees, turn off heat and leave the pot on the stove while you turn your Standing Mixer on to the Low setting.
- Slowly and carefully add the Sugar mixture to the Gelatin mixture in the Standing Mixer and blend for about 2 minutes, until thoroughly mixed.
- Next, increase the speed to High and mix for approximately 10 minutes, or until mixture has reached the consistency of Marshmallow Fluff.
- Add the Vanilla (or whatever flavor you desire) Extract and mix for another minute to thoroughly blend.
- Pour the Marshmallow mixture into the prepared 9″ x 13″ Baking Dish, spreading with a spatula to smooth out the surface.

- With the remaining 1/4 Cup Confectioner’s Sugar, sprinkle evenly over the top of the Marshmallow mixture. Place somewhere to let rest and firm up for 24 hours.
- Once the Marshmallow has firmed up, remove from the baking dish and place on a cutting surface.

- Using a sharp knife, cut into squares or use cookie cutters to make different-themed shapes (dip knife and/or cookie cutters into Confectioner’s Sugar to help prevent sticking).

- Enjoy with a Hot Cup of Cocoa, a good book and a roaring fire!