Gluten Free Sandwich Bread

Gluten Free Sandwich Bread

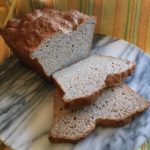
After trying several Gluten Free Breads available in the stores, I decided to try making my own. I finally found a recipe that is simple, delicious and easy on the purse…the total cost per 2 pound loaf is just $5.43 (give or take a few cents, depending on price fluctuations of ingredients).
An enormous “Thank You” to America’s Test Kitchen for creating this recipe!!! 🙂

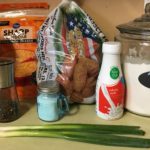
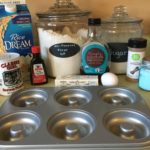
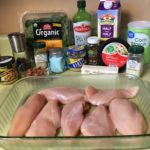
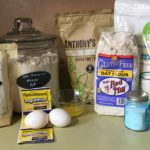
  • 2 Tbsp Unsalted Butter (Melted and cooled)
  • 2 Large Eggs
  • 2 Cups Warm Water (110 degrees – do NOT use water over this temperature, because it will kill the yeast)
  • 2 1/3 + 1/4 Cups King Arthur Gluten Free Multi-Purpose Flour (Sifted)
  • 1 1/3 Cups Gluten Free Oat Flour (Sifted)
  • 1/2 Cup Nonfat Dry Milk Powder
  • 3 Tbsp Powdered Psyllium Husk
  • 2 Tbsp Granulated Sugar
  • 2 1/4 tsp Rapid Rise or Instant Yeast
  • 2 tsp Baking Powder
  • 1 1/2 tsp Salt
  1. Gather the ingredients.
  2. Spray loaf pan with non-stick cooking spray and set aside.
  3. Melt the Butter and set aside to cool a little.
  4. In a Stand Mixer, using the paddle attachment (not the dough hook), mix the dry ingredients – GF Flour, Oat Flour, Dry Milk Powder, Psyllium, Sugar, Yeast, Baking Powder and Salt on Low until blended (about 1 minute).
  5. In a separate bowl, whisk the Eggs with the 110 degree Water and melted Butter until well-blended.
  6. Slowly add the Water mixture to the Dry Ingredients in the Stand Mixer, mixing on Low until all ingredients are blended, scraping sides as needed. Increase speed to Medium and mix for 6 minutes. Dough will look like cookie dough.
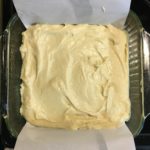
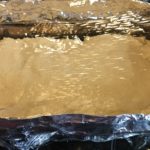
  7. Using a rubber spatula that is sprayed with non-stick cooking spray, scrape dough into the prepared loaf pan and smooth out surface with wet hands. Note: if using an 8 1/2″ pan you will need to wrap a foil collar around the pan (staple ends together), in case dough rises above the top (see photo).
  8. Spray or flick water with hands onto the top of the bread dough and cover loosely with plastic wrap.
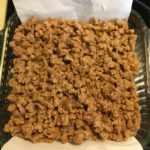
  9. Place in a warm spot to rise about 50% – usually about 1 hour.
  10. Preheat oven to 350 degrees and put oven rack in the middle position.
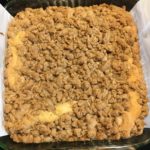
  11. When ready to bake, remove plastic and spray or flick water onto the top of bread and bake for 1 – 1 1/2 hours (our oven runs a bit hot, so I usually only bake my bread for 1 hour). Bread is ready when it turns golden brown and sounds hollow when tapped.
  12. Let cool for about 10 minutes in pan. Then remove to a wire rack to cool completely. Enjoy with butter and honey (or your favorite jam).
  1. Bread keeps on shelf tightly sealed in a plastic bag for 3-5 days.
  2. Freezes well, too, if you can resist eating the entire loaf!
  3. I keep a back-up Ziploc Baggie with all of the dry ingredients already sifted and mixed in the refrigerator for a quick start 🙂
Lunch, Main Dish, Snacks


Gluten Free Chicken Spaghetti

Gluten Free Chicken Spaghetti

This recipe was actually kind of an accident…I ran out of time to go to the grocery store, so I had to scrounge around in my pantry and refrigerator to come up with something for dinner. To my surprise, this dish was an instant hit with my family!!! I hope you and your family like it as well 🙂

  • 2 Large Boneless, Skinless Chicken Breasts (You can use leftovers, if you have them)
  • 12 Oz. Box Gluten Free Spaghetti Noodles (Broken in half)
  • 2-2 1/2 Cups Shredded Cheddar Cheese (Mild, Regular or Sharp)
  • 1 Large Bell Pepper, finely diced (Any color you have on hand will do…I used a Yellow one, because that’s what I had ;))
  • 1 10 3/4 oz. can Cream of Chicken Soup (You may use Cream of Mushroom, if you don’t have Cr. of Chicken)
  • 1 tsp Season All
  • 1/8 tsp Cayenne
  • 1/4 tsp Freshly Ground Black Pepper
  • 1-2 Sliced Green Onions (optional)
  1. Preheat oven to 350 degrees.
  2. Gather the ingredients.
  3. Spray a 9″ x 13″ baking dish with non-stick cooking spray. Set aside.
  4. If your chicken breasts are raw, boil them for about 15 minutes in a large pot, reserving the water to be used later for cooking the pasta.
  5. Once the chicken breasts are almost done, remove them from the hot water to a cutting board to cool slightly. In addition, remove 1 cup of the water and set aside.
  6. Bring the water that was used to cook the chicken to a boil and add the pasta, cooking until al dente.
  7. While the pasta is cooking, shred the chicken and place in a large bowl.
  8. In the same large bowl, add the Cream of Chicken Soup, 1 1/2 cups of the Shredded Cheddar Cheese, the bell pepper and spices. Mix well with the shredded chicken.
  9. Add the cooked spaghetti and the 1 cup of reserved water to the chicken mixture, mixing well.
  10. Dump this mixture into the prepared baking dish and spread out evenly. Top with the remaining cheese.
  11. Bake uncovered for 40-45 minutes, covering with foil if the cheese starts to brown.
  12. Top with sliced green onions and serve. Yummy!
Lunch, Main Dish


Gluten Free Potatoes au Gratin

Gluten Free Potatoes au Gratin

Wow! This is the ultimate rich and creamy comfort food that is a true crowd-pleaser. Plus, it’s not only tasty and satisfying, but SO easy to make!! My family loves it SO much that we have it as our main dish along with a fresh salad for dinner on many nights! Yummy!!! Enjoy 🙂
A HUGE “Thank You” to Ree Drummond for sharing this yummy recipe! I have made a couple of changes to make it allergy-friendly and Gluten Free for my family 🙂

  • 8 Medium-Large Russet Potatoes (Scrubbed clean and cut into bite-sized pieces)
  • 3 Cups Heavy Cream (or Half & Half)
  • 1 Cup Whole Milk
  • 1/4 Cup All-Purpose Gluten Free Flour (I use King Arthur brand)
  • 2 tsps Salt
  • 1/2 tsp Freshly Ground Black Pepper
  • 2 Cups Shredded Cheddar
  • 2 Green Onions (Sliced Thin)
  1. Preheat oven to 400 degrees.
  2. Gather the ingredients.
  3. Spray a 9″ x 13″ baking pan with non-stick cooking spray (or coat with butter). Dump the bite-sized pieces of potatoes into the baking pan and spread evenly.
  4. In a large bowl, combine the cream, milk, flour, salt and pepper and whisk until thoroughly mixed. Pour this over the potatoes in the baking dish.
  5. Cover the baking dish with foil and bake for approximately 20 minutes. Remove foil and bake for an additional 15-20 minutes.
  6. Top with the cheese and bake for approximately 5 minutes, or until cheese melts and mixture is bubbly. Top with green onions and serve while hot. Enjoy!
Side Dish


Easy Gluten Free Cinnamon-Sugar Coffee Cake

Easy Gluten Free Cinnamon-Sugar Coffee Cake

This Gluten Free Coffee Cake is SO moist, tasty and easy to make! It’s the perfect afternoon snack, dessert or breakfast for those weekend sleepovers. An instant hit with our family and friends! 🙂
*Thank You to America’s Test Kitchen for sharing this wonderful recipe!!

The Crumb Topping

  • 1/2 Cup Unsalted Butter, Melted (1 Stick or 8 Tbsp)
  • 1/3 Cup Granulated Sugar
  • 1/3 Cup Dark Brown Sugar (Packed)
  • 1 Large Egg Yolk
  • 1/8 tsp Salt
  • 3/4 tsp Cinnamon
  • 3/4 Cup + 1/3 Cup All-Purpose Gluten Free Flour, Sifted (I use Better Batter GF Multi-Purpose Flour)

The Cake

  • 3/4 Cup + 1/3 Cup All-Purpose GF Flour, Sifted (I use Better Batter GF Multi-Purpose Flour)
  • 1/2 Cup Granulated Sugar
  • 1/4 tsp Salt
  • 1/4 tsp Xanthan Gum (use ONLY if your GF Flour Blend doesn’t contain any; Better Batter contains Xanthan Gum, so I do not add it )
  • 1/2 tsp Baking Soda
  • 6 Tbsp Butter, Unsalted (Softened & Cut Into 6 Pieces)
  • 1/2 Cup Sour Cream
  • 2 Large Eggs
  • 1 Large Egg Yolk
  • 1 tsp Vanilla Extract
  1. Gather the ingredients.
  2. Spray an 8″ x 8″ baking pan with non-stick cooking spray. Next, fold a 16″ length of Parchment Paper to a width of 7″ and fit it into the baking pan, so that the excess hangs over the edges for easy removal of the cake. Set aside.

Making the topping:

  1. In a small sauce pan, melt the butter over low heat. Once completely melted, remove from heat and let cool slightly.
  2. Using a whisk, mix in the sugars, salt, cinnamon and egg yolk to the melted butter, thoroughly mixing.
  3. Add the GF Flour to the butter mixture, blending well. The mixture will look like ground meat. Set aside.

Making the Cake:

  1. Place one of your oven racks in the upper-middle position of the oven and preheat oven to 325 degrees.
  2. In a stand mixer, using the paddle attachment, mix the GF Flour, Granulated Sugar, Salt, Xanthan Gum (if needed) and Baking Soda on low until completely blended.
  3. Next, add the Butter to the flour mixture, one piece at a time, mixing on low until butter pieces are no longer visible – mixture will resemble coarse sand.
  4. Add the Sour Cream, Eggs, Yolk and Vanilla to the Flour mixture and mix on medium-high until batter is light and fluffy.

Putting it Together:

  1. Scrape the batter into the prepared baking pan and smooth the top.
  2. Using your hands, break the Topping Mixture into large pea-sized pieces and sprinkle over the top of the batter to completely cover.
  3. Bake for 35-45 minutes, rotating the pan halfway through baking. It’s done when the middle is no longer jiggly and a wooden toothpick inserted into the middle comes out clean.
  4. Let cool in the pan for 30 minutes before removing, using the excess Parchment Paper to lift and pull the cake out.
  5. Place on a platter or cutting board to cut and serve. Enjoy!

**This cake stores well in an air-tight container for about 3 days.

***A HUGE “Thank You” to America’s Test Kitchen for sharing this wonderful recipe!!! 🙂

Breakfast, Desserts, Snacks


Easy 3-Ingredient Candied Cashews

Easy 3-Ingredient Candied Cashews

This is the easiest and yummiest recipe for Candied Cashews!!! Only 3 ingredients, about 15 minutes and these delicious morsels are ready to enjoy…..well, you have to wait a few minutes for them to cool before you pounce on them! These are perfect for snacking, giving as gifts or topping your favorite ice cream 🙂
A BIG “Thank You” to www.saltandlavender.com for sharing this wonderful treat!!!

  • 2 Tbsp Salted Butter
  • 1 Cup Granulated Sugar
  • 2 Cups Cashews (I used Lightly Salted)
  1. Gather the ingredients.
  2. In a medium to large nonstick skillet, melt the butter over medium-low heat.
  3. Once the butter is melted, add the sugar and cashews.
  4. Cook over low to medium-low heat until sugar has completely melted, stirring often to completely coat the cashews and to prevent mixture from burning.
  5. Turn out onto a sheet of parchment paper to let cool.
  6. Enjoy as a snack, as a topping on ice cream or mixed in with your favorite yogurt…or give as a special gift!
Desserts, Snacks


Mexican Chicken & Rice Soup

Mexican Chicken & Rice Soup

This soup is warm, hearty and filling…making it perfect for these cold Winter days! I particularly like this soup because it’s not only wonderful on Day 1, but also gets tastier and thicker as time goes by. Top with your favorite toppings, such as avocados, sour cream, shredded cheese, chopped onions, lime, etc. Enjoy 🙂

Soup

  • 2 Tbsp Olive Oil
  • 1-2 Garlic Cloves (Finely Chopped)
  • 1 tsp Ground Coriander
  • 1 tsp Ground Cumin
  • 1 tsp Chile Powder
  • 1 Can (14.5 oz) Crushed Tomatoes
  • 6 Cups Chicken Broth
  • 2-3 Boneless Skinless Chicken Breasts
  • 1 Cup Rice, uncooked (I use Basmati or Jasmine)
  • Salt (to taste (optional))
  • Pepper (to taste)

Toppings (The Sky is the Limit!)

  • Avocados (Cut into bite-size pieces)
  • Chopped Onions (Green or White…any variety)
  • Shredded Cheese
  • Sour Cream
  • Croutons
  • Lime Juice
  1. Gather the ingredients.
  2. In a large Stock Pot (or Dutch Oven), heat the Olive Oil over medium-low. Add the Garlic and cook for 2-3 minutes or until Garlic starts to turn a light golden brown.
  3. Add the spices (Coriander, Cumin and Chile Powder) and cook for 1-2 minutes.
  4. Next, add the Chicken Broth and Tomatoes. Increase the temperature to medium-high or high and bring to a simmer, stirring constantly.
  5. Once the mixture starts to bubble, decrease the temperature back to medium-low and add the Chicken Breasts. Cook for about 10-12 minutes, stirring often and turning the Chicken Breasts over halfway through to evenly cook.
  6. Remove the Chicken Breasts from the pot, placing on a cutting board to be shredded once it’s cool enough to handle.
  7. While Chicken is cooling a little, add the Rice, Ground Pepper and Salt (if adding). Continue cooking over medium-low heat while you shred the chicken.
  8. Add the shredded Chicken back into the stock pot and continue cooking until the Rice is thoroughly cooked (about 15-20 minutes, depending on the type of Rice you use).
  9. Serve the soup with the assortment of toppings.
    Yummy!
Lunch, Main Dish
Mexican


Quick & Easy Gluten Free Cinnamon Sugar Cake Donuts

Quick & Easy Gluten Free Cinnamon Sugar Cake Donuts

Oh my gosh! These donuts (aka: doughnuts) are the BEST Gluten Free Donuts out there! They’re not only scrumptious, but quick and easy to make!!! All you need is a few ingredients (most of which you will already have in your Kitchen), about 30 minutes and you will have delicious, moist doughnuts that aren’t heavy, dry or gritty 🙂
A HUGE thank you to www.loveandzest.com for sharing this wonderful recipe!

Batter for the Donuts

  • 4 Tbsp Unsalted Butter (Melted)
  • 1/3 Cup Pure Maple Syrup
  • 1 tsp Vanilla Extract
  • 1 Large Egg (Beaten)
  • 1 tsp Baking Powder
  • 1/4 tsp Salt
  • 1/2 Cup Rice Milk (I use original, but Vanilla is fine; You may substitute with Unsweetened Almond or Oat Milk)
  • 1 Cup Gluten Free All-Purpose Flour, sifted (I use King Arthur All-Purpose Measure for Measure)

Cinnamon Sugar Coating

  • 1/2 Cup Granulated Sugar
  • 1-2 Tbsp Cinnamon (If you don’t care for a lot of cinnamon, start with 1 Tbsp)
  1. Gather the ingredients.
  2. Preheat oven to 425 degrees.
  3. Spray a 6-count non-stick donut pan with non-stick cooking spray. Set aside.
  4. In a large microwave-proof mixing bowl (I use an 8-cup glass measuring bowl with a pour spout for easy transfer of batter to donut pan), melt the butter in the microwave.
  5. Using a whisk, stir the Maple Syrup and Vanilla Extract into the melted butter.
  6. Add the beaten egg and mix until well blended.
  7. Next, mix in the Rice Milk , Salt and Baking Powder until Baking Powder is completely mixed in.
  8. Whisk in the sifted GF Flour and mix until completely blended (I sift the flour directly into the batter).
  9. Spoon or pour the batter into the greased Donut pan, spreading evenly in each well.
  10. Bake for 10 minutes.
  11. Remove and let sit in pan for about 5 minutes to cool slightly.

Making the Cinnamon Sugar Coating

  1. While the donuts are cooling, pour the sugar and cinnamon into a large resealable plastic baggie and mix well.
  2. When the donuts are slightly cooled, turn the donut pan upside down onto a wire rack and thump the bottom a couple of times to remove the donuts.
  3. Add a donut, one-at-a-time, into the resealable baggie and gently shake in the sugar mixture until completely coated.
  4. Place the finished donuts on a wire rack to let them set/dry. As they cool, the donuts absorb the cinnamon, so try to refrain from pouncing on the donuts as soon as you pull each one out of the baggie…they get better and better as they cool. Enjoy!
Breakfast, Desserts, Snacks


Creamy Garlic Chicken with Spinach & Bacon

Creamy Garlic Chicken with Spinach & Bacon

If you’re searching for a tasty Chicken dish for these cold Winter nights that will satisfy just about any palate, look no further! This creamy recipe is not only savory and rich, but hearty and filling! And, if you’re not in the mood for Bacon (who in the world would NOT be?!), just substitute Sundried Tomatoes. This dish is quick and easy to make 🙂
Many thanks to eatwell101 for sharing this delicious recipe!!!

  • 6 Boneless, Skinless Chicken Breasts (Rinsed and patted dry with paper towels)
  • 2 tsp Olive Oil
  • 2 Tbsp Butter (salted or unsalted)
  • 3 tsp Garlic (chopped (I use the already chopped garlic in a jar from the produce section))
  • 1/3 Cup Chicken Broth
  • 5-6 Crispy Bacon Strips (If you’re substituting Sundried Tomatoes, use as much or as little as you want (I usually add about 5 Tablespoons))
  • 1 3/4 Cup Half & Half (You may also use Heavy Cream or Skim Milk)
  • 3 Cups Spinach Leaves (Fresh)
  • 1/2 tsp Dried Oregano
  • 1/2 tsp Dried Basil
  • Salt & Pepper (to taste)
  • 1/2 Cup Parmesan Cheese (Shredded)
  • Crushed Chili Pepper Flakes (Optional)
  • 1 tsp Cornstarch (mixed with 1 Tablespoon water if you need/want a thicker sauce)
  1. Gather your ingredients.
  2. In a large skillet, heat the Olive Oil over low to medium heat (our cooktop runs quite hot, so I cook this between Low and Medium heat).
  3. Sprinkle both sides of the chicken breasts with salt and pepper and add to the skillet, adjusting the temperature to brown both sides. Cook about 6-8 minutes per side, depending on the thickness of the breasts. Remove the chicken breasts from the skillet, once they’re cooked and set aside (you may place them in a warm oven).
  4. Next, add the butter to the skillet, mixing with the leftover chicken juices. Once melted, add the garlic and cook for approximately 1 minute.
  5. Add the Chicken Broth to the butter and garlic mixture in the skillet. Cook for 2 minutes to reduce down slightly. Add the Bacon (or the Sundried Tomatoes) and cook for another 1-2 minutes.
  6. Add the Half & Half (or Heavy Cream or Skim Milk) to the skillet and continue cooking over Low Heat until mixture starts to bubble, stirring frequently. Add the Basil and Oregano (and salt & pepper to taste, optional).
  7. Add the Spinach and Parmesan Cheese and simmer until Spinach has wilted and cheese has melted. At this stage, if you want a thicker sauce, add the Cornstarch & Water mixture, mixing well. Continue simmering and stirring often.
  8. Once the sauce has reached the desired consistency, add the chicken breasts back into the skillet, coating well with the sauce. Add the chili pepper flakes, if using.
  9. Heat for a few minutes to warm the chicken. Top each breast with the savory garlic sauce and extra Bacon, if desired. Serve over steamed rice and your favorite veggie. Enjoy!
Main Dish


Gluten Free Pan-Fried Flounder with Lemon-Caper Sauce

Gluten Free Pan-Fried Flounder with Lemon-Caper Sauce

A light and tasty Lemon-Caper Sauce makes any mild-flavored fish pop with flavor! You may use Flounder, Tilapia, Cod, or whatever fish is readily available in your area for this quick & easy recipe, which I adapted from one of Giada De Laurentiis’ recipes. This recipe is quickly becoming a family favorite…I hope your friends and family enjoy it as well 🙂

  • 4 Fillets Any Mild-Flavored Fish (I have used Flounder and Tilapia)
  • 2 Tablespoons Olive Oil (Divided)
  • 4 Tablespoons Unsalted Butter, Room Temp (You may use salted butter instead of adding the optional 1/4 teaspoon butter )
  • 1/3 Cup Gluten Free All-Purpose Flour
  • 1/4 Cup Capers (Rinsed and drained)
  • 1 Clove Garlic, chopped
  • 1/2 Cup Chicken Stock
  • 1/4 Cup Lemon Juice (Fresh or bottled)
  • 1/2 teaspoon Chili Pepper Paste (I use Gourmet Garden, found in the Produce section)
  • 1/2 teaspoon Oregano (Dried or 1 teaspoon fresh)
  • 1-2 Tablespoons Italian Parsley, Chopped (Fresh)
  • 1/4 teaspoon Salt (Optional)
  1. Gather the ingredients.
  2. Rinse fish fillets and pat dry with paper towels. Set aside near cooktop.
  3. In a large, non-stick frying pan add 1 Tablespoon Olive Oil and 1 Tablespoon Butter. Heat over medium to medium-high heat.
  4. Place the flour (and salt, if using) in a shallow bowl, large enough to hold the flour and to drag the fish fillets through. I set up a little “work station” to make things easier – please see photo.
  5. Once the butter has fully melted, dredge 2 of the fish fillets through the flour, fully coating both sides, and gently shake off any excess flour. Then place the fish into the frying pan and cook over Medium heat for 2-3 minutes on the first side (until edges begin to turn brown). Gently flip the fish over using a large spatula and cooking spoon. Cook for another 30-45 seconds.
  6. Remove the 2 cooked fish fillets to a plate, while you repeat this process with the other 2 fillets…adding 1 Tablespoon Olive Oil and 1 Tablespoon Butter, etc.
  7. When all 4 fillets are finished cooking and removed from the pan, add the capers and the garlic to the skillet. Continue cooking over Medium heat for about 30 seconds.
  8. Next, add the Chicken Stock and Lemon Juice, stirring well. Cook over Low heat for about 2 minutes or until mixture has reduced slightly.
  9. Add the remaining 2 Tablespoons of Butter, the Chili Pepper Paste and Oregano, mixing well. Heat for 1 minute.
  10. Plate each Fish Fillet and spoon the sauce over the fillets and sprinkle with the Parsley.
  11. Serve with your favorite vegetable and side…Enjoy!
Main Dish