Honey-Sriracha Tofu Bites ~ Dairy-Free; Gluten-Free; Vegan

Honey-Sriracha Tofu Bites ~ Dairy-Free; Gluten-Free; Vegan

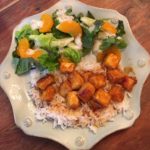
This quick & easy recipe is chock full of flavor. It’s sweet with a kick of heat and is ready in about 20 minutes! Serve over rice with your favorite veggie 🙂

  • 14 oz. Medium-Firm or Firm Tofu
  • 1 tsp Garlic, minced
  • 2 Tbsp Sriracha Sauce
  • 2 Tbsp Braggs Liquid Aminos (you may also use Soy Sauce)
  • 4 Tbsp Honey (I usually add 4 Heaping Tablespoons)
  • 2 Tbsp White Wine Vinegar (you may also use Rice Vinegar)
  • 3-4 Tbsp Potato Starch (or GF Corn Starch*)
  • 3 Tbsp Canola Oil
  • 1-2 Chopped Fresh Green Onions (optional for topping)
  1. Gather all ingredients.
  2. Drain the water off of the block of Tofu and set the tofu on several layers of paper towels for about 10 minutes, flipping over a few times (this step helps pull the water out of the tofu, so it won’t “sweat” and add a bunch of liquid to your dish while cooking).
  3. While the tofu is draining, whisk together the Garlic, Sriracha, Braggs Liquid Aminos, Honey and Vinegar until completely blended. Set aside.
  4. Next, cut up the tofu into cubes and place in a medium to large bowl.
  5. Sprinkle the Potato Starch (NOT Potato Flour) over the cubes of Tofu and gently toss to evenly coat. *You may use Corn Starch in place of the Potato Starch, but the end result will be a little different…more crispy and chewy when using the Corn Starch; the Potato Starch results in a softer outside and somewhat “gummy.” My family prefers the Potato Starch, but both end up tasting delicious 😉
  6. In a large non-stick skillet, heat the Canola Oil over Medium to Medium-High heat until it has a shimmer on the surface, which indicates that it’s ready.
  7. Carefully, add the coated Tofu cubes and spread them out evenly. Cook each side for about 2-3 minutes or until Tofu turns a light, golden brown.
  8. Add about 1/2 to 3/4 of the Honey-Sriracha Sauce (the reserve sauce is for topping) to the lightly-browned Tofu and gently stir to coat the Tofu.
  9. Lower the temperature to Low and continue cooking for another 2-3 minutes, or until the sauce has thickened.
  10. Serve over Rice, spooning a little bit of the reserve sauce over the top, and pair with your favorite vegetable. Yummy!

A BIG “Thank You” to pickledplum.com for sharing the original recipe 🙂 I made a few changes in order to make it allergy-friendly for my family.

Dinner, Lunch, Main Dish, Side Dish


Brown Sugar Oatmeal Cookies ~ Gluten-Free

Brown Sugar Oatmeal Cookies ~ Gluten-Free

These Oatmeal Cookies are so buttery and chewy that they melt in your mouth. I also love the fact that there are only 8 ingredients needed…all ingredients that we usually have on-hand.
Of course, a HUGE “Thank You” to Ree Drummond (aka: The Pioneer Woman) for sharing the original recipe for these wonderful cookies! The only thing that I changed was swapping out the regular flour with Gluten-Free Flour 😉 These cookies earned a 5-Star review in our house!

  • 2 Cups Dark Brown Sugar (firmly packed)
  • 1 Cup Salted Butter, Softened
  • 2 tsp Vanilla Extract
  • 2 Large Eggs
  • 1 1/2 Cups Better Batter All Purpose Gluten Free Flour Mix (you can use other brands, but make sure they contain Xanthan Gum – results will vary)
  • 1 tsp Salt (table)
  • 1/2 tsp Baking Soda
  • 3 Cups Gluten-Free Old Fashioned Oats (I use Quaker Brand)
  • 1/2 Cup Finely Chopped Nuts (optional ~ I did not include nuts due to nut allergies)
  1. Preheat oven to 350 degrees.
  2. Gather the ingredients.
  3. Line 1-2 cookie sheets with Parchment Paper or a baking pad. Set aside.
  4. Using a stand mixer, with the paddle attachment, combine the Brown Sugar and Softened Butter until light and fluffy.
  5. Next, add the Vanilla and the Eggs, one at a time, scraping down the sides of the bowl after adding each Egg.
  6. In a separate bowl, combine the GF Flour, Salt and Baking Soda until well-blended.
  7. Slowly add the Flour mixture to the Butter mixture, one cup at a time, mixing until just combined after each addition.
  8. Next, add the Oats (and Chopped Nuts, if using), one cup at a time, scraping the sides of the bowl after each addition. Mix until all Oats are blended (be sure to check the very bottom of the bowl for any dry oats).
  9. Using a cookie scoop or spoon of your desired size (I used a 2″ cookie scoop), drop cookie dough balls onto prepared cookie sheets several inches apart (they spread!)
  10. Bake for 12-14 minutes (longer if you want crispy cookies).
  11. Cool on the cookie sheets for about 2 minutes before transferring them to a wire cooling rack.
  12. Enjoy with a cold glass of milk or a bowl of Vanilla Ice Cream 🙂
Desserts, Snacks


Paprika Cauliflower Bites ~ Gluten-Free

Paprika Cauliflower Bites ~ Gluten-Free

Did you know that there are three (3) different types of Paprika? There is “Sweet Paprika,” usually labeled as “Paprika” and offers a somewhat sweet pepper flavor without much heat. The second type is “Hot Paprika,” because it is exactly that…HOT! The last type is “Smoked Paprika” and comes from peppers that have been smoked and dried over a fire. “Smoked Paprika” comes in a variety of spiciness (mild, medium, medium-hot and hot), depending on the variety of peppers used.
Paprika is definitely one of my favorite spices, so I am always trying out new ways to use it in my recipes. I hope you enjoy these Paprika Cauliflower Bites 🙂

The Marinade:

  • 1/4 Cup Light Olive Oil (or Canola Oil)
  • 1/4 Cup lemon juice (Juice of 1 Large Lemon)
  • 1/4 Cup Parmesan Cheese, grated or shredded (I use grated when it’s available)
  • 1 tsp Dried Oregano
  • 1 tsp Salt (table)
  • 1 tsp Ground Black Pepper

The Cauliflower:

  • 1 Head Cauliflower (broken/cut into bite-size pieces)

The Coating:

  • 1 Cup All-Purpose Gluten Free Flour (I use King Arthur or Better Batter)
  • 4 tsp Paprika (I use “Sweet Paprika” (label usually states just “Paprika”)
  • 1/2 tsp Ground Black Pepper
  • 1 Tbsp Parmesan Cheese, shredded or grated (I use Shredded for this part for a cheesier finish)
  • 1/2 Cup Butter, salted
  1. In a medium-size bowl, combine all of the Marinade ingredients mixing well; set aside.
  2. Place the bite-size Cauliflower pieces into a large resealable plastic bag.
  3. Pour the Marinade into the bag with the Cauliflower and close bag securely. Smoosh the Cauliflower around in the marinade to evenly coat. Refrigerate for at least 2 hours.
  4. Meanwhile, combine the GF Flour, Paprika, Pepper and Parmesan Cheese in a large bowl, mixing well.
  5. Once the Cauliflower has finished marinating, melt the butter in a large non-stick skillet over medium heat.
  6. Using a slotted spoon, transfer the Cauliflower pieces from the marinade to the GF Flour mixture in the large bowl. Gently toss to evenly coat all of the Cauliflower pieces with the GF Flour mixture.
  7. Once the Cauliflower pieces are ready to cook, transfer the pieces to the large skillet containing the melted butter. Do not move the Cauliflower around for about 1-2 minutes, allowing the pieces to turn golden brown and lightly crispy. Gently flip the Cauliflower pieces over to cook all sides…you may have to reduce the temperature to prevent burning. Test a piece after about 5 minutes to see if it’s done (softened) – I usually cook mine for about 8-10 minutes.
  8. Serve with a fresh salad and your choice of protein….yummy! 🙂
Appetizers, Dinner, Hors d’Oeuvres, Side Dish


Oat Bread (Gluten-Free; Dairy-Free; Vegan)

Oat Bread (Gluten-Free; Dairy-Free; Vegan)

You will fall in love with this soft, yummy GF, DF, Vegan Oat Bread! It’s perfect for toast, sandwiches or warm with some fresh buttery spread 🙂 I usually make two loaves at a time and freeze one to have a loaf ready to go when the first one runs out (usually within 2-3 days in our family). I hope you enjoy it!

  • 3 Cups + 3 Tbsp (453 g) GF Bread Flour Blend (I usually use my own blend (from “letthemeatgfcake” and instructions are included with my Italian Sandwich Bread GF recipe) or Better Batter GF Flour Blend (just be sure your GF flour blend contains Xanthan Gum))
  • 2 Tbsp + 1 tsp Granulated Sugar
  • 2 tsp Kosher Salt
  • 2 tsp Quick Rise Yeast
  • 2 Cups Plain Oat Milk
  • 4 Tbsp Buttery Spread (Earth Balance Original or Country Crock Plant Butter with Avocado Oil)
  • 1 Handful GF Whole Oats (for sprinkling on the top)
  1. Thoroughly coat all sides and bottom of the loaf pan with shortening and then a dusting of GF Flour. Set aside.
  2. In a small microwave-proof bowl, melt the butter-substitute and set aside.
  3. Using a Stand Mixer, with the Paddle attachment and set on Low, combine the GF Flour, Sugar, Salt and Yeast until completely blended.
  4. In another microwave-proof bowl (or 2-cup glass measuring cup with a pour spout), heat the Oat Milk for 45-60 seconds or until just slightly warm.
  5. Pour the melted Butter-substitute into the luke-warm Oat Milk and gently stir.
  6. With the mixer on Low, slowly add the Milk mixture to the GF Flour Mixture until completely combined.
  7. Scrape down the sides of the bowl and the paddle attachment. Increase the speed to Medium-High and beat for 5 minutes.
  8. Using a rubber spatula, scrape the bread dough into the prepared loaf pan and spread evenly. Lightly spray the top with water and cover with plastic wrap (I spray one side of my plastic wrap with non-stick cooking spray, so it can be easily removed after the dough rises).
  9. Place in a warm, draft-free spot to rise for about 1 – 1 1/2 hour (or more, depending on the current temperature) or until dough has risen slightly above the top of the pan.
  10. Once the dough is ready to bake, place one oven rack in the lowest position and the other rack in the middle position of your oven. Next, place an oven-proof dish (I use a glass loaf pan) with about 1 Cup of water on the lower rack set off to one side, so as not to block the heat.
  11. Preheat oven to 425 degrees.
  12. Remove plastic covering from the bread loaf, sprinkle the top with the GF Whole Oats and bake for 35-40 minutes. Bread is done when it starts to pull away from the sides of the loaf pan and it makes a hollow thud sound when you gently thump it. Note: If the bread starts to get too dark on the top, cover loosely with foil (I start checking at the 15 minute mark).
  13. Remove from oven and let cool in pan for about 10 minutes. Then, remove bread from the pan and continue cooling on a wire rack.
  14. Enjoy with a buttery spread and honey or fresh jam/preserves…or slice to use for your favorite sandwiches 🙂
Breakfast, Dinner, Lunch, Snacks


Zucchini Bread – Gluten-Free & Dairy-Free

Zucchini Bread – Gluten-Free & Dairy-Free

This moist, delicious Gluten-Free, Dairy-Free Zucchini Bread is packed full of nutrients and spices! I always make a double batch (this recipe is for 2 loaves), because it disappears very quickly in our house 😉 I attempted to make a Vegan version (substituting applesauce for the eggs) for my daughter, but it turned out like a VERY wet brick…I will continue trying different Vegan versions until I succeed! In the meantime, let me know what you think of this GF, DF version 🙂

  • 3 Cups Zucchini, shredded (water squeezed out)
  • 4 Cups Better Batter All Purpose Gluten Free Flour Mix (You can use other cup-for-cup GF flours, but end results may vary)
  • 1 Cup Granulated Sugar
  • 2-3 Tbsp Granulated Sugar (for sprinkling in both pans)
  • 1/4 Cup Light Brown Sugar (Firmly Packed)
  • 5 tsp Baking Powder, GF
  • 1 1/2 tsp Ground Cinnamon
  • 1/2 tsp Salt
  • 1/4 tsp Nutmeg
  • 1 Tbsp Lemon Zest
  • 1 1/2 Cups Plain Rice Milk (or any other non-dairy unflavored milk (if you’re not DF, you can use Skim, 1%, 2% or Whole Milk))
  • 1/4 Cup + 2 Tbsp Vegetable Oil (I use Canola)
  • 2 tsp Vanilla Extract
  • 2 Large Eggs (lightly beaten)
  • Non-Stick Cooking Spray
  • 1/2 Cup Pecans or Walnuts, chopped (optional)
  1. Preheat oven to 350 degrees.
  2. Gather the ingredients.
  3. Spray two 8″ x 4″ loaf pans with the non-stick cooking spray. Sprinkle all sides and bottom of each pan with about 1 Tbsp Granulated Sugar. Set aside.

The Flour Mixture:

  1. In a large bowl, combine the GF Flour, 1 Cup Granulated Sugar, Light Brown Sugar, Baking Powder, Spices and Lemon Zest. Mix thoroughly and form a well in the center. Set aside.

The Zucchini Mixture:

  1. Using a food processor or handheld grater, shred the Zucchini and place on paper towels in a large bowl to absorb the water.
  2. In another large bowl, mix the milk, oil, vanilla and eggs until well combined. Add the shredded zucchini and mix well.

Making the Batter:

  1. Add the Zucchini Mixture to the center of the Flour Mixture.
  2. Mix well using a fork to start with to help break up the Zucchini. Then switch to a large spoon to ensure that you get all of the ingredients off of the bottom. (Note: if you’re adding nuts, do so at this step).

Baking the Bread:

  1. Divide the batter between the two prepared loaf pans. If desired, you may sprinkle the tops with additional granulated sugar.
  2. Bake on the center rack for 50-60 minutes or until toothpick comes out clean.
  3. Cool in their pans for about 10 minutes.
  4. Transfer loaves to wire cooling rack and let cool completely before slicing.
  5. Enjoy!
Breakfast, Desserts, Lunch, Snacks, Sweet Breads