Stovetop Chicken Cordon Bleu ~ Gluten Free

Stovetop Chicken Cordon Bleu

My mother used to make Chicken Cordon Bleu when I was growing up and it always made me feel so special, because she put so much time into pounding out the chicken until it was really thin and then rolling it up with Swiss Cheese and Ham (and sometimes a sweet pickle in the very center!), then breading the outside and baking it in the oven until all of the sweet and salty flavors melded together! This easier and quicker version has all of the same delicious flavors, but without all of the pounding, rolling and baking…and it’s Gluten-Free 😉 Enjoy!

  • 2 Cups Broccoli, chopped
  • 3 Cups Dry Gluten Free Pasta (I use Fusilli or Elbow)
  • 2 Tbsp Butter, salted
  • 4 Boneless, Skinless Chicken Breasts (rinsed, patted dry with paper towels and cut into bite-size pieces)
  • 1/2 Medium Vidalia Onion, chopped
  • 2 large pinches Ground Pepper
  • 2 Heaping Tbsp Dijon mustard (Creamy or with seeds)
  • 2 Cups Skim Milk (or 1%; 2%; Whole (I use Skim for a healthier version))
  • 1 Heaping Cup Swiss Cheese, shredded
  • 1 1/2 Cups Ham, diced (I use GF Honey Ham for a bit of sweetness)
  • 2-3 Tbsp Dried Parsley (for serving to add a bit of color ;))
  • GF Italian Flavored Bread Crumbs (for serving (I just sprinkle a little on top after plating))
  1. Gather all of the ingredients.
  2. In a large pot, bring water to a boil and add the Broccoli, cooking for just about 3 minutes (you want the broccoli to be just tender and bright green). Remove broccoli from the boiling water (do not discard water) with a slotted spoon and place in a large bowl; set aside.
  3. Add the GF Pasta to the boiling broccoli water and cook as instructed on the package. Drain, rinse and add to the reserved Broccoli in the large bowl; set aside.
  4. Note: I usually start this step while the pasta is cooking 😉
    In a very large, non-stick skillet (3.5-4 qt) melt the 2 Tbsp butter over medium-low heat.
  5. Once the butter is melted, add the chopped onions and cook until translucent.
  6. Next, add the bite-size Chicken pieces and Black Pepper; cook until no longer pink (about 8-10 minutes).
  7. Add the 3 Tbsp GF Flour blend and the 2 Tbsp Dijon Mustard to the Chicken and Onions; stir to evenly coat.
  8. Next, add the 2 Cups of Milk and bring to a low boil, stirring often to prevent clumping; cook until the sauce begins to thicken (usually about 3-5 minutes).
  9. Reduce the temperature to Low and add the Pasta and Broccoli to the Chicken mixture, stirring to mix well.
  10. Add the shredded Swiss Cheese and Ham; mix until cheese is completely melted.
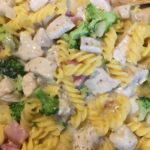
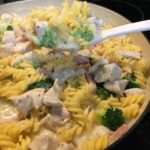
  11. Serve with or without the GF Bread Crumbs sprinkled on top and Parsley. Yummy!!!

Note: If you want to make this dish ahead of time, turn it into a casserole! Just scoop the finished skillet ingredients into a 9 x 13 casserole dish (minus the Bread Crumbs or Parsley at this point) and refrigerate for 1-2 days or freeze for up to 3 months. Once you are ready to heat it up, preheat the oven to 375 degrees; sprinkle the top with desired amount of Bread Crumbs (about 3/4 cup); cook for about 30 minutes or until bread crumbs are a golden brown (if cooking from frozen, add about 20-25 minutes); top with Parsley and serve!

Dinner, Main Dish


Cashew Chicken ~ Gluten Free

Cashew Chicken ~ Gluten Free

Our family’s go-to order from our favorite local Chinese restaurant was always the Cashew Chicken. However, since we moved, we have not been able to find another restaurant that makes a Cashew Chicken as well as our favorite. So, I pulled up my shirt sleeves and headed into my kitchen to try and re-create our much-loved and missed recipe 😉 After MANY failed attempts, I finally succeeded in pleasing all members of my family! I hope you enjoy it as much as we do 🙂

Soy Sauce Mixture:

  • 1/4 Cup Bragg Liquid Aminos or Soy Sauce (I use Bragg Liquid Aminos because it’s GF and Soy Free, but you can use regular or low-sodium soy sauce)
  • 1 Tbsp Rice Vinegar
  • 1 Tbsp Worcestershire sauce
  • 1 Tbsp Light Brown Sugar
  • 1/2 tsp Canola Oil
  • 1 Tbsp Fresh Ginger (finely chopped)

Chicken:

  • 4 Boneless, Skinless Chicken Breasts (cut into bite-size pieces)
  • 1-2 Pinches Table Salt
  • 1-2 Pinches Ground Black Pepper
  • 3 Tbsp Canola Oil

Garlic, Bell Peppers, etc.:

  • 1 tsp Garlic, minced ((2 cloves))
  • 1 Large Bell Pepper (Cut into bite-size pieces; I like to use Red or Orange for the color and the sweetness)
  • 2 Tbsp Fresh Ginger, chopped
  • 1 Cup Broccoli, chopped ((optional) or Snow Peas)
  • 1/4 Cup Dry Sherry

The Slurry (i.e the thickener):

  • 2 Tbsp Cornstarch (make sure it’s Gluten Free, if you’re GF)
  • 1/4 Cup Bragg Liquid Aminos or Soy Sauce

The Yummy Parts:

  • 1 Cup Whole Roasted Unsalted Cashews
  • 1/3 – 1/2 Cup Water Chestnuts, chopped (I leave mine whole for more crunch)
  • 1-2 Scallions, Green and White Parts (sliced for topping)

The Soy Sauce Mixture:

  1. In a small bowl, whisk together the Bragg Liquid Aminos (or Soy Sauce), Rice Vinegar, Worcestershire Sauce, Light Brown Sugar, Canola Oil and Ginger; Set aside.

The Chicken & Veggies:

  1. In a large non-stick skillet, heat the 3 Tablespoons of Canola Oil over medium heat.
  2. Once the oil is shimmering, add the chicken, sprinkling with salt and pepper, and saute until thoroughly cooked (about 5 – 8 minutes).
  3. Remove the cooked chicken with a slotted spoon and place in a large bowl; set aside.
  4. Reduce the temperature to medium-low, add the Garlic, Bell Pepper, and 2 Tablespoons Ginger to the same skillet; cook for about 2 minutes, keeping Peppers crisp. (Note: if you’re adding Broccoli or Snow Peas, do so now)
  5. Next, add the Sherry and stir thoroughly with the juices and Garlic-Peppers-Ginger mixture.
  6. Add the Soy Sauce Mixture that you set aside earlier to the skillet and bring to a boil (about 1 minute).
  7. In a small bowl, whisk together the Cornstarch and 1/4 Cup Bragg Aminos to make the slurry; add this to the skillet and stir thoroughly to blend well (if sauce is too thick, add 1/4 cup water).
  8. Lastly, return the Chicken to the skillet along with the Cashews and Water Chestnuts;
  9. Garnish with scallions and serve. Enjoy!
Dinner, Main Dish
Asian


Copycat Cheez-It Cheddar Cheese Crackers ~ Gluten Free

Copycat Cheez-It Cheddar Cheese Crackers ~ Gluten Free

These are the yummiest Gluten-Free Cheese Crackers I have EVER tasted!!! They taste just like Cheez-It crackers! Plus, they are SO easy to make and only 6 ingredients are needed 🙂 I love them with my Roasted Red Pepper and Tomato soup…or just by themselves! A big bag of these yummy crackers would make a perfect treat for anyone.
*This recipe was adapted from a Ree Drummond (aka: “The Pioneer Woman”) recipe (“Homemade Cheddar Crackers”)…of course! Thank you SO much for sharing!

  • 2 Cups Sharp Cheddar Cheese (Shredded)
  • 1 Cup Gluten Free All-Purpose Flour Blend (I use Caputo brand – it’s a little more expensive, but well worth it – it performs like “regular” flour and is not gritty)
  • 4 Tbsp Salted Butter (Kept cold & cut into small pieces)
  • 1/2 tsp Kosher Salt
  • 1/2 tsp Seasoned Salt (I use Season-All)
  • 3 Tbsp Ice Water
  1. Place all of the ingredients, except for the Ice Water, into a Food Processor and pulse until the mixture looks like sand.
  2. With the Food Processor running, slowly add the Ice Water, one Tablespoon at a time, through the shoot until the dough forms a ball.
  3. Wrap the Cheese-dough ball in plastic and refrigerate for 1 hour.
  4. When ready to bake, preheat oven to 350 degrees.
  5. Line 1-2 baking sheets with silicone baking mats or parchment paper; set aside.
  6. Roll out the dough to 1/4″ thickness and cut into desired-size squares using a pizza cutter ~ I use a straight-edge ruler and usually cut my dough into 1″ x 1″ squares.
  7. Place the squares onto the lined baking sheets.
  8. Using the smaller end of a chop stick or wooden skewer, poke a small hole into the center of each square.
    Note: If desired, you can sprinkle the crackers with a little kosher salt at this stage, but they really do not need it 😉
  9. Bake the crackers for 15-18 minutes or until golden brown; I bake mine for the maximum amount of time since I prefer mine on the more crispy side.
  10. Allow to cool completely to fully develop the flavors and desired crispiness.
  11. Enjoy with your favorite soup, salad or all on their own 🙂
  12. Note: if your crackers get soft, simply toss them onto a baking sheet and re-heat in a 275 degree oven for about 8-10 minutes.
Appetizers, Hors d’Oeuvres, Lunch, Snacks, Soup


Chopped Salad with Barbecue Ranch Dressing

Chopped Salad with Barbecue Ranch Dressing

Oh my gosh! I could eat this salad every day! The combination of the fresh, crunchy lettuce, the salty bacon pieces and the slightly sweet BBQ Ranch Dressing is something that words just cannot accurately describe!! I am forever indebted to Ree Drummond (aka: “The Pioneer Woman”) for sharing the original recipe of this awesome salad (“Cowboy Chopped Salad”), which I have made a few minor adjustments to to make it allergy-friendly and GF for my family 🙂 Enjoy!!!

The Bacon:

  • 12-15 Slices Thick or Regular Bacon (Cooked and chopped into bite-size pieces)

The Barbecue Ranch Dressing:

  • 1 Cup Mayonnaise (I use Hellmann’s)
  • 1/2 Cup Lite or Regular Sour Cream (I use Daisy Lite Sour Cream)
  • 1/4 Cup Barbecue Sauce (I use Sweet Baby Ray’s )
  • 3 Tbsp Dried Parsley
  • 1/2 tsp Garlic, chopped
  • 1 pinch Kosher Salt (to taste)
  • 1 pinch Ground Black Pepper (to taste)
  • 1/2 – 3/4 Cup Buttermilk (I make my own by pouring 1 Tbsp White Vinegar into a 1 Cup measuring cup and adding enough Whole Milk to fill the rest; gently stir and let rest for 5 minutes.)

The Salad:

  • 1 Large Head of Lettuce (I use Romaine Lettuce, but Iceburg, Green or Red Leaf Lettuce, etc. is great, too)
  • 1 Cup Grape Tomatoes (halved)
  • 1-2 Chopped Green Onions/Scallions (I use both the green and white parts)
  • 3 Cups Shredded Cheddar Cheese
  • Pico de Gallo (Topping; I use store-bought once my garden has gone dormant)
  1. While the bacon is cooking, begin making the BBQ Ranch Dressing.

The BBQ Ranch Dressing:

  1. In a medium-size bowl, whisk together all of the dressing ingredients, except for the Buttermilk.
  2. Once all of the ingredients are thoroughly combined, add the Buttermilk 1/4 cup at a time until desired consistency is reached. Reserve any leftover Buttermilk in the refrigerator to add to the dressing later, as it will thicken over time.
  3. Cover and refrigerate the dressing until ready to use.

The Salad:

  1. In a very large bowl, place all of the salad ingredients, except for the Pico de Gallo, and gently toss to mix (reserve some of the Cheese and Onions for toppings).

Putting it All Together:

  1. To serve the salad, you can set up a station with the large salad bowl as center stage with the Bacon served in a side bowl (for non-bacon-eaters), as well as the Pico de Gallo and any other toppings that you want to serve separately. You can also serve the BBQ Ranch Dressing separately or sparingly toss on the salad, so individuals can add more if desired 😉
Dinner, Lunch, Main Dish, Salads, Side Dish, Snacks


Frosted Pumpkin Spice Cookies ~ Gluten Free

Frosted Pumpkin Spice Cookies ~ Gluten Free

This is an updated version of my post from last year (2019), which was not a GF recipe. Fear not….this IS a Gluten Free recipe for soft, sweet and delicious Frosted Pumpkin Cookies. These wonderful little treats are mildly flavored with a blend of spices that you can adjust to satisfy your personal taste. Please let me know what you think 🙂

The Cookie:

  • 3 1/2 Cups Gluten Free All-Purpose Flour Blend (I used Better Batter brand)
  • 1 tsp Baking Powder, GF
  • 1 tsp Baking Soda
  • 1/2 tsp Table Salt
  • 2 1/2 tsp Cinnamon (increase to 3 tsp if you want a spicier taste)
  • 1/2 tsp Nutmeg (increase to 3/4 – 1 tsp for a spicier taste)
  • 1/4 tsp Ground Ginger (increase to 1/2 tsp for a spicier taste)
  • 1 Cup Dixie Crystals Extra Fine Granulated Sugar
  • 1 Cup Light Brown Sugar (packed)
  • 1 Cup Vegetable Oil (I use Canola Oil)
  • 2 Cups Canned Pumpkin Puree
  • 2 Large Eggs (lightly beaten)
  • 1 tsp Vanilla Extract (GF)

The Frosting:

  • 1 Cup Cream Cheese, softened (I use Philadelphia Cream Cheese (full fat))
  • 1/2 Cup Salted Butter, Softened
  • 3 tsp Vanilla Extract (GF)
  • 4 Cups Powdered Sugar
  • 1 tsp Ground Cinnamon

Making the Cookies:

  1. Line cookie sheet/sheets with parchment paper or silicone baking mats; set aside.
  2. Gather the ingredients.
  3. In a Large mixing bowl, sift together the GF Flour, Baking Powder, Baking Soda, Salt and Spices; Mix well; Set aside.
  4. In another Large mixing bowl, combine the Sugars, Oil, Pumpkin, Eggs and Vanilla Extract until completely blended.
  5. Gradually add the dry ingredients, one cup at a time, to the wet ingredients and mix until smooth.
  6. Cover bowl with plastic wrap or dish cloth and let rest for 30 minutes. This allows the GF Flour to absorb the moisture from the wet ingredients which reduces (hopefully, eliminates!) the grainy texture.
  7. When ready to bake the cookies, place oven rack in the middle position and preheat oven to 350 degrees.
  8. Using a Small cookie scoop (or medium, if you want larger cookies) scoop out the cookie dough onto the prepared baking sheets.
  9. Spray the back of a spoon with non-stick cooking spray and use the spoon to flatten the cookie mounds (re-apply spray as often as needed).
  10. Bake for 10-12 minutes.
  11. Let cookies cool on cookie sheet for 1-2 minutes before transferring to a wire rack to cool completely before frosting.

Making the Frosting:

  1. While the cookies are baking and cooling start making the frosting…
  2. Using a Handheld or Stand Mixer, beat the softened Butter, Cream Cheese and Vanilla Extract until well-blended.
  3. Gradually add the Powdered Sugar, one cup at a time, mixing until completely blended and creamy.
  4. Add the Ground Cinnamon and Mix thoroughly.
  5. You’re ready to frost the cookies and enjoy!

Note: The original recipe that I posted in 2019 was from “Two Sisters Crafting,” which I have updated so it is now GF, thanks in large part to “amyin the kitchen.com 🙂 I just love converting and joining recipes to see what the end results will be! Thanks so much for sharing your wonderful recipes!!!

Desserts, Snacks
American