Pasta Primavera in a Lemon-Butter Sauce ~ Gluten Free

Pasta Primavera in a Lemon-Butter Sauce ~ Gluten Free

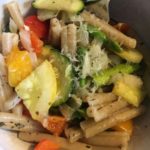
What better way to celebrate Spring than making “Pasta Primavera,” a healthy Spring Vegetable & Pasta dish…after all, “primavera” means ‘spring style’ in Italian 😉 I love this easy and very versatile recipe….I use as many veggies that I can find in my refrigerator before they go bad. Asparagus, squash, broccoli, bell peppers, carrots, zucchini, onions, snow peas…the possibilities are endless! And, the light lemony-butter sauce makes this recipe irresistible 🙂
*The original version of this recipe came from evolvingtable.com – thank you SO much for sharing! I have adjusted the original recipe in order to make it gluten-free and allergy-friendly for my family.

The Pasta:

  • 4 Cups Gluten-Free Pasta, dry (any style is fine)

The Vegetables:

  • 1 lb Asparagus (trim ends and cut into 2″ pieces)
  • 1 large Yellow Squash (quartered lengthwise & cut into bite-size pieces)
  • 1 large Zucchini (quartered lengthwise & cut into bite-size pieces)
  • 2 large Bell Peppers, any color (cut into bite-size pieces)
  • 1 large Vidalia Onion (cut into bite-size pieces)
  • 2-3 Tbsp Olive Oil
  • 1/2-1 tsp Kosher Salt
  • 1/4-1/2 tsp Ground Black Pepper
  • 1 tsp Dried Oregano
  • 1/2 tsp Dried Thyme
  • 1/2 tsp Dried Marjoram
  • 1/2 tsp Dried Basil

The Lemon-Butter Sauce:

  • 4 Tbsp Butter, salted ((1/2 stick))
  • 1 Large Lemon (Zest and juice)
  • 1 1/2 tsp Garlic, minced (I use the already-minced Garlic in a jar)
  • 1/2 Cup Water (reserved from the pasta water)
  • 1 Tbsp Dried Basil (or 1/4 Cup fresh, chopped)
  • 1/2-3/4 Cup Parmesan, grated (fresh is best)
  • 1/2-1 tsp Salt (to taste)

The Pasta:

  1. In a large pot, cook the pasta according to the package instructions for al dente; reserve 1/2 cup pasta water for the sauce before draining the rest of the water; set the pasta aside in a colander & keep the large pot available for cooking the sauce, etc.

The Vegetables:

  1. Preheat oven to 425 degrees.
  2. Line a large baking sheet with foil and lightly spray with non-stick cooking spray; set aside.
  3. While the Pasta is cooking, cut up all of the vegetables into bite-size pieces and place them into a large bowl. *This step can be done ahead of time, if desired (just keep veggies refrigerated until ready to use).
  4. Add the Olive Oil and spices to the vegetables in the bowl and toss to thoroughly coat; spread the veggies evenly onto the prepared baking sheet and bake for 15-18 minutes or until veggies are tender.

The Lemon-Butter Sauce:

  1. Using the same pot that you used to cook the pasta, add the butter, lemon zest, lemon juice and garlic; cook over medium-low heat until the butter is completely melted and the garlic becomes fragrant (about 2 minutes).
  2. Add the cooked Pasta, the reserved Pasta Water and the roasted vegetables to the Lemon-Butter mixture, tossing until thoroughly coated.
  3. Next, add the Basil, 1/2 cup Parmesan and Salt (to taste); toss to combine.
  4. Serve with freshly-grated Parmesan and fresh chopped Basil, if desired.
  5. Oh, so yummy! Enjoy 🙂
Dinner, Lunch, Main Dish
American, Italian


Creamy Chicken with Sun-Dried Tomatoes & Bacon ~ Gluten Free

Creamy Chicken with Sun-Dried Tomatoes & Bacon ~ Gluten Free

Oh my! This dish is delish 😉 The tangy sun-dried tomatoes are a perfect accent for the savory chicken and bacon in this recipe! And, the creamy sauce has a tiny bit of a punch with the addition of red pepper flakes. This dish received a “Double Yum” in our house 🙂
A BIG “Thank You” to “juliasalbum.com” for sharing the original version of this recipe ~ I have tweaked the ingredients a tiny bit to make it Gluten-Free and Allergy-friendly for our family

The Chicken:

  • 3-4 large Chicken Breasts (quartered)
  • 1/2 tsp Paprika
  • 2-3 Pinches Salt
  • 2 Tbsp olive oil (you can use the oil from the jar of sun-dried tomatoes, if desired)
  • 2 tsp Garlic, minced (I use the already-minced Garlic in a jar)
  • 3/4 – 1 Cup Sun-Dried Tomatoes (packed in oil, drained (reserve the oil if using in place of the Olive Oil))

The Cream Sauce:

  • 1 Cup Half & Half (or Heavy Cream for a thicker sauce)
  • 1 Cup Whole Milk (you can also use 2%, 1% or Skim for a lighter version)
  • 1 Cup Mozzarella Cheese, shredded
  • 1 heaping tsp Dried Basil (or 1 Tbsp Fresh, chopped)
  • 1/4-1/2 tsp Red Pepper Flakes
  • Salt (to taste)
  • Ground Black Pepper (to taste)
  • 8-10 Strips bacon (cooked and crumbled)
  1. Cook Bacon until crisp, drain and set aside.
  2. Cut each Chicken Breast into quarters, sprinkle with the Salt and Paprika; set aside.
  3. In a large non-stick sauce pan, heat the 2 Tbsp. of Olive Oil (or the oil reserved from the Sun-Dried Tomatoes) over Medium heat.
  4. Once the oil is hot (the surface should be shimmering), add the Garlic and Sun-dried Tomatoes and cook for 1-2 minutes, or until you start to smell the Garlic; using a slotted spoon, remove the Garlic and Sun-dried Tomatoes from the pan, leaving the oil behind, and set aside.
  5. Add the Chicken to the pan with the leftover oil, adding more oil if needed; cook the chicken for 4-5 minutes per side (until the chicken is a light golden brown).
  6. Remove the pan from the heat & cover; the chicken will continue to cook (about 5 minutes).
  7. Once the Chicken is no longer pink inside, remove it from the skillet and set aside; drain any juices leftover in the pan.
  8. Return the pan to the cooktop, add the Half & Half (or Heavy Cream, if using) and cook over Medium heat until it comes to a boil;
  9. Add the 1 cup of Shredded Mozzarella cheese, reduce temperature to Low, and stir until cheese has completely melted.
  10. Slowly add the 1 Cup of Whole Milk and whisk continually until mixture is smooth.
  11. Add the sauteed Sun-dried Tomatoes and Garlic to the cream sauce, mixing well;
  12. Next, add the Basil, Red Pepper Flakes and Salt; mix thoroughly.
  13. Lastly, add the cooked Chicken breasts and 1/2 of the crumbled cooked Bacon (reserving the other 1/2 for serving); heat until chicken is warm.
  14. Top with the remaining 1/2 of the Bacon and serve over rice, pasta or plain with your favorite veggies 🙂
Dinner, Main Dish


Quick & Easy Orange Chicken ~ Ground (Gluten Free)

Quick & Easy Orange Chicken ~ Ground (Gluten Free)

Wow! Full of flavor and SO quick & easy to prepare makes this dish an instant winner in our house!!! Serve over rice and with your favorite veggies 🙂
*Thank You to dinnerthendessert.com for sharing the original version of this recipe ~ I have made several adjustments to the ingredients in order to make it Gluten-Free and Allergy-friendly for my family 😉

The Chicken:

  • 3 lbs Ground Chicken
  • 1 Tbsp Canola Oil
  • 1 1/2 tsp Ground Ginger (or 2-3 Tbsp Fresh Ginger Root, minced)
  • 1 1/2 Tbsp Garlic, minced (I use the already-minced Garlic in a jar)
  • 1/2 – 3/4 tsp Red Pepper Flakes

The Orange Sauce:

  • 1/2 Cup Water
  • 2 tsp Canola Oil
  • 1/4 Cup Braggs Liquid Aminos (or GF Soy Sauce (low sodium or regular))
  • 1/2 – 3/4 Cup Granulated Sugar
  • 3-5 Tbsp White Vinegar (I use 3 Tbsp since my family does not like a strong vinegar taste)
  • 2 Medium Oranges, Zest (Squeeze some of the fresh orange juice over the dish before serving, if you want that extra orange punch)

The Slurry (Thickener):

  • 3 Tbsp Warm Water
  • 3 Tbsp Gluten Free Cornstarch

The Chicken:

  1. In a large non-stick saucepan, cook the Ground Chicken over Medium-Low heat (cook on Medium, if you want a crust to form) until done.
  2. When the Chicken is almost finished cooking, add the Ginger, Garlic and Red Pepper Flakes; cook for about 1 minute.

The Sauce:

  1. While the Chicken is cooking, mix the Sauce ingredients together in a medium-sized bowl until thoroughly blended.

Putting it Together:

  1. Once the Chicken is finished cooking, reduce the temperature to Low and pour the Orange Sauce over the Chicken; bring to a low boil.

The Slurry:

  1. While the Chicken and Sauce are simmering, stir the Cornstarch into the warm Water in a small bowl until completely dissolved.
  2. Pour this Cornstarch Slurry into the Orange-Chicken mixture and stir until combined and sauce begins to thicken.
    *If you prefer a thinner sauce, add more warm water or the fresh-squeezed orange juice at this point.
  3. If you want to add any veggies (Broccoli, Asparagus, Snow Peas, etc.), do so now and cover the pot with a lid to lightly cook the veggies for about 3-5 minutes.
  4. Serve over rice and enjoy 🙂
Dinner, Lunch, Main Dish
American, Asian


Creamy Spinach-Mushroom & Pasta Soup ~ Gluten Free!

Creamy Spinach-Mushroom & Pasta Soup ~ Gluten Free!

This is one of the BEST soups I have ever tasted! It’s also SO easy to make, sending this recipe right to the top of my Favorites list 😉 Full of freshness and comfort!
Thank You, as always, to The Pioneer Woman for sharing the original version of this delicious soup ~ I have tinkered with the ingredients a bit in order to make it GF and allergy-friendly for my family 🙂

  • 1/4 Cup Olive Oil (I use the milder version, so it doesn’t compete with the other flavors)
  • 1 1/2 Cups Mushrooms (Chopped)
  • 1 tsp Dried Thyme ((or 1 Tbsp Fresh))
  • 1 tsp Kosher Salt
  • 2 tsp Italian Seasoning ((*I make my own blend by combining 1 1/2 tsp dried Oregano, 1 tsp dried marjoram and 1/2 tsp dried Basil ~ this makes 3 tsp, so you will have 1 extra tsp to use later))
  • 1 1/2 tsp Minced Garlic (I use the already-minced Garlic in a jar)
  • 1/4 Cup Gluten-Free All Purpose Flour
  • 6 Cups Vegetable Broth (I use the Low Sodium Version)
  • 1 Cup Heavy Cream (For a little bit lighter version, I substitute 1/2 Cup of the Heavy Cream with 1/2 Cup Whole Milk)
  • 2 Cups Gluten-Free Pasta, dry (We like the Bow-Tie Pasta or the Little Shells for this recipe)
  • 4 Heaping Cups Baby Spinach
  • Ricotta Cheese, for serving ((optional))
  1. Heat the Olive Oil in a large pot (Dutch Oven) over medium heat.
  2. Add the Mushrooms, Thyme and Salt; cook until the mushrooms are browned and soft (about 5-7 minutes).
  3. Add the 2 tsp of Italian Seasoning and the Garlic; continue cooking for about 1-2 minutes.
  4. Next, sprinkle the GF Flour over the Mushroom mixture and stir until evenly coated.
  5. Stir in the Vegetable Broth and bring to a low boil; reduce temperature to Low and cook until the mixture thickens (about 8-10 minutes).
  6. Slowly pour in the Heavy Cream, mixing thoroughly.
  7. Add your choice of GF Pasta to the pot and continue cooking until the pasta is al dente (about 5-8 minutes, depending on the type of pasta).
  8. Lastly, add the Spinach and cook until it wilts ~ about 1 minute.
  9. Serve with a dollop of Ricotta Cheese, if desired.
    Enjoy 🙂
Appetizers, Dinner, Lunch, Main Dish, Side Dish, Soup, Stew


Quick & Easy Lemon-Garlic Salmon ~ Yum!

Quick & Easy Lemon-Garlic Salmon ~ Yum!

As many of you already know, Salmon is one of my family’s most-requested meals…so, I am always looking for new Salmon recipes to try. And, this one is a winner! It’s not only delicious and nutritious, but it’s SO quick and easy to prepare. I hope you enjoy it as much as we do 🙂
A huge “Thank You” to wellplated.com for posting the original version of this wonderful recipe. Please note: I have made substitutions and changes to the original recipe to suit my family.

  • 1 2-2.5 lbs Salmon Fillets w/ Skin (I purchase a whole fillet and bake it in tact)
  • 4 Tbsp Salted Butter, softened ((1/2 stick))
  • 1 Large Lemon (Zest & Juice)
  • 2-3 Heaping Teaspoons Garlic, minced (I use the already minced Garlic in a jar)
  • 2 tsp Dried Parsley
  • 1-2 large pinches Black Pepper
  • 1/2 tsp Salt
  1. Preheat oven to 400 degrees.
  2. Line a baking sheet with aluminum foil and spray with non-stick cooking spray.
  3. Rinse the Salmon in cold water, pat dry with paper towels and place in the center of the prepared baking sheet, skin side down; set aside.
  4. In a small bowl, mash together the Softened Butter, Lemon Zest, Garlic, Parsley, Pepper and Salt until well-combined.
  5. Using a butter knife, rubber spatula or your fingers, spread the Butter paste over the Salmon Fillets; Note: I usually end up using my fingers to spread the Butter mixture ~ the warmth of your skin helps spread the butter more easily.
  6. Next, squeeze the Lemon Juice evenly over the Salmon Fillets and sprinkle with extra salt and pepper, if desired.
  7. Bake in pre-heated oven on the center rack for 15-20 minutes, depending on the thickness of your fillets. The fillets will flake apart easily with a fork when done and should measure 145 degrees.
  8. Serve with wedges of fresh lemon and sprinkle with extra Parsley. Enjoy!
Dinner, Main Dish