Elementor #9209

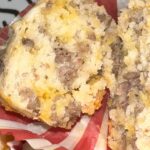
Sausage Pancake Muffins ~ Gluten-Free

These muffins are perfect for a quick grab and go breakfast for those hectic mornings. They also make a great gift for new parents, new homeowners, welcome baskets, etc.! Only 5 ingredients are needed to make these quick-and-easy Breakfast goodies 🙂

  • 1 lb Pork Sausage
  • 2 Cups Gluten-Free Pancake Mix (I use "Great Value" brand from Walmart)
  • 1.25 Cups Water
  • 1 Cup Finely Shredded Sharp Cheddar Cheese
  • .25 Cup Pure Maple Syrup (Plus more for dipping)
  • 1-2 Tbsp Melted Butter ((optional))
  1. Gather all the ingredients.

  2. Preheat oven to 400 degrees.

  3. Grease Muffin tin; set aside (Note: If using paper liners, be sure to spray them well with cooking spray).

  4. Using a large non-stick skillet, cook sausage thoroughly (about 8-10 minutes) over medium heat; drain and set aside on some paper towels.

  5. In a large mixing bowl, combine the GF Pancake MIx and Water until smooth.

  6. Add the cooked Sausage, Cheese and Maple Syrup to the GF Pancake & Water mixture in the large mixing bowl and gently stir until combined.

  7. Divide the mixture evenly between the Muffin cups.

  8. Bake in the preheated oven for about 15-17 minutes, or until a toothpick comes out clean.

  9. Brush the tops of the muffins with the melted butter and serve with a small ramekin of warm Maple Syrup for dipping….Yum!!!

Breakfast
Gluten Free
breakfast, butter, cheddar cheese, gluten-free, ground sausage, maple syrup, pancakes, Pork, quick & easy, snacks


Elementor #9104


Quick & Easy Bite-Size Chicken Piccata ~ Gluten-Free

This easy Chicken Piccata dish has quickly become our family's favorite! The delicious creamy lemon and caper sauce will have your family coming back for seconds…and thirds! Enjoy 🙂

  • Large Non-Stick Skillet
  • Medium Mixing Bowl
  • Small Mixing Bowl
  • 1 1/2 lbs. Chicken, cut into bite-sized pieces (I buy Chicken Tenderloins or already cut-up Chicken Breast Pieces to make things go quickly.)
  • Salt & Pepper
  • 1/2 Cup Gluten-Free All-Purpose Flour, sifted (I use Krustaez – less expensive and not grainy)
  • 1/2 tsp Garlic Powder
  • 1/2 Cup Salted Butter (Divided into 2 Tbsp + 2 Tbsp + 4 Tbsp)
  • 2 Tbsp Light Olive Oil, divided (I use Light Olive Oil, so it doesn't interfere with the Lemon & Capers)
  • 1/2 Cup Reduced Sodium Chicken Broth (Room temperature or heated for 30 seconds in the microwave)
  • 2 Tbsp Fresh Lemon Juice (This usually takes 1-2 Lemons, depending on how juicy they are)
  • 1 Zest of Lemon
  • 2-3 Tbsp Capers, with brine drained
  • 1 Cup Heavy Whipping Cream
  • 2-3 Pinches Chopped Parsley (optional)
  1. Gather all of your ingredients.

  2. Rinse and trim Chicken; pat dry with some paper towels and cut into bite-size pieces and put them into a medium-large mixing bowl; season with Salt & Pepper.

  3. In a small mixing bowl, sift the GF flour with the Garlic Powder, mixing well.

  4. Sprinkle the Flour mixture over the Chicken pieces and toss gently to thoroughly coat the Chicken.

  5. In a large non-stick skillet, heat 2 Tbsp of the butter and 1 Tbsp Olive oil over medium-low heat.

  6. *At this point, begin cooking your GF Pasta or Rice, according to the instructions on the box.

  7. Once the Butter and Oil are hot (when the butter is completely melted and there is a slight sheen on the surface of the oil), add half of the Chicken pieces and cook for about 5-6 minutes, while stirring occasionally to brown on all sides (do not cook the Chicken all the way through at this stage, because you will be adding the Chicken back to the skillet later). Remove the Chicken pieces from the skillet and set aside; repeat the process with the other half of the Chicken (melt 2 Tbsp Butter and 1 Tbsp Oil, etc.).

  8. Reduce the temperature to Low and add the remaining 4 Tbsp Butter, Chicken Broth, Lemon Juice, Lemon Zest and Capers to the skillet; stir until ingredients are mixed and butter is completely melted.

  9. Add the Heavy Cream, while whisking to thoroughly blend. Increase the temperature to Medium-Low and bring to a low boil; continue cooking until sauce begins to thicken (about 5 minutes).

  10. Lower the temperature to Low and add the Chicken pieces back into the skillet, stirring well to completely coat the Chicken; continue cooking for about 5 Minutes. Sprinkle with a couple of pinches of Parsley (if using) and stir. Note: if the sauce is thicker than you like, add a little more Chicken Broth until you reach the desired thickness.

  11. Serve over your choice of Gluten-Free Pasta (I usually serve it over GF Capellini Pasta by Jovial) or Rice and a fresh salad or steamed veggies.

  12. Enjoy 🙂

If you want to use whole Chicken Tenderloins, just prepare them using the same steps above, coating them thoroughly with the flour mixture and then cooking for about 3 minutes per side; remove from pan and set aside until the Lemon-Caper Sauce is finished cooking; then add the Chicken back to the skillet and cook for about 5 minutes to cook completely.

Dinner
American, Italian
Gluten Free
Baked Chicken, capers, chicken piccata, creamy, diet lemon-lime soda, Dinner, gluten-free, Gluten-Free Pasta


Elementor #9081

Quick & Easy Bite-Size Chicken Piccata ~ Gluten-Free

This easy Chicken Piccata dish has quickly become our family's favorite! The delicious creamy lemon and caper sauce will have your family coming back for seconds…and thirds! Enjoy 🙂

  • Large Non-Stick Skillet
  • Medium Mixing Bowl
  • Small Mixing Bowl
  • 1 1/2 lbs. Chicken, cut into bite-sized pieces (I buy Chicken Tenderloins or already cut-up Chicken Breast Pieces to make things go quickly.)
  • Salt & Pepper
  • 1/2 Cup Gluten-Free All-Purpose Flour, sifted (I use Krustaez – less expensive and not grainy)
  • 1/2 tsp Garlic Powder
  • 1/2 Cup Salted Butter (Divided into 2 Tbsp + 2 Tbsp + 4 Tbsp)
  • 2 Tbsp Light Olive Oil, divided (I use Light Olive Oil, so it doesn't interfere with the Lemon & Capers)
  • 1/2 Cup Reduced Sodium Chicken Broth (Room temperature or heated for 30 seconds in the microwave)
  • 2 Tbsp Fresh Lemon Juice (This usually takes 1-2 Lemons, depending on how juicy they are)
  • 1 Zest of Lemon
  • 2-3 Tbsp Capers, with brine drained
  • 1 Cup Heavy Whipping Cream
  • 2-3 Pinches Chopped Parsley (optional)
  1. Gather all of your ingredients.

  2. Rinse and trim Chicken; pat dry with some paper towels and cut into bite-size pieces and put them into a medium-large mixing bowl; season with Salt & Pepper.

  3. In a small mixing bowl, sift the GF flour with the Garlic Powder, mixing well.

  4. Sprinkle the Flour mixture over the Chicken pieces and toss gently to thoroughly coat the Chicken.

  5. In a large non-stick skillet, heat 2 Tbsp of the butter and 1 Tbsp Olive oil over medium-low heat.

  6. *At this point, begin cooking your GF Pasta or Rice, according to the instructions on the box.

  7. Once the Butter and Oil are hot (when the butter is completely melted and there is a slight sheen on the surface of the oil), add half of the Chicken pieces and cook for about 5-6 minutes, while stirring occasionally to brown on all sides (do not cook the Chicken all the way through at this stage, because you will be adding the Chicken back to the skillet later). Remove the Chicken pieces from the skillet and set aside; repeat the process with the other half of the Chicken (melt 2 Tbsp Butter and 1 Tbsp Oil, etc.).

  8. Reduce the temperature to Low and add the remaining 4 Tbsp Butter, Chicken Broth, Lemon Juice, Lemon Zest and Capers to the skillet; stir until ingredients are mixed and butter is completely melted.

  9. Add the Heavy Cream, while whisking to thoroughly blend. Increase the temperature to Medium-Low and bring to a low boil; continue cooking until sauce begins to thicken (about 5 minutes).

  10. Lower the temperature to Low and add the Chicken pieces back into the skillet, stirring well to completely coat the Chicken; continue cooking for about 5 Minutes. Sprinkle with a couple of pinches of Parsley (if using) and stir. Note: if the sauce is thicker than you like, add a little more Chicken Broth until you reach the desired thickness.

  11. Serve over your choice of Gluten-Free Pasta (I usually serve it over GF Capellini Pasta by Jovial) or Rice and a fresh salad or steamed veggies.

  12. Enjoy 🙂

If you want to use whole Chicken Tenderloins, just prepare them using the same steps above, coating them thoroughly with the flour mixture and then cooking for about 3 minutes per side; remove from pan and set aside until the Lemon-Caper Sauce is finished cooking; then add the Chicken back to the skillet and cook for about 5 minutes to cook completely.

Dinner
American, Italian
Gluten Free
Baked Chicken, capers, chicken piccata, creamy, Dinner, gluten-free, Gluten-Free Pasta, lemon


Easy Homemade Italian Seasoning ~ 4 Herbs

There is nothing more comforting than a large pot of Homemade Spaghetti Sauce simmering on the stove, especially when it's made with your own blend of herbs. This quick & easy blend is my go-to for all Italian sauces. It also makes a wonderful gift for those Italian food lovers in your life! I hope you enjoy it as much as I do 🙂

  • Small Mason Jar with Tight Fitting Lid
  • 2 Tbsp Dried Oregano
  • 4 tsp Dried Marjoram
  • 4 tsp Dried Thyme
  • 2 tsp Dried Basil
  1. Measure all of the herbs into a glass jar with a tight-fitting lid and shake vigorously to combine. Keep out of the light and use often! Enjoy 🙂

Italian
easy, Italian, quick, spices


Honey & Garlic Pork Tenderloins

Honey & Garlic Pork Tenderloins

It’s not very often that I come across a recipe that I don’t have to make ANY changes to in order to make it Gluten-Free and allergy-friendly for my family, but this recipe needed ZERO changes!!! Plus, it was quick and easy to make AND everyone loved it 🙂 This yummy recipe is for two (2) Pork Tenderloins, making it perfect for a large group and/or leftovers.
I owe a HUGE “Thank You” to Ashley Fehr @thereciperebel.com for sharing this wonderful recipe 🙂

The Tenderloins:

  • 2 Pork Tenderloins (approximately 2-2 1/2lbs total) (rinsed & trimmed of most fat (leave a little for flavor))
  • 1-2 Tbsp Olive Oil (or Canola Oil (I used Light Olive Oil))
  • 1 tsp Seasoning Salt (I used “Castle” brand Seasoning Salt, but any brand will do)

The Honey-Garlic Sauce:

  • 2/3 Cup Honey
  • 1/4 Cup Chicken Broth (Regular or low sodium – I used “Orrington Farms” Chicken Broth Base & Seasoning because I know it’s Gluten-Free (purchased from Walmart))
  • 2 Tbsp Soy Sauce (Regular or low sodium – I used Tamara for GF)
  • 2 Tbsp Minced Garlic (I used the already minced from a jar for ease and speed)
  • 1 Tbsp Apple Cider Vinegar
  • 1/4 tsp Salt (omit if you’re on a low sodium diet)
  • 1 1/2 Tbsp Corn Starch
  • 1-2 pinches Red Pepper Flakes
  1. Preheat oven to 400 degrees F.
  2. Lightly spray a 9″ x 13″ baking dish with cooking spray; set aside.
  3. Rinse both Tenderloins with cold water and pat dry with paper towels; trim majority of fat and place both tenderloins into the prepared baking dish; set aside.
  4. In a medium mixing bowl, whisk together all of the Honey-Garlic sauce ingredients until all of the corn starch is dissolved – I used boiling water to make the Chicken Broth and this helps dissolve the corn starch.
  5. Carefully pour the sauce around the pork tenderloins – try not to pour the sauce on top of the tenderloins, as it will prevent them from browning.
  6. Bake in the preheated oven, uncovered, for 20-25 minutes (until pork temperature reaches 140 degrees F).
  7. Remove and lightly cover with foil to rest for 10 minutes before slicing.
  8. Drizzle sauce over the pork slices before serving.
  9. Serve with your favorite sides and ENJOY 🙂
Dinner, Main Dish
American


Best Ground Chicken Chili Recipe ~ Gluten Free

Best Ground Chicken Chili Recipe ~ Gluten Free

This recipe is SO yummy, simple and quick to make! It’s also very versatile – you can use ground chicken, turkey, pork or beef or a combination of any ground meats to satisfy your taste buds. Plus, add beans/legumes, corn, potatoes, etc. I hope you enjoy this Chili recipe as much as we do! 🙂

  • 2 lbs Ground Chicken (or any ground meat you desire)
  • 1/2 large Vidalia Onion (finely diced)
  • 3-4 cloves garlic (minced)
  • 2 15 oz, cans Tomato Sauce (plain (spice mix recipe below) )
  • 1 15 oz. can Diced Tomatoes
  • 5-6 Tbsp Tomato Paste
  • 2 Tbsp Granulated Sugar (I use Dixie Crystals Extra Fine Granulated Sugar*)
  • 2 Cups Chicken Broth
  • 1 15.25 oz. can Corn (Yellow or White) (drained)

Chili Spice Mixture:

  • 4 Tbsp Chili Powder (or more, if desired (add 1 Tbsp at a time))
  • 2-3 tsp Garlic Powder
  • 2-3 tsp Ground Cumin
  • 1 tsp Paprika
  • 1/2 tsp Salt (table)
  • 1/4 tsp Ground Black Pepper

Toppings:

  • Chopped Green Onions
  • Chopped Vidalia Onions
  • Sour Cream
  • Shredded Hard Cheese (Monterey Jack or Cheddar are our favorites)
  1. Using a large pot, combine the ground Chicken (or other ground meat), Onions and Garlic and heat over medium until the meat is thoroughly cooked (about 8-10 minutes).
  2. Next, add the Tomato Sauce, Diced Tomatoes and Tomato Paste and stir until thoroughly combined.
  3. Add the Broth, Sugar, Chili Spice Mixture and Corn (add canned Beans now, if using) to the pot, stirring until well mixed.
  4. Bring to a low boil, then reduce temperature to Low and simmer for about 15 minutes to bring out the flavors.
  5. Serve with your favorite toppings and Enjoy! 🙂
Dinner, Lunch, Main Dish


White Chicken Enchiladas ~ Gluten Free

White Chicken Enchiladas ~ Gluten Free

Wow! This yummy Chicken Enchiladas dish instantly moved to the top of our “Family Favorites!” It’s a great recipe for making ahead and re-heating for those busy nights and/or last minute plans for dinner guests 🙂 Friends and family will LOVE receiving this as a house-warming gift or for any occasion!
As usual, a HUGE “Thank You” goes to “The Pioneer Woman” for sharing this wonderful recipe. I made some changes to the original recipe to make it allergy-friendly and Gluten Free for my family 😉

The Chicken:

  • 4-5 Boneless, Skinless Chicken Breasts (You could also use a cooked Rotisserie Chicken from your local Grocer to save time)
  • Kosher Salt
  • Ground Black Pepper
  • 2-3 Tbsp Olive Oil

Roasted Bell Peppers:

  • *2 *Red Bell Peppers (or 1-16 oz. already-roasted red Bell Peppers in a jar)
  • *2 *Bell Peppers (any color) (or 1-16 oz. jar of store-bought Roasted Bell Peppers)

The Chicken Mixture (the Filling):

  • 1 Large Onion (or 3-4 Green Onions (white & green parts), thinly sliced)
  • 1 Tbsp Vegetable Oil (I use Canola)
  • *1 Cup Chicken Broth (*You will need a Total of 3 Cups (1 Cup for the Filling + 2 Cups for the Sauce); I use Low-Sodium, so I have more control over the sodium content)
  • *1 Cup Heavy Cream (*You will need a Total of 1 1/2 Cups (1 Cup for the Filling + 1/2 Cup for the Sauce))
  • *1/2 tsp Paprika (*You will need a Total of 1 tsp (1/2 tsp for the Filling + 1/2 tsp for the Sauce))
  • 1/2 of the Roasted Peppers (from above)
  • the Prepared Chicken (from above)

The Sauce:

  • 4 Tbsp Salted Butter
  • 1/4 Cup Gluten-Free All-Purpose Flour (I use Bob’s Red Mill 1-to-1 GF Flour)
  • 2 Cups Low-Sodium Chicken Broth
  • 1/2 Cup Heavy Cream (or Whole Milk)
  • 1/2 tsp Paprika
  • 1 1/2 Cups Shredded Monterey Jack Cheese (*You will need about 3-1/2 Cups + more, if needed)
  • 1 Cup Sour Cream, Lite or Regular (I use Daisy brand Lite)

Other Ingredients:

  • 12-14 8″ Gluten-Free Tortilla Wraps
  • 1 Cup Salsa (I use Store-bought)
  • 1/4 Cup Cilantro ((Optional))

Baking the Chicken:

  1. Preheat oven to 400 degrees. Line a baking sheet with foil; set aside.
  2. Rinse the Chicken Breasts with cold water, pat a little with paper towels, place on the prepared baking sheet, sprinkle both sides with salt & pepper and drizzle with the olive oil.
  3. Bake for about 20 minutes or until the Chicken is almost done (you will be cooking the chicken a bit more later).
  4. Let the Chicken cool a little, then shred using 2 forks; set aside.

Roasting the Bell Peppers:

  1. While the Chicken Breasts are baking, prepare the Bell Peppers for roasting by cutting them into halves down the middle (from stem to bottom) and removing the stems, seeds and any white membrane.
    (Note: if you’re using store-bought Roasted Bell Peppers, skip the “Roasting” step, drain and chop 2-16 Fl. Oz. jars into 1/2″ pieces).
  2. Place the Bell Pepper halves face-down on the prepared baking sheet and roast for about 3-5 minutes or until the skins are blackened.
  3. Remove the Peppers from the oven and place them into a resealable plastic bag; close bag and leave for about 30 minutes.
  4. When cool enough to handle, remove the Peppers from the plastic bag and scrape off the blackened part (discard this black part); chop the Peppers into 1/2″ pieces (or any size desired); set aside.

Making the Filling:

  1. Heat the Vegetable Oil in a large skillet over Medium heat and add the chopped Onions, cooking until translucent (about 2-3 minutes)..
  2. Next, reduce temperature to Medium-Low and add the Shredded Chicken, 1 Cup of the Chicken Broth and 1 Cup of the Heavy Cream, mixing thoroughly.
  3. Add 1/2 teaspoon Paprika and 1/2 of the chopped, Roasted Peppers; stir thoroughly and continue cooking for a few minutes (the liquid will reduce and thicken a little bit); set aside.

Making the Sauce:

  1. Using a separate, large skillet or saucepan, melt the Butter over Medium Heat; add the GF Flour, whisk thoroughly and cook for 1 minute, while whisking.
  2. Add the remaining 2 cups of Chicken Broth, whisking constantly until smooth (about 2 minutes).
  3. Next, reduce heat to Medium-Low and add the remaining 1/2 cup Heavy Cream, 1/2 teaspoon Paprika and 1 1/2 cups Shredded Cheese; mix completely.
  4. Lastly, add the Sour Cream and the other 1/2 of the chopped, Roasted Peppers, mixing thoroughly (add a bit of Chicken Broth if the consistency is too thick); add any Salt and Pepper at this point, if desired.

Putting it Together:

  1. Preheat oven to 350 degrees.
  2. To assemble the Enchiladas, I set up a “work station” as follows: A. 9″x13″ Baking Dish (may need 2) B. large plate with the stack of Tortillas C. Bowl of remaining Shredded Cheese D. The skillet containing the Chicken Filling mixture
  3. First, using a slotted spoon, spread about a 1/2 cup (+or-) portion of the Chicken Filling towards one end of the Tortilla Wraps and sprinkle with 1 Tablespoon of the Shredded Cheese; next, begin rolling the Tortilla wrap starting from the Chicken Filling end; place seam-side down in one of the 9″x13″ baking dishes; Repeat until all of the Tortilla Wraps and Filling are gone.
  4. Pour the Sauce over the tops of all of the Tortilla Wraps (Enchiladas) and spread out evenly to thoroughly coat; Sprinkle the top with any remaining Shredded Cheese (about 1/2 cup per dish).
  5. Bake, uncovered, for about 20 minutes or until bubbling.
  6. Serve with your favorite toppings: Sour Cream, Salsa, Cilantro, etc. Yum!
Dinner, Lunch, Main Dish


Mini Chicken “Meatloaf” Cups (Gluten-Free)

This recipe has quickly become a family favorite in our home! It can be made with any ground meat of your choice, or a combination of ground meats. I love the simplicity and versatility of this recipe and the fact that it only requires a few ingredients. You can also sneak in some finely chopped vegetables of your choice for those picky eaters. Also makes a wonderful afternoon snack! I hope you and your family enjoy it as much as we do 🙂

A huge “Thank You” to “The Pioneer Woman” (aka: “Ree Drummond”) for sharing the original version of this recipe. I have made some changes in order to make this dish GF and allergy-friendly for our family.

Mini Chicken “Meatloaf” Cups (Gluten-Free)

  • 1 1/2 Cups Gluten-Free Whole Oats (I use Bob’s Red Mill GF Whole Oats)
  • 1 Cup Whole Milk (or Unflavored Oat Milk for a dairy-free version)
  • 2 1/2 lbs Ground Chicken (or ground Turkey, Pork, Beef or combination of ground meats of your choice)
  • 2 tsp Dried Minced Parsley (or 3 Tablespoons Freshly Minced Parsley)
  • 1/2 tsp Seasoned Salt (such as “Season All” or “Lawry’s”)
  • 1/2 tsp Ground Black Pepper ( )
  • 1/2 tsp Red Pepper Flakes (optional, if you would like a bit of heat)
  • 1/4 + 3/4 Cup Ketchup (more, if needed)
  • Shredded Parmesan Cheese (optional)
  1. Preheat oven to 350 degrees.
  2. Generously spray 18-20 standard muffin cups (2 – 12-cup muffin pans) with cooking spray; set aside.
  3. In a small bowl, mix the Whole Oats and Milk together; set aside for about 5 minutes.
  4. In a large bowl, thoroughly mix the ground Meat, the Oat mixture, Parsley, Seasoned Salt, Pepper and 1/4 Cup Ketchup.
  5. Scoop a 1/4-cup portion of the Meat mixture into the prepared muffin cups and evenly flatten/smooth the tops.
  6. Next, squirt about 1/2 teaspoon of Ketchup onto the tops of each “meatloaf” and smooth the Ketchup evenly to thoroughly coat the tops.
  7. Bake for 25 minutes, then carefully remove the muffin pans from the oven and squirt another 1/2 teaspoon onto the tops of the “meatloaves,” spreading evenly with the back of the spoon to thoroughly coat each “meatloaf.”
  8. Bake for an additional 30 minutes or until edges start to crisp and/or sizzle.
  9. Remove from the oven and add any additional Ketchup to the tops; you may also lightly sprinkle the tops with shredded Parmesan Cheese, if desired; let sit in the pan for about 5 minutes before serving.
  10. Excellent served with a fresh Salad and fruit! Yummy 🙂
Appetizers, Dinner, Hors d’Oeuvres, Lunch, Main Dish, Snacks
American


Pumpkin Spice Bundt Cake (Gluten Free)


Pumpkin Spice Bundt Cake (Gluten Free)

Wow! This cake takes it all!!! It is so moist and full of flavor…and, it's Gluten-Free 🙂 If you haven't tried "Gluten Free Heaven" Flour Mixes, then you don't know what you're missing! They have mastered the secret to GF baking – you will never know it's GF. A big shout out to Dixie Crystals for the original version of this recipe…I made a few changes in order to make it GF and allergy-friendly for my family. Thank you to Dixie Crystals and GF Heaven 🙂

Cake:

  • 1 3/4 Cups *Gluten Free Heaven" Cake & Pastry Flour (*I have not made this cake with any other GF flours; please note that all GF Flours are not created the same and results will vary if you use a different GF Flour)
  • 3/4 + 1/8 teaspoon *Xanthan Gum (*This must be added for “GF Heaven Flours” since they do not contain it; leave out if your GF Flour already contains it)
  • 1 teaspoon GF Baking Powder
  • 1/2 teaspoon GF Baking Soda
  • 2 teaspoons Ground Cinnamon
  • 1/2 teaspoon Ground Ginger
  • 1/8 teaspoon Ground Cloves
  • 1 teaspoon Salt
  • 1 Cup + 2 Tbsp Unsalted Butter (Very soft, but not melted)
  • 1 Cup Extra Fine Granulated Sugar (I always use Dixie Crystals)
  • 3 Large Eggs (room temperature)
  • 2/3 Cup Canned Pumpkin (I used Libby’s)
  • 1/3 Cup Orange Juice (I used “no pulp” kind)

Glaze:

  • 2/3 Cups Confectioner’s Sugar ((Powdered); plus more if you want a thicker consistency)
  • 2 Tbsp Orange Juice
  1. Set oven rack in the middle position; Preheat oven to 350 degrees.
  2. Butter and flour Bundt pan (you can also use a 9 x 5 – inch loaf pan); set aside.
  3. In a medium-sized bowl, whisk together the GF Flour, Xanthan Gum, Baking Soda & Powder and Spices; set aside.
  4. Using a Stand or Handheld Mixer, fitted with the paddle attachment, beat the Butter until light & fluffy; add the Granulated Sugar and blend until thoroughly mixed and fluffy.
  5. Add the Eggs, one at a time, blending well after adding each Egg; scrape sides of bowl often; whip until the mixture is very light & fluffy.
  6. Next, add the Canned Pumpkin and mix until blended.
  7. Add the Dry Ingredient mixture and Orange Juice in 3-4 segments, mixing and scraping bowl and paddle well between each addition.
  8. Scrape the batter into the prepared Bundt Pan; place in the preheated oven on the middle rack and bake for 45 minutes (check the cake around the 30-35 minute mark to make sure it isn't browning too much – if it is, cover loosely with a piece of aluminum foil); test doneness after 45 minutes with a toothpick and pressing lightly on the top to see if it springs back; bake an additional 15-30 minutes, depending on your oven (my cake was ready after 45 minutes).

  9. Once cake is done, remove from oven and let cool in the pan for approximately 10-15 minutes before turning out onto a cooling rack.
  10. While the cake is cooling, thoroughly whisk the Powdered Sugar and Orange Juice together in a small bowl until desired consistency is reached; spoon the Glaze over slightly warm or completely cooled cake.
  11. Serve with or without Vanilla Ice Cream and Enjoy! 🙂

*Use the “Spoon & Sweep” method for measuring the GF Flour: use a spoon to fill the measuring cup with the desired amount of flour, then scrape across the top with the back side of a knife to level off.

Desserts, Snacks
Gluten Free
bundt cake, Cake, dixie crystals, gluten-free, Holidays, Pumpkin, pumpkin spice, sweet treats, sweets, Treats


Easy Creamy Broccoli & Cheddar Soup ~ Gluten Free

This quick & easy recipe reminds me of my favorite Broccoli-Cheddar Soup from Panera Bread, but without the Gluten 🙂 It’s so fresh and flavorful that I can’t stop at just one bowl! I owe a HUGE “Thank You” to Holly Nilsson @ spendwithpennies.com for sharing the original version of this yummy soup!! I made a few adjustments in order to make it Gluten-Free and allergy-friendly for my family.

Easy Creamy Broccoli & Cheddar Soup ~ Gluten Free

  • 1 Tbsp Butter (unsalted)
  • 1 Small Onion (Chopped)
  • 1/2 Cup Carrots (Diced)
  • 1/2 teaspoon Garlic (minced)
  • 1 Large Head Broccoli (Chopped (about 3 Cups))
  • 2 Cups Chicken Broth (Low Sodium or Regular)
  • 1/2 teaspoon Dried Thyme
  • Salt & Pepper (to taste)
  • 2 Tbsp All-Purpose Gluten Free Flour (I use Bob’s Red Mill 1-to-1 GF Flour)
  • 3/4 Cup Whole Milk
  • 3/4 Cup Skim Milk
  • 1 Cup Sharp Cheddar Cheese (Shredded)
  1. In a large saucepan, melt the Butter over medium-low heat. Once Butter is melted, add the Onions, Carrots and Garlic; cook until the Onions are translucent and soft (about 3-5 minutes).
  2. Add the Broccoli, Chicken Broth and Seasonings to the Onion mixture and cook over low heat until the Broccoli has softened ~ about 15 minutes.
  3. Next, using either an Immersion Blender, Regular Blender or Food Processor, thoroughly blend the cooked Vegetable/Broth mixture; set aside in the large saucepan over Low heat.
  4. Meanwhile, in a small/medium bowl, combine the GF Flour blend and Milks using a whisk to thoroughly blend; Add this mixture to the Vegetable/Broth mixture in the large saucepan.
  5. Increase the temperature to Medium/Medium-Low and bring to a boil, while whisking continuously; once the mixture has thickened (about 5 minutes), remove from heat and add the Shredded Cheddar.
  6. Serve with your favorite GF Bread and Enjoy!
Appetizers, Dinner, Hors d’Oeuvres, Lunch, Main Dish, Snacks, Soup
American