Oat Bread (Gluten-Free; Dairy-Free; Vegan)

Oat Bread (Gluten-Free; Dairy-Free; Vegan)

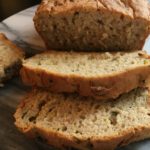
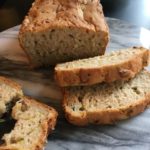
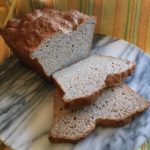
You will fall in love with this soft, yummy GF, DF, Vegan Oat Bread! It’s perfect for toast, sandwiches or warm with some fresh buttery spread 🙂 I usually make two loaves at a time and freeze one to have a loaf ready to go when the first one runs out (usually within 2-3 days in our family). I hope you enjoy it!

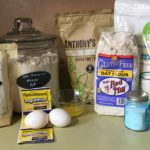
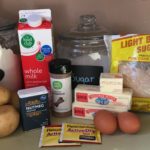
  • 3 Cups + 3 Tbsp (453 g) GF Bread Flour Blend (I usually use my own blend (from “letthemeatgfcake” and instructions are included with my Italian Sandwich Bread GF recipe) or Better Batter GF Flour Blend (just be sure your GF flour blend contains Xanthan Gum))
  • 2 Tbsp + 1 tsp Granulated Sugar
  • 2 tsp Kosher Salt
  • 2 tsp Quick Rise Yeast
  • 2 Cups Plain Oat Milk
  • 4 Tbsp Buttery Spread (Earth Balance Original or Country Crock Plant Butter with Avocado Oil)
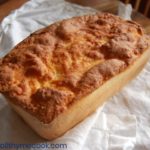
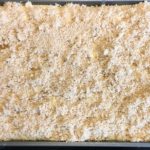
  • 1 Handful GF Whole Oats (for sprinkling on the top)
  1. Thoroughly coat all sides and bottom of the loaf pan with shortening and then a dusting of GF Flour. Set aside.
  2. In a small microwave-proof bowl, melt the butter-substitute and set aside.
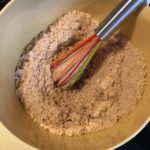
  3. Using a Stand Mixer, with the Paddle attachment and set on Low, combine the GF Flour, Sugar, Salt and Yeast until completely blended.
  4. In another microwave-proof bowl (or 2-cup glass measuring cup with a pour spout), heat the Oat Milk for 45-60 seconds or until just slightly warm.
  5. Pour the melted Butter-substitute into the luke-warm Oat Milk and gently stir.
  6. With the mixer on Low, slowly add the Milk mixture to the GF Flour Mixture until completely combined.
  7. Scrape down the sides of the bowl and the paddle attachment. Increase the speed to Medium-High and beat for 5 minutes.
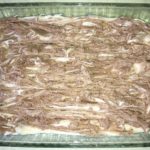
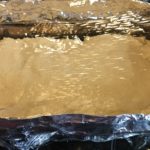
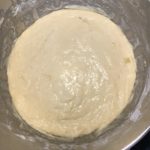
  8. Using a rubber spatula, scrape the bread dough into the prepared loaf pan and spread evenly. Lightly spray the top with water and cover with plastic wrap (I spray one side of my plastic wrap with non-stick cooking spray, so it can be easily removed after the dough rises).
  9. Place in a warm, draft-free spot to rise for about 1 – 1 1/2 hour (or more, depending on the current temperature) or until dough has risen slightly above the top of the pan.
  10. Once the dough is ready to bake, place one oven rack in the lowest position and the other rack in the middle position of your oven. Next, place an oven-proof dish (I use a glass loaf pan) with about 1 Cup of water on the lower rack set off to one side, so as not to block the heat.
  11. Preheat oven to 425 degrees.
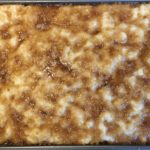
  12. Remove plastic covering from the bread loaf, sprinkle the top with the GF Whole Oats and bake for 35-40 minutes. Bread is done when it starts to pull away from the sides of the loaf pan and it makes a hollow thud sound when you gently thump it. Note: If the bread starts to get too dark on the top, cover loosely with foil (I start checking at the 15 minute mark).
  13. Remove from oven and let cool in pan for about 10 minutes. Then, remove bread from the pan and continue cooling on a wire rack.
  14. Enjoy with a buttery spread and honey or fresh jam/preserves…or slice to use for your favorite sandwiches 🙂
Breakfast, Dinner, Lunch, Snacks


Zucchini Bread – Gluten-Free & Dairy-Free

Zucchini Bread – Gluten-Free & Dairy-Free

This moist, delicious Gluten-Free, Dairy-Free Zucchini Bread is packed full of nutrients and spices! I always make a double batch (this recipe is for 2 loaves), because it disappears very quickly in our house 😉 I attempted to make a Vegan version (substituting applesauce for the eggs) for my daughter, but it turned out like a VERY wet brick…I will continue trying different Vegan versions until I succeed! In the meantime, let me know what you think of this GF, DF version 🙂

  • 3 Cups Zucchini, shredded (water squeezed out)
  • 4 Cups Better Batter All Purpose Gluten Free Flour Mix (You can use other cup-for-cup GF flours, but end results may vary)
  • 1 Cup Granulated Sugar
  • 2-3 Tbsp Granulated Sugar (for sprinkling in both pans)
  • 1/4 Cup Light Brown Sugar (Firmly Packed)
  • 5 tsp Baking Powder, GF
  • 1 1/2 tsp Ground Cinnamon
  • 1/2 tsp Salt
  • 1/4 tsp Nutmeg
  • 1 Tbsp Lemon Zest
  • 1 1/2 Cups Plain Rice Milk (or any other non-dairy unflavored milk (if you’re not DF, you can use Skim, 1%, 2% or Whole Milk))
  • 1/4 Cup + 2 Tbsp Vegetable Oil (I use Canola)
  • 2 tsp Vanilla Extract
  • 2 Large Eggs (lightly beaten)
  • Non-Stick Cooking Spray
  • 1/2 Cup Pecans or Walnuts, chopped (optional)
  1. Preheat oven to 350 degrees.
  2. Gather the ingredients.
  3. Spray two 8″ x 4″ loaf pans with the non-stick cooking spray. Sprinkle all sides and bottom of each pan with about 1 Tbsp Granulated Sugar. Set aside.

The Flour Mixture:

  1. In a large bowl, combine the GF Flour, 1 Cup Granulated Sugar, Light Brown Sugar, Baking Powder, Spices and Lemon Zest. Mix thoroughly and form a well in the center. Set aside.

The Zucchini Mixture:

  1. Using a food processor or handheld grater, shred the Zucchini and place on paper towels in a large bowl to absorb the water.
  2. In another large bowl, mix the milk, oil, vanilla and eggs until well combined. Add the shredded zucchini and mix well.

Making the Batter:

  1. Add the Zucchini Mixture to the center of the Flour Mixture.
  2. Mix well using a fork to start with to help break up the Zucchini. Then switch to a large spoon to ensure that you get all of the ingredients off of the bottom. (Note: if you’re adding nuts, do so at this step).

Baking the Bread:

  1. Divide the batter between the two prepared loaf pans. If desired, you may sprinkle the tops with additional granulated sugar.
  2. Bake on the center rack for 50-60 minutes or until toothpick comes out clean.
  3. Cool in their pans for about 10 minutes.
  4. Transfer loaves to wire cooling rack and let cool completely before slicing.
  5. Enjoy!
Breakfast, Desserts, Lunch, Snacks, Sweet Breads


Italian Sandwich Bread (Gluten Free)

Italian Sandwich Bread (Gluten Free)

I panicked when I found out that I was allergic to Gluten…that meant NO BREAD!!! 🙁 I tried the frozen GF Breads in the grocery store, but they all tasted wrong! And the texture was well, also wrong!! So, I decided to hit the internet and cookbooks for a good GF Bread Recipe. I had tried SO many different recipes and was just about to give up when I discovered a wonderful GF Bread Flour Blend by Kim (“letthemeatgfcake”). Everyone in my family couldn’t believe that it was Gluten Free…it tasted JUST like “regular” gluten bread 🙂 I bake at least one loaf per day…sometimes 2….yes, it’s THAT great!!! Now, I can have my GF Bread and eat it, too 🙂
A HUGE “Thank You” to Kim @ “letthemeatgfcake.com” for sharing this delicious recipe!

  • 3 Cups + 3 Tbsp (453 g) GF Bread Flour Blend (recipe in the notes*)
  • 2 Tbsp + 1 tsp Granulated Sugar
  • 2 tsp Kosher Salt
  • 2 tsp Quick Rise Yeast (Instant)
  • 2 Cups Milk (You can use Whole, 2%, 1%, Skim, Rice Milk, Cashew Milk, Oat Milk, etc.)
  • 4 Tbsp Unsalted Butter (melted; You can also use a dairy-free butter, such as “Earth Balance”)
  1. Thoroughly coat the bread pan/pans with shortening and then a dusting of GF Flour, being sure to bang the pan to get rid of any extra flour. Set aside.
  2. In a small microwave-proof bowl, melt the butter and set aside.
  3. Using a stand mixer, combine (on Low) the GF Flour Blend, Sugar, Salt and Yeast until completely mixed (about 1 minute).
  4. In another microwave-proof bowl, heat the milk for 45-60 seconds or until just slightly warm.
    Note: I use a 2-Cup Glass measuring cup with a pour spout to make it easier to add to the flour mixture.
  5. Pour the melted butter into the luke-warm milk.
  6. Turn the mixer on to Low and slowly pour the Milk/Butter mixture into the Flour blend until completely combined.
  7. Scrape down the sides of bowl and increase the speed to Medium-High and beat for 5 minutes.
  8. Using a rubber spatula, scrape the bread dough into the prepared bread pan and spread dough out evenly.
  9. Cover the pan with plastic wrap and place in a warm spot to rise for about 1 1/2 – 2 hours or until it has doubled in size.
    Note: I place my breads on top of our cable box since it is nice and warm 🙂
  10. Once the bread dough is ready to bake, place one oven rack in the lowest position and the other rack in the middle position of your oven. Next, place an oven-proof baking pan/dish on the bottom rack (off to one side, so it isn’t directly underneath where the bread will be baking – you don’t want to block heat to the bread above it); add about 1 cup of water to the pan (this is for producing steam for the baking bread).
  11. Preheat oven to 425 degrees.
  12. Remove plastic covering from bread loaf and bake for 35-40 minutes. Bread is done with it starts pulling away from the sides and it makes a hollow thud sound when you thump it lightly.
    Note: if bread starts to get too dark on the top, cover with foil – start checking at about 15 minutes.
  13. Remove from oven and place on a cooling rack while still in the pan for about 10 minutes. Then, remove bread from pan and continue cooling on the wire rack.
  14. Enjoy with butter and honey or fresh strawberry jam or with your favorite sandwich fixings 🙂

Before I start with the recipe for the Gluten Free Bread Flour blend, I need to point out a few things:

1st, kitchen scales would be very helpful since the ingredients in this recipe have to be weighed (in grams).

2nd, weigh each ingredient separately and then add to the storage container or ziploc baggie used to keep the flour fresh.

3rd, I have found that it is much easier to store my flours and flour blends in large plastic containers with tight-fitting tops – easy to scoop from 😉

GF Bread Flour Blend Recipe (makes 5 Cups):

  • Potato Starch – 280 grams
  • Superfine White Rice Flour – 245 grams
  • Tapioca Starch/Flour – 75 grams
  • Whey Protein Isolate (unflavored) – 75 grams
  • Xanthan Gum – 15 grams
Breakfast, Dinner, Lunch, Snacks
American, Italian


Brown Sugar-Cinnamon Coffee Cake (Gluten Free)

Brown Sugar-Cinnamon Coffee Cake (Gluten Free)

Do you like Coffee Cake? Are you Gluten-intolerant or have Celiac’s and miss eating yummy treats, like Brown Sugar Cinnamon Coffee Cake? Well, now you can have your coffee cake and eat it, too 🙂 This is truly one of the BEST Coffee Cakes I have ever eaten!!! A HUGE “Thank You” to Audrey from “Mama Knows Gluten Free” for sharing this delicious recipe…my entire family thanks you 🙂

The Cake Ingredients:

  • 3 Cups All-Purpose Gluten Free Flour, Sifted (I use King Arthur brand; sifted)
  • 1 1/2 tsp Xanthan Gum (if your GF Flour Blend doesn’t already have it)
  • 1/4 tsp Salt
  • 1 Cup Granulated Sugar
  • 4 tsp Baking Powder (make sure it’s GF)
  • 1 1/2 Cups Whole Milk (you can also use Almond, Rice, Cashew or Coconut Milk for a dairy-free option)
  • 2 Large Eggs
  • 2 tsp Vanilla Extract
  • 1/2 Cup Unsalted Butter, melted (or use Earth Balance brand for a dairy-free version)

The Brown Sugar-Cinnamon Topping

  • 1 Cup Unsalted Butter, softened (or Earth Balance for dairy-free)
  • 1 Cup Light Brown Sugar, packed
  • 2 Tbsp GF All-Purpose Flour
  • 1 Tbsp Ground Cinnamon

The Glaze Ingredients:

  • 2 Cups Powdered Sugar
  • 5 Tbsp Whole Milk (or dairy-free milk of your choice)
  • 1 tsp Vanilla Extract

Making the Cake:

  1. Preheat oven to 350 degrees.
  2. Spray a 9″ x 13″ baking pan (preferably glass) with non-stick cooking spray. Set aside.
  3. Gather the ingredients needed for Cake.
  4. Melt the Butter and set aside.
  5. Using a stand or handheld mixer, fitted with the paddle attachment, mix the GF Flour, Xanthan Gum, Salt, Sugar and Baking Powder on Low until thoroughly blended.
  6. Add the Milk, Eggs and Vanilla to the Flour mixture, blending until thoroughly mixed.
  7. Slowly drizzle the Melted Butter into the Flour-Milk mixture, mixing until fully incorporated.
  8. Pour batter into the prepared baking pan. Set aside while you prepare the Brown Sugar topping.

Making the Brown Sugar-Cinnamon Topping:

  1. Using a Stand or handheld mixer, fitted with the paddle attachment, combine the softened Butter, Brown Sugar, GF Flour and Cinnamon until thoroughly mixed and creamy.
  2. Drop this Brown Sugar mixture by spoonfuls onto the coffee cake batter in the baking pan making sure to cover the surface equally.
  3. Using a sharp knife, thoroughly swirl the Brown Sugar mixture throughout the coffee cake batter.
  4. Bake in preheated oven for about 35-40 minutes, checking after 30 minutes. Cake is done when a toothpick inserted into the middle comes out clean.

Making the Glaze:

  1. In a large bowl, whisk together the Powdered Sugar, Milk and Vanilla until smooth. Drizzle over the warm Coffee Cake and let set for about 10 minutes. Slice into desired-size pieces and Enjoy with a glass of ice-cold milk :)!

Store in an air-tight comtainer. Re-heat slices in microwave for about 10-15 seconds 🙂

Breakfast, Desserts, Snacks, Sweet Breads
American


Gluten Free Lemon Pound Cake

Gluten Free Lemon Pound Cake

This Lemon Pound Cake turns out moist, tasty and delicious every time! Made with Fresh Lemon Juice and Lemon Zest puts this GF Lemon Pound Cake over the top! I have learned to make TWO cakes, since my family tends to inhale the first one within a few hours 😉
A big “Thank You” to America’s Test Kitchen for creating this recipe 🙂

Cake Ingredients:

  • 1 1/4 Cups King Arthur Gluten Free Multi-Purpose Flour (Sifted)
  • 1 tsp Baking Powder
  • 1/2 tsp Salt
  • 1/4 tsp Xanthan Gum
  • 1 1/4 Cup Granulated Sugar
  • 2 Tbsp Lemon Zest (about 2 lemons)
  • 1 Tbsp Lemon Juice (from the Lemons used for Zest)
  • 4 Large Eggs
  • 1/2 Cup Cream Cheese (softened)
  • 1 1/2 tsp Vanilla Extract
  • 1/2 Cup Unsalted Butter (Melted)

Glaze Ingredients:

  • 1/2 Cup Powdered Sugar
  • 2 tsp Lemon Juice

The Cake Instructions:

  1. Preheat oven to 350 degrees.
  2. Grease and flour an 8 1/2″ x 4 1/2″ loaf pan. Set aside.
  3. In a large mixing bowl, whisk the Flour, Baking Powder, Salt and Xanthan Gum until blended. Set aside.
  4. In a food processor, combine the Granulated Sugar and Lemon Zest until thoroughly mixed (about 7 pulses).
  5. Next, add the Lemon Juice, Eggs, Softened Cream Cheese and Vanilla Extract to the Sugar mixture. Process until completely blended (about 20-30 seconds)
  6. With the Food Processor running on Low, slowly drizzle the melted Butter into the Cream Cheese mixture. Continue processing until mixed completely (about 30-40 seconds).
  7. Add this Cream Cheese mixture to the Flour mixture in the large bowl. Whisk until thoroughly blended and smooth.
  8. Pour the batter into the prepared loaf pan. Bake for 15 minutes at 350 degrees. Decrease the temperature to 325 degrees and bake for an additional 35-40 minutes, or until cake is a light golden brown and toothpick inserted into the center comes out clean.
  9. Let cool in the pan on a wire rack for about 10 minutes. Remove cake from pan and continue cooling on the wire rack until completely cooled (about 1 1/2 hours).

The Glaze Instructions:

  1. In a small bowl, whisk together the Powdered Sugar and Lemon Juice until smooth, adding more sugar if not thick enough.

Putting it all Together:

  1. Once the cake is completely cooled, drizzle the Glaze over the top of the cake, letting it run down the sides. Sprinkle fresh Lemon Zest on top and let Glaze set for about 15 minutes before serving. Enjoy 🙂

Store cake at room temperature in a large plastic baggie, sealed tightly.

Breakfast, Desserts, Snacks, Sweet Breads


Gluten Free Sandwich Bread

Gluten Free Sandwich Bread

After trying several Gluten Free Breads available in the stores, I decided to try making my own. I finally found a recipe that is simple, delicious and easy on the purse…the total cost per 2 pound loaf is just $5.43 (give or take a few cents, depending on price fluctuations of ingredients).
An enormous “Thank You” to America’s Test Kitchen for creating this recipe!!! 🙂

  • 2 Tbsp Unsalted Butter (Melted and cooled)
  • 2 Large Eggs
  • 2 Cups Warm Water (110 degrees – do NOT use water over this temperature, because it will kill the yeast)
  • 2 1/3 + 1/4 Cups King Arthur Gluten Free Multi-Purpose Flour (Sifted)
  • 1 1/3 Cups Gluten Free Oat Flour (Sifted)
  • 1/2 Cup Nonfat Dry Milk Powder
  • 3 Tbsp Powdered Psyllium Husk
  • 2 Tbsp Granulated Sugar
  • 2 1/4 tsp Rapid Rise or Instant Yeast
  • 2 tsp Baking Powder
  • 1 1/2 tsp Salt
  1. Gather the ingredients.
  2. Spray loaf pan with non-stick cooking spray and set aside.
  3. Melt the Butter and set aside to cool a little.
  4. In a Stand Mixer, using the paddle attachment (not the dough hook), mix the dry ingredients – GF Flour, Oat Flour, Dry Milk Powder, Psyllium, Sugar, Yeast, Baking Powder and Salt on Low until blended (about 1 minute).
  5. In a separate bowl, whisk the Eggs with the 110 degree Water and melted Butter until well-blended.
  6. Slowly add the Water mixture to the Dry Ingredients in the Stand Mixer, mixing on Low until all ingredients are blended, scraping sides as needed. Increase speed to Medium and mix for 6 minutes. Dough will look like cookie dough.
  7. Using a rubber spatula that is sprayed with non-stick cooking spray, scrape dough into the prepared loaf pan and smooth out surface with wet hands. Note: if using an 8 1/2″ pan you will need to wrap a foil collar around the pan (staple ends together), in case dough rises above the top (see photo).
  8. Spray or flick water with hands onto the top of the bread dough and cover loosely with plastic wrap.
  9. Place in a warm spot to rise about 50% – usually about 1 hour.
  10. Preheat oven to 350 degrees and put oven rack in the middle position.
  11. When ready to bake, remove plastic and spray or flick water onto the top of bread and bake for 1 – 1 1/2 hours (our oven runs a bit hot, so I usually only bake my bread for 1 hour). Bread is ready when it turns golden brown and sounds hollow when tapped.
  12. Let cool for about 10 minutes in pan. Then remove to a wire rack to cool completely. Enjoy with butter and honey (or your favorite jam).
  1. Bread keeps on shelf tightly sealed in a plastic bag for 3-5 days.
  2. Freezes well, too, if you can resist eating the entire loaf!
  3. I keep a back-up Ziploc Baggie with all of the dry ingredients already sifted and mixed in the refrigerator for a quick start 🙂
Lunch, Main Dish, Snacks


Moravian Sugar Cake ~ Gluten Free!!!

Moravian Sugar Cake

I just updated this recipe and it’s now Gluten-Free 🙂 This is my all-time favorite Christmas treat and I couldn’t go without it just because of my Gluten allergy, so I rolled up my sleeves and headed into my kitchen to come up with a GF version! I hope you all approve 🙂 The crispy Brown Sugar-Cinnamon topping combined with the buttery, tender yeast cake is seriously addictive! Perfect for Christmas morning, New Years Eve, and Holiday Gifts for your special friends and family 🙂
A huge “Thank You” to pastrychefonline.com for sharing the original version of this Wonderful Recipe!!!

For the Dough

  • 1/2 Cup Warm Water
  • 2 Tablespoons Dried Yeast
  • 1 Cup Mashed Potatoes (Unseasoned – no skin, butter, milk or seasonings)
  • 1 1/2 teaspoons Salt
  • 1/2 Cup Granulated Sugar
  • 11 Tablespoons Salted Butter, Melted ((1 Stick + 3 Tablespoons))
  • 1 Cup Whole Milk
  • 2 Large Eggs
  • 4 Cups All-Purpose Gluten Free Flour (Divided; check to see if your GF flour blend contains Xanthan Gum, if so great, but if not add 2 tsp. Xanthan Gum )
  • *2 tsp Xanthan Gum (*Add ONLY if your GF flour blend does NOT contain Xanthan Gum ~ 1/2 tsp xanthan gum per 1 cup GF flour for cakes, muffins, quick breads)

For the Topping

  • 8 Tablespoons Salted Butter, Melted
  • 1 Cup Granulated Sugar
  • 1 Cup Light Brown Sugar (packed)
  • 1/2 teaspoon Ground Cinnamon
  • 1/4 teaspoon Ground Nutmeg
  • 1/8 teaspoon Salt

Making the Dough

  1. Gather the ingredients.
  2. In the bowl of your standing mixer, combine the warm water and yeast. Using the paddle attachment, stir for about 1 minute or until yeast is completely dissolved.
  3. Next, add the mashed potatoes, salt, sugar, melted butter, milk, eggs and 2 cups of the flour. Mix well on low.
  4. Change the paddle attachment to the dough hook. Add the remaining 2 cups of flour and mix on medium speed for about 5 minutes, scraping the sides as needed. Dough should be very sticky and stretchy when pulling dough between your fingers. Add a little bit of extra flour if dough doesn’t feel like it has enough body…wetter is better than dry!
  5. Smooth the top of the dough with an oiled rubber spatula and cover bowl with a towel. Set in a warm area of your kitchen and let rise for about 1 1/2 – 2 hours. (Dough should double in size).
  6. Spray 2 jelly roll pans with non-stick spray.
  7. Divide the dough in half between the 2 jelly roll pans. Spray the dough and your hands with the non-stick spray and begin patting and stretching the dough until it fills each pan – alternate between the pans to allow the dough to relax and stretch on its own.
  8. Spray the dough with non-stick spray and cover with plastic wrap. Set in a warm area to let rise once again, about 1 hour.

Making the topping

  1. Place the oven racks in top third and bottom third of your oven. Preheat to 400 degrees.
  2. Meanwhile, in a medium bowl, combine the sugars, cinnamon, nutmeg and salt. Mix very well.

Putting it all Together

  1. Once the dough in the pans has risen and become puffy, dimple the dough thoroughly using your greased fingers – do not worry if you puncture all the way through to the pan.
  2. Next, brush the tops of the dough with 4 Tablespoons of the melted butter per pan. Butter should pool in the dimples that you created.
  3. Sprinkle half of the sugar mixture onto each of the cakes until you can no longer see the dough.
  4. Place the cakes on the oven racks (one on the top rack and one on the bottom rack). Bake for 7 minutes.
  5. Switch the cakes on the racks. Bake for another 7 minutes.
  6. Let cakes cool in the pans for about 5 minutes.
  7. Using a large spatula and your hands, transfer to cooling racks – this keeps the bottoms from getting soggy.
  8. Serve warm or wrap very well in freeze-proof bags to freeze for up to 2 months.
  9. Enjoy these yummy cakes throughout the holidays!
  10. They make the PERFECT Holiday Gifts for friends and family 🙂
Breakfast, Desserts, Snacks, Sweet Breads