Elementor #9081

Quick & Easy Bite-Size Chicken Piccata ~ Gluten-Free

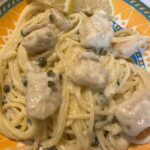
This easy Chicken Piccata dish has quickly become our family's favorite! The delicious creamy lemon and caper sauce will have your family coming back for seconds…and thirds! Enjoy 🙂

  • Large Non-Stick Skillet
  • Medium Mixing Bowl
  • Small Mixing Bowl
  • 1 1/2 lbs. Chicken, cut into bite-sized pieces (I buy Chicken Tenderloins or already cut-up Chicken Breast Pieces to make things go quickly.)
  • Salt & Pepper
  • 1/2 Cup Gluten-Free All-Purpose Flour, sifted (I use Krustaez – less expensive and not grainy)
  • 1/2 tsp Garlic Powder
  • 1/2 Cup Salted Butter (Divided into 2 Tbsp + 2 Tbsp + 4 Tbsp)
  • 2 Tbsp Light Olive Oil, divided (I use Light Olive Oil, so it doesn't interfere with the Lemon & Capers)
  • 1/2 Cup Reduced Sodium Chicken Broth (Room temperature or heated for 30 seconds in the microwave)
  • 2 Tbsp Fresh Lemon Juice (This usually takes 1-2 Lemons, depending on how juicy they are)
  • 1 Zest of Lemon
  • 2-3 Tbsp Capers, with brine drained
  • 1 Cup Heavy Whipping Cream
  • 2-3 Pinches Chopped Parsley (optional)
  1. Gather all of your ingredients.

  2. Rinse and trim Chicken; pat dry with some paper towels and cut into bite-size pieces and put them into a medium-large mixing bowl; season with Salt & Pepper.

  3. In a small mixing bowl, sift the GF flour with the Garlic Powder, mixing well.

  4. Sprinkle the Flour mixture over the Chicken pieces and toss gently to thoroughly coat the Chicken.

  5. In a large non-stick skillet, heat 2 Tbsp of the butter and 1 Tbsp Olive oil over medium-low heat.

  6. *At this point, begin cooking your GF Pasta or Rice, according to the instructions on the box.

  7. Once the Butter and Oil are hot (when the butter is completely melted and there is a slight sheen on the surface of the oil), add half of the Chicken pieces and cook for about 5-6 minutes, while stirring occasionally to brown on all sides (do not cook the Chicken all the way through at this stage, because you will be adding the Chicken back to the skillet later). Remove the Chicken pieces from the skillet and set aside; repeat the process with the other half of the Chicken (melt 2 Tbsp Butter and 1 Tbsp Oil, etc.).

  8. Reduce the temperature to Low and add the remaining 4 Tbsp Butter, Chicken Broth, Lemon Juice, Lemon Zest and Capers to the skillet; stir until ingredients are mixed and butter is completely melted.

  9. Add the Heavy Cream, while whisking to thoroughly blend. Increase the temperature to Medium-Low and bring to a low boil; continue cooking until sauce begins to thicken (about 5 minutes).

  10. Lower the temperature to Low and add the Chicken pieces back into the skillet, stirring well to completely coat the Chicken; continue cooking for about 5 Minutes. Sprinkle with a couple of pinches of Parsley (if using) and stir. Note: if the sauce is thicker than you like, add a little more Chicken Broth until you reach the desired thickness.

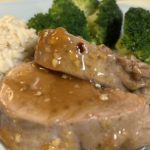
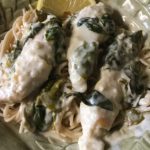
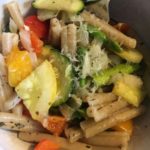
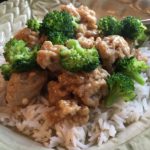
  11. Serve over your choice of Gluten-Free Pasta (I usually serve it over GF Capellini Pasta by Jovial) or Rice and a fresh salad or steamed veggies.

  12. Enjoy 🙂

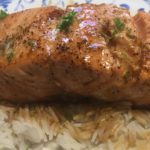
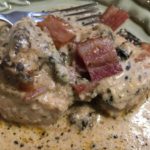
If you want to use whole Chicken Tenderloins, just prepare them using the same steps above, coating them thoroughly with the flour mixture and then cooking for about 3 minutes per side; remove from pan and set aside until the Lemon-Caper Sauce is finished cooking; then add the Chicken back to the skillet and cook for about 5 minutes to cook completely.

Dinner
American, Italian
Gluten Free
Baked Chicken, capers, chicken piccata, creamy, Dinner, gluten-free, Gluten-Free Pasta, lemon


Honey & Garlic Pork Tenderloins

Honey & Garlic Pork Tenderloins

It’s not very often that I come across a recipe that I don’t have to make ANY changes to in order to make it Gluten-Free and allergy-friendly for my family, but this recipe needed ZERO changes!!! Plus, it was quick and easy to make AND everyone loved it 🙂 This yummy recipe is for two (2) Pork Tenderloins, making it perfect for a large group and/or leftovers.
I owe a HUGE “Thank You” to Ashley Fehr @thereciperebel.com for sharing this wonderful recipe 🙂

The Tenderloins:

  • 2 Pork Tenderloins (approximately 2-2 1/2lbs total) (rinsed & trimmed of most fat (leave a little for flavor))
  • 1-2 Tbsp Olive Oil (or Canola Oil (I used Light Olive Oil))
  • 1 tsp Seasoning Salt (I used “Castle” brand Seasoning Salt, but any brand will do)

The Honey-Garlic Sauce:

  • 2/3 Cup Honey
  • 1/4 Cup Chicken Broth (Regular or low sodium – I used “Orrington Farms” Chicken Broth Base & Seasoning because I know it’s Gluten-Free (purchased from Walmart))
  • 2 Tbsp Soy Sauce (Regular or low sodium – I used Tamara for GF)
  • 2 Tbsp Minced Garlic (I used the already minced from a jar for ease and speed)
  • 1 Tbsp Apple Cider Vinegar
  • 1/4 tsp Salt (omit if you’re on a low sodium diet)
  • 1 1/2 Tbsp Corn Starch
  • 1-2 pinches Red Pepper Flakes
  1. Preheat oven to 400 degrees F.
  2. Lightly spray a 9″ x 13″ baking dish with cooking spray; set aside.
  3. Rinse both Tenderloins with cold water and pat dry with paper towels; trim majority of fat and place both tenderloins into the prepared baking dish; set aside.
  4. In a medium mixing bowl, whisk together all of the Honey-Garlic sauce ingredients until all of the corn starch is dissolved – I used boiling water to make the Chicken Broth and this helps dissolve the corn starch.
  5. Carefully pour the sauce around the pork tenderloins – try not to pour the sauce on top of the tenderloins, as it will prevent them from browning.
  6. Bake in the preheated oven, uncovered, for 20-25 minutes (until pork temperature reaches 140 degrees F).
  7. Remove and lightly cover with foil to rest for 10 minutes before slicing.
  8. Drizzle sauce over the pork slices before serving.
  9. Serve with your favorite sides and ENJOY 🙂
Dinner, Main Dish
American


White Chicken Enchiladas ~ Gluten Free

White Chicken Enchiladas ~ Gluten Free

Wow! This yummy Chicken Enchiladas dish instantly moved to the top of our “Family Favorites!” It’s a great recipe for making ahead and re-heating for those busy nights and/or last minute plans for dinner guests 🙂 Friends and family will LOVE receiving this as a house-warming gift or for any occasion!
As usual, a HUGE “Thank You” goes to “The Pioneer Woman” for sharing this wonderful recipe. I made some changes to the original recipe to make it allergy-friendly and Gluten Free for my family 😉

The Chicken:

  • 4-5 Boneless, Skinless Chicken Breasts (You could also use a cooked Rotisserie Chicken from your local Grocer to save time)
  • Kosher Salt
  • Ground Black Pepper
  • 2-3 Tbsp Olive Oil

Roasted Bell Peppers:

  • *2 *Red Bell Peppers (or 1-16 oz. already-roasted red Bell Peppers in a jar)
  • *2 *Bell Peppers (any color) (or 1-16 oz. jar of store-bought Roasted Bell Peppers)

The Chicken Mixture (the Filling):

  • 1 Large Onion (or 3-4 Green Onions (white & green parts), thinly sliced)
  • 1 Tbsp Vegetable Oil (I use Canola)
  • *1 Cup Chicken Broth (*You will need a Total of 3 Cups (1 Cup for the Filling + 2 Cups for the Sauce); I use Low-Sodium, so I have more control over the sodium content)
  • *1 Cup Heavy Cream (*You will need a Total of 1 1/2 Cups (1 Cup for the Filling + 1/2 Cup for the Sauce))
  • *1/2 tsp Paprika (*You will need a Total of 1 tsp (1/2 tsp for the Filling + 1/2 tsp for the Sauce))
  • 1/2 of the Roasted Peppers (from above)
  • the Prepared Chicken (from above)

The Sauce:

  • 4 Tbsp Salted Butter
  • 1/4 Cup Gluten-Free All-Purpose Flour (I use Bob’s Red Mill 1-to-1 GF Flour)
  • 2 Cups Low-Sodium Chicken Broth
  • 1/2 Cup Heavy Cream (or Whole Milk)
  • 1/2 tsp Paprika
  • 1 1/2 Cups Shredded Monterey Jack Cheese (*You will need about 3-1/2 Cups + more, if needed)
  • 1 Cup Sour Cream, Lite or Regular (I use Daisy brand Lite)

Other Ingredients:

  • 12-14 8″ Gluten-Free Tortilla Wraps
  • 1 Cup Salsa (I use Store-bought)
  • 1/4 Cup Cilantro ((Optional))

Baking the Chicken:

  1. Preheat oven to 400 degrees. Line a baking sheet with foil; set aside.
  2. Rinse the Chicken Breasts with cold water, pat a little with paper towels, place on the prepared baking sheet, sprinkle both sides with salt & pepper and drizzle with the olive oil.
  3. Bake for about 20 minutes or until the Chicken is almost done (you will be cooking the chicken a bit more later).
  4. Let the Chicken cool a little, then shred using 2 forks; set aside.

Roasting the Bell Peppers:

  1. While the Chicken Breasts are baking, prepare the Bell Peppers for roasting by cutting them into halves down the middle (from stem to bottom) and removing the stems, seeds and any white membrane.
    (Note: if you’re using store-bought Roasted Bell Peppers, skip the “Roasting” step, drain and chop 2-16 Fl. Oz. jars into 1/2″ pieces).
  2. Place the Bell Pepper halves face-down on the prepared baking sheet and roast for about 3-5 minutes or until the skins are blackened.
  3. Remove the Peppers from the oven and place them into a resealable plastic bag; close bag and leave for about 30 minutes.
  4. When cool enough to handle, remove the Peppers from the plastic bag and scrape off the blackened part (discard this black part); chop the Peppers into 1/2″ pieces (or any size desired); set aside.

Making the Filling:

  1. Heat the Vegetable Oil in a large skillet over Medium heat and add the chopped Onions, cooking until translucent (about 2-3 minutes)..
  2. Next, reduce temperature to Medium-Low and add the Shredded Chicken, 1 Cup of the Chicken Broth and 1 Cup of the Heavy Cream, mixing thoroughly.
  3. Add 1/2 teaspoon Paprika and 1/2 of the chopped, Roasted Peppers; stir thoroughly and continue cooking for a few minutes (the liquid will reduce and thicken a little bit); set aside.

Making the Sauce:

  1. Using a separate, large skillet or saucepan, melt the Butter over Medium Heat; add the GF Flour, whisk thoroughly and cook for 1 minute, while whisking.
  2. Add the remaining 2 cups of Chicken Broth, whisking constantly until smooth (about 2 minutes).
  3. Next, reduce heat to Medium-Low and add the remaining 1/2 cup Heavy Cream, 1/2 teaspoon Paprika and 1 1/2 cups Shredded Cheese; mix completely.
  4. Lastly, add the Sour Cream and the other 1/2 of the chopped, Roasted Peppers, mixing thoroughly (add a bit of Chicken Broth if the consistency is too thick); add any Salt and Pepper at this point, if desired.

Putting it Together:

  1. Preheat oven to 350 degrees.
  2. To assemble the Enchiladas, I set up a “work station” as follows: A. 9″x13″ Baking Dish (may need 2) B. large plate with the stack of Tortillas C. Bowl of remaining Shredded Cheese D. The skillet containing the Chicken Filling mixture
  3. First, using a slotted spoon, spread about a 1/2 cup (+or-) portion of the Chicken Filling towards one end of the Tortilla Wraps and sprinkle with 1 Tablespoon of the Shredded Cheese; next, begin rolling the Tortilla wrap starting from the Chicken Filling end; place seam-side down in one of the 9″x13″ baking dishes; Repeat until all of the Tortilla Wraps and Filling are gone.
  4. Pour the Sauce over the tops of all of the Tortilla Wraps (Enchiladas) and spread out evenly to thoroughly coat; Sprinkle the top with any remaining Shredded Cheese (about 1/2 cup per dish).
  5. Bake, uncovered, for about 20 minutes or until bubbling.
  6. Serve with your favorite toppings: Sour Cream, Salsa, Cilantro, etc. Yum!
Dinner, Lunch, Main Dish


Mini Chicken “Meatloaf” Cups (Gluten-Free)

This recipe has quickly become a family favorite in our home! It can be made with any ground meat of your choice, or a combination of ground meats. I love the simplicity and versatility of this recipe and the fact that it only requires a few ingredients. You can also sneak in some finely chopped vegetables of your choice for those picky eaters. Also makes a wonderful afternoon snack! I hope you and your family enjoy it as much as we do 🙂

A huge “Thank You” to “The Pioneer Woman” (aka: “Ree Drummond”) for sharing the original version of this recipe. I have made some changes in order to make this dish GF and allergy-friendly for our family.

Mini Chicken “Meatloaf” Cups (Gluten-Free)

  • 1 1/2 Cups Gluten-Free Whole Oats (I use Bob’s Red Mill GF Whole Oats)
  • 1 Cup Whole Milk (or Unflavored Oat Milk for a dairy-free version)
  • 2 1/2 lbs Ground Chicken (or ground Turkey, Pork, Beef or combination of ground meats of your choice)
  • 2 tsp Dried Minced Parsley (or 3 Tablespoons Freshly Minced Parsley)
  • 1/2 tsp Seasoned Salt (such as “Season All” or “Lawry’s”)
  • 1/2 tsp Ground Black Pepper ( )
  • 1/2 tsp Red Pepper Flakes (optional, if you would like a bit of heat)
  • 1/4 + 3/4 Cup Ketchup (more, if needed)
  • Shredded Parmesan Cheese (optional)
  1. Preheat oven to 350 degrees.
  2. Generously spray 18-20 standard muffin cups (2 – 12-cup muffin pans) with cooking spray; set aside.
  3. In a small bowl, mix the Whole Oats and Milk together; set aside for about 5 minutes.
  4. In a large bowl, thoroughly mix the ground Meat, the Oat mixture, Parsley, Seasoned Salt, Pepper and 1/4 Cup Ketchup.
  5. Scoop a 1/4-cup portion of the Meat mixture into the prepared muffin cups and evenly flatten/smooth the tops.
  6. Next, squirt about 1/2 teaspoon of Ketchup onto the tops of each “meatloaf” and smooth the Ketchup evenly to thoroughly coat the tops.
  7. Bake for 25 minutes, then carefully remove the muffin pans from the oven and squirt another 1/2 teaspoon onto the tops of the “meatloaves,” spreading evenly with the back of the spoon to thoroughly coat each “meatloaf.”
  8. Bake for an additional 30 minutes or until edges start to crisp and/or sizzle.
  9. Remove from the oven and add any additional Ketchup to the tops; you may also lightly sprinkle the tops with shredded Parmesan Cheese, if desired; let sit in the pan for about 5 minutes before serving.
  10. Excellent served with a fresh Salad and fruit! Yummy 🙂
Appetizers, Dinner, Hors d’Oeuvres, Lunch, Main Dish, Snacks
American


Easy Creamy Broccoli & Cheddar Soup ~ Gluten Free

This quick & easy recipe reminds me of my favorite Broccoli-Cheddar Soup from Panera Bread, but without the Gluten 🙂 It’s so fresh and flavorful that I can’t stop at just one bowl! I owe a HUGE “Thank You” to Holly Nilsson @ spendwithpennies.com for sharing the original version of this yummy soup!! I made a few adjustments in order to make it Gluten-Free and allergy-friendly for my family.

Easy Creamy Broccoli & Cheddar Soup ~ Gluten Free

  • 1 Tbsp Butter (unsalted)
  • 1 Small Onion (Chopped)
  • 1/2 Cup Carrots (Diced)
  • 1/2 teaspoon Garlic (minced)
  • 1 Large Head Broccoli (Chopped (about 3 Cups))
  • 2 Cups Chicken Broth (Low Sodium or Regular)
  • 1/2 teaspoon Dried Thyme
  • Salt & Pepper (to taste)
  • 2 Tbsp All-Purpose Gluten Free Flour (I use Bob’s Red Mill 1-to-1 GF Flour)
  • 3/4 Cup Whole Milk
  • 3/4 Cup Skim Milk
  • 1 Cup Sharp Cheddar Cheese (Shredded)
  1. In a large saucepan, melt the Butter over medium-low heat. Once Butter is melted, add the Onions, Carrots and Garlic; cook until the Onions are translucent and soft (about 3-5 minutes).
  2. Add the Broccoli, Chicken Broth and Seasonings to the Onion mixture and cook over low heat until the Broccoli has softened ~ about 15 minutes.
  3. Next, using either an Immersion Blender, Regular Blender or Food Processor, thoroughly blend the cooked Vegetable/Broth mixture; set aside in the large saucepan over Low heat.
  4. Meanwhile, in a small/medium bowl, combine the GF Flour blend and Milks using a whisk to thoroughly blend; Add this mixture to the Vegetable/Broth mixture in the large saucepan.
  5. Increase the temperature to Medium/Medium-Low and bring to a boil, while whisking continuously; once the mixture has thickened (about 5 minutes), remove from heat and add the Shredded Cheddar.
  6. Serve with your favorite GF Bread and Enjoy!
Appetizers, Dinner, Hors d’Oeuvres, Lunch, Main Dish, Snacks, Soup
American


Creamy Lemon Chicken over Gluten-Free Pasta

Creamy Lemon Chicken over Gluten-Free Pasta

This recipe has quickly become one of our favorites! It’s so quick and easy to make, but tastes like you’ve been in the kitchen for hours 😉 Serve with a fresh garden salad and you’re good to go!
As usual, I found this recipe in The Pioneer Woman’s collection and made a few simple changes to make it Gluten-Free and allergy-friendly for my family.

  • 1/2 Cup All-Purpose Gluten Free Flour (I use Bob’s Red Mill GF 1-to-1 Baking Flour)
  • 2-3 Tbsp Olive Oil (I use the lighter Olive Oil, so it doesn’t interfere with the flavors)
  • 1-1 1/2 lbs Chicken Tender (you can really use any cut of chicken, but I usually prefer Chicken Tenders for ease and convenience)
  • 1 1/2 tsp Garlic, minced (I use the already minced garlic in a jar)
  • 1/4 Cup Low Sodium Chicken Broth (You can also use Vegetable Broth)
  • 3/4 Cup Heavy Cream (or Half & Half)
  • 1/2 Cup Parmesan Cheese, grated (Fresh is much better here)
  • 1 Large Lemon (Zest & Juice)
  • Salt & Pepper (to taste)
  • 3 Large Handfuls (Baby Spinach (optional))
  • Basil or Parsley (for garnish)
  • 12 oz. box Gluten Free Pasta (You can use any type of GF Pasta of your choice, but I have found that GF Spaghetti, Fettuccine or Capellini work best)
  1. Place the flour in a shallow dish and season with salt & pepper, if desired. Set aside.
  2. Heat the oil in a large skillet over medium heat until the oil begins to shimmer on the surface.
  3. Meanwhile, dredge the Chicken Tenders through the flour to fully coat and shake off excess flour.
  4. Carefully place the floured Chicken Tenders into the hot oil and cook for about 3-4 minutes on each side or until thoroughly cooked; remove the chicken and place on a plate.
  5. While the Chicken is cooking, bring a large pot of water to boil and cook the GF Pasta according to directions; drain and set aside.
  6. Once all of the Chicken has cooked and been removed from the pan, lower the temperature to Simmer/Low and add the Minced Garlic; cook for about 1 minute.
  7. Carefully add the Chicken Broth and stir well.
  8. Next, add the Cream, Parmesan Cheese, Lemon Zest and Juice stirring well to combine all of the ingredients; add salt & pepper to taste; simmer until the sauce begins to thicken (about 2-3 minutes).
  9. Return the Chicken Tenders to the pan and cover completely with the sauce; add the Spinach, if desired, and cook for about 1 minute (or until the Spinach is wilted).
  10. Serve over your choice of GF Pasta and garnish with Basil or Parsley, if desired.
Dinner, Main Dish
American


Honey-Lime Salmon

Honey-Lime Salmon

Yes, I’m posting another Salmon recipe 😉 My family just LOVES Salmon SO much that I am always in search of new and different ways to prepare it! We also adore anything citrus, so this recipe is perfect for us!!! With just a few ingredients needed and about 20 minutes, this yummy dish earns 5-stars in this household 🙂
As usual, I have to thank Ree Drummond for sharing the original version of this wonderful recipe! I made a few adjustments to the original version in order to make it Gluten-Free and allergy-friendly for my family.

  • 1-1 1/2 lb Salmon (cut into 4 fillets; skin removed, if desired)
  • 1-2 Tbsp Canola Oil
  • 4 Tbsp Butter, Unsalted (divided)
  • 1-2 pinches Salt
  • 1-2 pinches Ground Black Pepper
  • 1-2 Tbsp Honey (start with 1 Tbsp and add more for desired sweetness)
  • 1 Tbsp Gluten Free Soy Sauce
  • 2 Medium Limes, Zest & Juice (Divided)
  • 2 + 1/2 Tbsp Fresh Parsley, chopped (reserve the 1/2 Tablespoon for serving)
  • 1-1 1/2 Cups Rice, cooked (for serving)
  1. Begin cooking the rice while you prepare the Salmon (both should be done at about the same time).
  2. Preheat oven to 250 degrees.
  3. In a large non-stick skillet, heat the oil and 2 Tablespoons of the butter over medium heat until the butter is completely melted and the surface begins to shimmer.
  4. Gently add the Salmon fillets to the pan, skin side down, and season the tops with salt & pepper; cook each side for approximately 3-5 minutes, depending on the thickness of the fillets (they are done when they begin to flake apart);
  5. When the Salmon fillets are done, carefully transfer them to an oven-proof plate/dish and place in the preheated oven to keep warm.
  6. Meanwhile, reduce heat to medium-low and return the skillet to the cooktop.
  7. Add the remaining 2 Tablespoons of Butter, Honey, GF Soy Sauce, Zest & Juice of 1 Lime to the skillet and stir until the butter is completely melted and the mixture begins to boil; cook until the sauce begins to thicken (about 1-2 minutes); add the chopped Parsley and mix thoroughly.
  8. Next, carefully add the Salmon fillets back into the skillet and spoon the sauce evenly over each fillet; continue cooking for 1-2 minutes while continuing to baste the fillets with the sauce mixture.
  9. Mix the remaining Zest & Juice of the other Lime into cooked rice; serve the Salmon fillets over the rice and drizzle remaining sauce and reserved Parsley over the tops of each fillet.
  10. Enjoy!
Dinner, Lunch, Main Dish
American


Pasta Primavera in a Lemon-Butter Sauce ~ Gluten Free

Pasta Primavera in a Lemon-Butter Sauce ~ Gluten Free

What better way to celebrate Spring than making “Pasta Primavera,” a healthy Spring Vegetable & Pasta dish…after all, “primavera” means ‘spring style’ in Italian 😉 I love this easy and very versatile recipe….I use as many veggies that I can find in my refrigerator before they go bad. Asparagus, squash, broccoli, bell peppers, carrots, zucchini, onions, snow peas…the possibilities are endless! And, the light lemony-butter sauce makes this recipe irresistible 🙂
*The original version of this recipe came from evolvingtable.com – thank you SO much for sharing! I have adjusted the original recipe in order to make it gluten-free and allergy-friendly for my family.

The Pasta:

  • 4 Cups Gluten-Free Pasta, dry (any style is fine)

The Vegetables:

  • 1 lb Asparagus (trim ends and cut into 2″ pieces)
  • 1 large Yellow Squash (quartered lengthwise & cut into bite-size pieces)
  • 1 large Zucchini (quartered lengthwise & cut into bite-size pieces)
  • 2 large Bell Peppers, any color (cut into bite-size pieces)
  • 1 large Vidalia Onion (cut into bite-size pieces)
  • 2-3 Tbsp Olive Oil
  • 1/2-1 tsp Kosher Salt
  • 1/4-1/2 tsp Ground Black Pepper
  • 1 tsp Dried Oregano
  • 1/2 tsp Dried Thyme
  • 1/2 tsp Dried Marjoram
  • 1/2 tsp Dried Basil

The Lemon-Butter Sauce:

  • 4 Tbsp Butter, salted ((1/2 stick))
  • 1 Large Lemon (Zest and juice)
  • 1 1/2 tsp Garlic, minced (I use the already-minced Garlic in a jar)
  • 1/2 Cup Water (reserved from the pasta water)
  • 1 Tbsp Dried Basil (or 1/4 Cup fresh, chopped)
  • 1/2-3/4 Cup Parmesan, grated (fresh is best)
  • 1/2-1 tsp Salt (to taste)

The Pasta:

  1. In a large pot, cook the pasta according to the package instructions for al dente; reserve 1/2 cup pasta water for the sauce before draining the rest of the water; set the pasta aside in a colander & keep the large pot available for cooking the sauce, etc.

The Vegetables:

  1. Preheat oven to 425 degrees.
  2. Line a large baking sheet with foil and lightly spray with non-stick cooking spray; set aside.
  3. While the Pasta is cooking, cut up all of the vegetables into bite-size pieces and place them into a large bowl. *This step can be done ahead of time, if desired (just keep veggies refrigerated until ready to use).
  4. Add the Olive Oil and spices to the vegetables in the bowl and toss to thoroughly coat; spread the veggies evenly onto the prepared baking sheet and bake for 15-18 minutes or until veggies are tender.

The Lemon-Butter Sauce:

  1. Using the same pot that you used to cook the pasta, add the butter, lemon zest, lemon juice and garlic; cook over medium-low heat until the butter is completely melted and the garlic becomes fragrant (about 2 minutes).
  2. Add the cooked Pasta, the reserved Pasta Water and the roasted vegetables to the Lemon-Butter mixture, tossing until thoroughly coated.
  3. Next, add the Basil, 1/2 cup Parmesan and Salt (to taste); toss to combine.
  4. Serve with freshly-grated Parmesan and fresh chopped Basil, if desired.
  5. Oh, so yummy! Enjoy 🙂
Dinner, Lunch, Main Dish
American, Italian


Creamy Chicken with Sun-Dried Tomatoes & Bacon ~ Gluten Free

Creamy Chicken with Sun-Dried Tomatoes & Bacon ~ Gluten Free

Oh my! This dish is delish 😉 The tangy sun-dried tomatoes are a perfect accent for the savory chicken and bacon in this recipe! And, the creamy sauce has a tiny bit of a punch with the addition of red pepper flakes. This dish received a “Double Yum” in our house 🙂
A BIG “Thank You” to “juliasalbum.com” for sharing the original version of this recipe ~ I have tweaked the ingredients a tiny bit to make it Gluten-Free and Allergy-friendly for our family

The Chicken:

  • 3-4 large Chicken Breasts (quartered)
  • 1/2 tsp Paprika
  • 2-3 Pinches Salt
  • 2 Tbsp olive oil (you can use the oil from the jar of sun-dried tomatoes, if desired)
  • 2 tsp Garlic, minced (I use the already-minced Garlic in a jar)
  • 3/4 – 1 Cup Sun-Dried Tomatoes (packed in oil, drained (reserve the oil if using in place of the Olive Oil))

The Cream Sauce:

  • 1 Cup Half & Half (or Heavy Cream for a thicker sauce)
  • 1 Cup Whole Milk (you can also use 2%, 1% or Skim for a lighter version)
  • 1 Cup Mozzarella Cheese, shredded
  • 1 heaping tsp Dried Basil (or 1 Tbsp Fresh, chopped)
  • 1/4-1/2 tsp Red Pepper Flakes
  • Salt (to taste)
  • Ground Black Pepper (to taste)
  • 8-10 Strips bacon (cooked and crumbled)
  1. Cook Bacon until crisp, drain and set aside.
  2. Cut each Chicken Breast into quarters, sprinkle with the Salt and Paprika; set aside.
  3. In a large non-stick sauce pan, heat the 2 Tbsp. of Olive Oil (or the oil reserved from the Sun-Dried Tomatoes) over Medium heat.
  4. Once the oil is hot (the surface should be shimmering), add the Garlic and Sun-dried Tomatoes and cook for 1-2 minutes, or until you start to smell the Garlic; using a slotted spoon, remove the Garlic and Sun-dried Tomatoes from the pan, leaving the oil behind, and set aside.
  5. Add the Chicken to the pan with the leftover oil, adding more oil if needed; cook the chicken for 4-5 minutes per side (until the chicken is a light golden brown).
  6. Remove the pan from the heat & cover; the chicken will continue to cook (about 5 minutes).
  7. Once the Chicken is no longer pink inside, remove it from the skillet and set aside; drain any juices leftover in the pan.
  8. Return the pan to the cooktop, add the Half & Half (or Heavy Cream, if using) and cook over Medium heat until it comes to a boil;
  9. Add the 1 cup of Shredded Mozzarella cheese, reduce temperature to Low, and stir until cheese has completely melted.
  10. Slowly add the 1 Cup of Whole Milk and whisk continually until mixture is smooth.
  11. Add the sauteed Sun-dried Tomatoes and Garlic to the cream sauce, mixing well;
  12. Next, add the Basil, Red Pepper Flakes and Salt; mix thoroughly.
  13. Lastly, add the cooked Chicken breasts and 1/2 of the crumbled cooked Bacon (reserving the other 1/2 for serving); heat until chicken is warm.
  14. Top with the remaining 1/2 of the Bacon and serve over rice, pasta or plain with your favorite veggies 🙂
Dinner, Main Dish


Quick & Easy Orange Chicken ~ Ground (Gluten Free)

Quick & Easy Orange Chicken ~ Ground (Gluten Free)

Wow! Full of flavor and SO quick & easy to prepare makes this dish an instant winner in our house!!! Serve over rice and with your favorite veggies 🙂
*Thank You to dinnerthendessert.com for sharing the original version of this recipe ~ I have made several adjustments to the ingredients in order to make it Gluten-Free and Allergy-friendly for my family 😉

The Chicken:

  • 3 lbs Ground Chicken
  • 1 Tbsp Canola Oil
  • 1 1/2 tsp Ground Ginger (or 2-3 Tbsp Fresh Ginger Root, minced)
  • 1 1/2 Tbsp Garlic, minced (I use the already-minced Garlic in a jar)
  • 1/2 – 3/4 tsp Red Pepper Flakes

The Orange Sauce:

  • 1/2 Cup Water
  • 2 tsp Canola Oil
  • 1/4 Cup Braggs Liquid Aminos (or GF Soy Sauce (low sodium or regular))
  • 1/2 – 3/4 Cup Granulated Sugar
  • 3-5 Tbsp White Vinegar (I use 3 Tbsp since my family does not like a strong vinegar taste)
  • 2 Medium Oranges, Zest (Squeeze some of the fresh orange juice over the dish before serving, if you want that extra orange punch)

The Slurry (Thickener):

  • 3 Tbsp Warm Water
  • 3 Tbsp Gluten Free Cornstarch

The Chicken:

  1. In a large non-stick saucepan, cook the Ground Chicken over Medium-Low heat (cook on Medium, if you want a crust to form) until done.
  2. When the Chicken is almost finished cooking, add the Ginger, Garlic and Red Pepper Flakes; cook for about 1 minute.

The Sauce:

  1. While the Chicken is cooking, mix the Sauce ingredients together in a medium-sized bowl until thoroughly blended.

Putting it Together:

  1. Once the Chicken is finished cooking, reduce the temperature to Low and pour the Orange Sauce over the Chicken; bring to a low boil.

The Slurry:

  1. While the Chicken and Sauce are simmering, stir the Cornstarch into the warm Water in a small bowl until completely dissolved.
  2. Pour this Cornstarch Slurry into the Orange-Chicken mixture and stir until combined and sauce begins to thicken.
    *If you prefer a thinner sauce, add more warm water or the fresh-squeezed orange juice at this point.
  3. If you want to add any veggies (Broccoli, Asparagus, Snow Peas, etc.), do so now and cover the pot with a lid to lightly cook the veggies for about 3-5 minutes.
  4. Serve over rice and enjoy 🙂
Dinner, Lunch, Main Dish
American, Asian