Salmon with Avocado Salsa

Salmon with Avocado Salsa
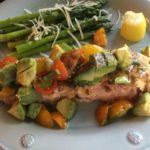
This Salmon dish is SO fresh and easy to make! Our family eats Salmon 1-2 times per week, so I am always looking for new ways to prepare it…this one is a definite winner! The Avocado Salsa is very versatile and is great paired with fish, chicken, pork, turkey, beef, pasta, baked potatoes, etc. It is wonderful on top of a Turkey Burger! I hope you and your family/friends enjoy it as much as we do 🙂

Avocado Salsa Ingredients:

  • 1 Large Ripe Avocado (Peeled, pitted and cubed)
  • 1 Green Onion (thinly chopped)
  • 1/2 Cup Tomatoes (Diced; I use red, orange and yellow cherry tomatoes)
  • 1 Large Lemon (Zest and Juice)

Salmon Ingredients:

  • 1 Pound Fresh Salmon (Rinsed and patted dry with paper towels)
  • 1 Tbsp Olive Oil
  • 1 tsp Ground Cumin
  • 1/2 tsp Ground Coriander
  • 1/2 tsp Onion Powder
  • 1/4 tsp Sea Salt
  • 1/8 tsp Ground Black Pepper
  • 1/8 tsp Ground Cayenne Pepper

Making the Salsa:

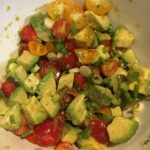
  1. In a small/medium bowl, gently mix the chopped Avocado, Green Onions, Tomatoes, Lemon Zest and Lemon Juice. Refrigerate while preparing the Salmon.
Making the Salmon:

  1. Preheat oven to 425 degrees.
  2. Line a baking sheet with foil, place salmon on the sheet and brush with the Olive Oil, being sure to completely coat the Salmon.
  3. In a small bowl, combine the spices and sprinkle evenly over the Salmon.
  4. Bake for 15-18 minutes.
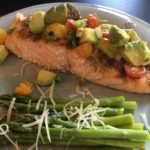
  5. Serve topped with the fresh Avocado Salsa and your favorite veggies!
Note: This recipe was inspired by a Keto-Friendly recipe that one of my daughters found…Thank you to Amy Ramos for sharing the original recipe for this yummy Salmon and Avocado dish!!! We are forever indebted to you 🙂

Dinner, Lunch, Main Dish


Lime Freeze (Milk Shake)

Lime Freeze (Milk Shake)

One of my fondest memories is of these WONDERFUL frozen treats! I used to walk down to our neighborhood pharmacy, now sadly closed, on hot Summer days and order one of these cool, delicious Lime Freezes 🙂 They are truly one of my all-time favorites and I was bound and determined to reproduce the recipe…I think this is as close as I’m going to get! It’s quick and easy to make and only requires 3 ingredients! Enjoy 🙂

  • 3-4 Large Ice Cream Scoops Lime Sherbet (I think Orange Sherbet would be delicious, too!)
  • 1 Large Ice Cream Scoop Vanilla Ice Cream
  • 3/4 Cup Diet Lemon Lime Soda (Sprite or any other type of Lemon-Lime Soda available; You can also use regular (instead of diet); add a splash at a time if you want a thinner version)
  1. Gather the ingredients.
  2. In a blender or food processor, combine all the ingredients and blend until smooth and creamy.
  3. Serve with a dollop of Cool Whip and a wedge of Lime for garnish 🙂
Desserts, Snacks


Lite Strawberry-Cool Whip Soft Serve “Ice Cream” (Gluten Free)

Lite Strawberry-Cool Whip Soft Serve “Ice Cream” (Gluten Free)

This refreshing treat is SO quick and easy to make…and there are only 3 ingredients needed! I am posting the Pineapple and Strawberry versions, but feel free to try different frozen fruit to create your favorite Summer treats! Yummy 🙂

  • 2 Cups Frozen Sliced Strawberries (or any fruit of your choice)
  • 3 Cups Frozen Lite Cool Whip
  • 3/4 Cup Pineapple Juice (add 1/4 Cup if too thick)
  1. Gather the ingredients.
  2. Using a blender (I have a Ninja brand that has an “Ice Cream” setting that works really well) or food processor, combine all of the ingredients and process until fully blended and smooth.
  3. Spoon (or pipe with a pastry bag) into desired glasses/cups and top with Cool Whip and Fruit! Enjoy 🙂
Desserts, Snacks
American


Lite Pineapple-Cool Whip Soft Serve “Ice Cream” (Gluten Free)

Lite Pineapple-Cool Whip Soft Serve “Ice Cream” (Gluten Free)

This refreshing treat is SO quick and easy to make…and there are only 3 ingredients needed! I am posting the Pineapple and Strawberry versions, but feel free to try different frozen fruit to create your favorite Summer treats! Yummy 🙂

  • 2 Cups Frozen Pineapple Chunks (or any frozen fruit of your choice)
  • 3 Cups Frozen Lite Cool Whip
  • 3/4 Cup Pineapple Juice (Add 1/4 if too thick)
  1. Gather the ingredients.
  2. Using a blender (I have a Ninja brand that has an “Ice Cream” setting that works really well) or food processor, combine all of the ingredients and process until fully blended and smooth.
  3. Spoon (or pipe with a pastry bag) into desired glasses/cups and top with Cool Whip and Fruit! Enjoy 🙂
Desserts, Snacks
American


Baked Turkey-Ranch Meatballs with Spicy Avocado Sauce (Gluten Free)

Baked Turkey-Ranch Meatballs with Spicy Avocado Sauce (Gluten Free)

Oh my goodness! These savory and slightly sweet meatballs paired with the spicy Avocado dipping sauce is out of this world!!! I always make a triple batch when I’m making any type of meatball, so I can freeze some for another busy night. However, after making a triple batch of these yummy meatballs, I didn’t have enough to freeze…my family LOVED them and not only went back for seconds, but thirds 🙂 I served this with a fresh salad, topped with cucumbers, strawberries and a store-bought Honey Poppy Seed dressing…delicious! I hope you enjoy 🙂

The Meatballs:

  • 3 lbs Ground Turkey
  • 2 Large Eggs
  • 1 Cup Gluten Free Seasoned Bread Crumbs
  • 1/8 Cup + 1 Tablespoon Worcestershire sauce
  • 2 Tablespoons (heaping) Ranch Dressing Powder Mix (I use Hidden Valley Ranch)
  • 1/4 Cup Light Brown Sugar (I do not pack this)
  • 2-3 Pinches Ground Black Pepper

The Spicy Avocado Sauce:

  • 1 Large Ripe Avocado (seed removed and sliced into smaller pieces)
  • 2/3 Cup Mayonnaise (I use Hellmann’s Mayonnaise)
  • 2/3 Cup Buttermilk or Buttermilk Substitute (Since Buttermilk is difficult to find right now, you can make your own: pour 1 Tablespoon White Vinegar (or Lemon Juice) in a 1 Cup measuring cup, then add milk of your choice to fill remaining cup (I used Plain Rice Milk))
  • 3-4 tsp Onion Powder
  • 3 tsp Garlic Powder
  • 1 tsp Kosher Salt
  • 1 tsp Paprika
  • 1/2 tsp Cayenne Pepper
  • 1/2 tsp Ground Black Pepper
  • Dried Parsley (for sprinkling on top)

Making the Meatballs:

  1. Gather the meatball ingredients.
  2. Preheat oven to 375 degrees.
  3. Line 2-3 baking sheets with parchment paper. Set aside.
  4. In a large mixing bowl, combine all of the Turkey Meatball ingredients and mix very well, either with a fork or your hands.
  5. Using a 2″ cookie scooper (or spoon), scoop turkey mixture onto the prepared baking sheets (16 meatballs per sheet). You may either form the meatballs using your hands or just drop meatballs directly onto sheet using the cookie scooper.
  6. Bake for 16-18 minutes, or until inside temperature measures 165 degrees (I usually cut the center-most meatball in half to check for any pinkness).

Making the Spicy Avocado Dipping Sauce:

  1. Gather the Avocado ingredients.
  2. While the meatballs are cooking, blend the Avocado ingredients (except for the Parsley) in a blender or food processor until smooth and creamy.
  3. Pour into serving bowl and top with dried Parsley. Refrigerate until ready to serve.
  4. Once the meatballs are cooked, drizzle some Spicy Avocado Sauce over the tops and serve with your favorite veggie! Yum!!!

*Thank you to californiaavocado.com for sharing the Spicy Avocado Ranch Dressing recipe…I made a few minor adjustments 😉

Appetizers, Dinner, Hors d’Oeuvres, Lunch, Main Dish
American


Stovetop Chicken in an Indian Curry Sauce

Stovetop Chicken in an Indian Curry Sauce

My mouth was watering just smelling this sweet and savory light Indian Curry Sauce simmering on the stove! The spices, cream and honey meld together perfectly into the most fragrant and delectable sauce that I have ever tasted 🙂 This yummy sauce pairs nicely with just about any vegetable, protein and/or starch. I hope you enjoy it!

The Curry Sauce:

  • 1/4 Cup Vegetable OIl (I used Canola Oil)
  • 1 Medium Onion, Finely Chopped (I used a Vidalia Onion)
  • 3 tsp Minced Garlic (I use the already minced Garlic in a jar)
  • 1/2 tsp Ground Ginger
  • 2 Tbsp Curry Powder (I used Madras Curry for a little bit more heat)
  • 3 1/2 Cups Chicken Broth
  • 1 Cup Heavy Cream (You can also use Half & Half or Whole MIlk)
  • 1 Tbsp Gluten Free Cornstarch
  • 2 heaping tsp Honey
  • 2-3 Pinches Salt
  • 2-3 Pinches Ground Black Pepper

The Chicken:

  • 4 Boneless, Skinless Chicken Breasts (Rinsed, trimmed and patted dry with a paper towel)
  • 1-2 Tbsp Salted Butter
  • 1-2 Tbsp Canola Oil
  • Salt & Pepper (Sprinkled over both sides of Chicken)

Making the Curry Sauce:

  1. Gather ingredients.
  2. In a medium-sized heavy saucepan, heat the Canola Oil over Medium heat.
  3. Add the finely chopped onion and cook for about 5 minutes, or until onion is translucent.
  4. Stir in the Garlic, Ginger and Curry and cook until fragrant (1-2 minutes).
  5. Add the Chicken Broth and stir well. Reduce heat to Low and simmer for about 20 minutes to reduce the mixture a little.
  6. While the broth is reducing, whisk the Cream, Cornstarch and Honey together in a small bowl until completely blended and smooth.
  7. Slowly whisk the Cream mixture into the Chicken Broth mixture, combining the ingredients completely. Simmer for about 5 minutes. Add a few pinches of Salt and Pepper to taste.
  8. Keep the sauce warm while cooking the chicken.

Cooking the Stovetop Chicken:

  1. In a large skillet, heat the Butter and Oil over medium-low heat until the butter is completely melted and bubbling.
  2. Add the Chicken Breasts, sprinkling with Salt & Pepper on both sides. Cook on each side for about 5-7 minutes per side, making sure that both sides are a light golden brown (internal temperature should be 165 degrees)
  3. Once the Chicken Breasts are nicely browned on both sides, use a ladle to spoon several scoops of sauce over the Chicken Breasts in the skillet. Turn the breasts over to thoroughly coat in the sauce.
  4. Serve the Chicken Breasts whole with your favorite side and vegetable and more sauce drizzled over the top…or cut up into bite-sized pieces and serve over Rice and with Steamed Broccoli and more yummy sauce!!!
    Enjoy!
Dinner, Main Dish
Indian


Salmon with Orange-Lime Glaze

Salmon with Orange-Lime Glaze

This quick and easy recipe for baked Salmon turns out tender and sweet, with just a touch of heat, every time. My family LOVES Salmon, so I am always trying out new ways to prepare it. Enjoy! 🙂

Salmon

  • 1 lb Fresh Salmon
  • 1/4-1/2 tsp Kosher Salt (I do not measure this, but I just use a couple of pinches)
  • 1/4 tsp Freshly Ground Pepper (Again, I do not usually measure this, but I grate a light coat of the Pepper over the Salmon)

Glaze

  • 1/2 Cup Orange Marmalade
  • 1 Lime Lime Zest (2 teaspoons)
  • 1 Lime Juice of 1 Lime (2-3 teaspoons)
  • Pinch Red Cayenne Pepper, powdered (I use a generous pinch for a little extra heat.)
  1. Preheat oven to 425 degrees.
  2. Line a baking sheet with foil and spray with non-stick cooking spray. Set aside.
  3. Gather the ingredients.
  4. Rinse and pat dry the Salmon. Place, skin side down, onto the prepared baking sheet. Evenly sprinkle with the Salt and Pepper. Set aside while you prepare the glaze.
  5. In a small bowl, combine the Orange Marmalade, Lime Zest, Lime Juice and Cayenne Pepper. Mix until completely blended. Taste to see if any adjustments are needed (Note: the heat of the Red Cayenne Pepper comes through as it cooks, so be careful adding too much 😉 ). Reserve 1/2 of this glaze for serving with cooked Salmon.
  6. Spread half of the Glaze over the top and sides of the Salmon, coating evenly.
  7. Bake for 15-18 minutes, depending on the thickness of the fillet.
  8. Serve with the reserved glaze and your favorite sides. Enjoy!

Note: I sometimes pan-sear the Salmon in a little bit of Olive Oil and Butter before adding the glaze and baking in the oven.

Dinner, Main Dish
American


Rustic Strawberry Tart (Gluten Free)

Rustic Strawberry Tart (Gluten Free)

We look forward to Spring every year because we get to make jam, jelly, frozen yogurt pies and yummy tarts with our buckets of fresh, plump Strawberries! This recipe was adapted from two of my favorite cooks/bakers/chefs….Ree Drummond (aka: The Pioneer Woman) and Kim (“letthemeatgfcake”). I simply swapped out the “regular” pie crust with Kim’s recipe for Gluten Free Pie Crust and filled it with a GF version of Ree’s Strawberry Filling. Topped with freshly whipped cream, this tart is out of this world!!! Enjoy 🙂

The Gluten Free Pie Crust:

  • 1 1/2 Cups Unsalted Butter (Chilled and Cut into 1/2″ pieces)
  • 3 Cups Gluten Free All-Purpose Flour Blend (this blend must include Xanthan Gum )
  • 1 Large Egg (beaten)
  • 1 Tbsp White Vinegar
  • 7-9 Tbsp Ice-cold Water
  • 1 tsp Salt
  • 1 Large Egg (for outside of crust)
  • 1 Tbsp Water (for outside of crust)

The GF Strawberry Filling:

  • 4 Cups Strawberries (cut into bite-size pieces)
  • 1/2 Cup Granulated Sugar
  • 2 Tbsp All-Purpose Gluten Free Flour (plus more for dusting work surface)
  • 1 tsp Vanilla Extract
  • 1 tsp Lemon Zest
  • 1 tsp lemon juice
  • 1/3 Cup Orange Marmalade (This is for using as a glaze for the strawberry filling; you can use just about any preserves, jams or marmalades that you have in your frig ;))
  • Splash Water

The Fresh Whipped Cream:

  • 1 Cup Heavy Whipping Cream (cold)
  • 3-4 Tbsp Powdered Sugar
  • 1 tsp Vanilla Extract

Making the GF Pie Crusts:

  1. NOTE: This recipe makes 2 pie crusts. You can refrigerate any unused & uncooked dough for up to 3 days, or freeze it for up to 3 months, well wrapped. To thaw the dough, move it to the refrigerator overnight, then let dough warm a little for about 20-30 minutes at room temperature.
  2. Gather the ingredients for the pie crusts.
  3. In a food processor, pulse together the GF Flour Blend and Salt until well combined.
  4. Next, add the Cold Butter pieces to the food processor and pulse until the butter is in large chunks.
  5. Add the Beaten Egg and Vinegar to the Butter/Flour mixture and pulse until just combined.
  6. Slowly add the Ice-cold Water, 1 Tablespoon at a time, to the dough mixture while pulsing. Note: depending on the humidity, you may not need all of the water. Pulse until the dough comes together.
  7. Divide the dough in half (I weigh mine) and wrap each half in plastic wrap, flattening the dough into discs. Refrigerate for at least 30 minutes.

Making the Strawberry Filling (while the Pie Dough is chilling):

  1. Gather the ingredients for the filling.
  2. Place one of your oven racks in the center position and preheat oven to 400 degrees.
  3. In a large bowl, combine the cut-up Strawberries, Sugar, GF Flour, Vanilla Extract, Lemon Zest and Juice until the Strawberries are well coated. Set aside while you roll out the pie dough.
  4. Lightly flour a piece of parchment paper and place one of the pie dough discs on top. Using a rolling pin, roll the dough out into an oval shape about 19″ x 11″ (thickness of dough should be about 1/4″).
  5. Transfer the rolled-out dough and the Parchment Paper to a baking sheet and spoon the Strawberry filling onto the center of the dough. Spread the filling evenly out, leaving a 1-2″ border of dough.
  6. Very gently fold the edges of the dough over the Strawberries, pinching together any folds in the dough.
  7. In a small bowl, whisk together 1 Large Egg and 1 Tbsp of water. Brush this egg wash onto the folded edges of the dough.
  8. Bake on the center rack for about 30 minutes, rotating the pan halfway through to evenly bake.
  9. While the tart is baking, warm the Preserves (or Jam/Jelly/Marmalade) with a splash of water (to help the Preserves spread).
  10. Once the crust is a golden brown, remove the Tart from the oven and gently brush the Strawberry filling with the warmed Preserves. Cool completely.

Making the Whipped Cream:

  1. Using a Stand Mixer, fitted with the Whisk attachment, whisk the Heavy Whipping Cream, Powdered Sugar and Vanilla Extract on Medium-High until soft peaks have formed.
  2. Serve the cooled Tart with a large dollop of freshly made Whipped Cream and watch it disappear!
Desserts, Lunch, Snacks
American


Garlic-Parmesan Asparagus

Garlic-Parmesan Asparagus

We are BIG fans of Asparagus, so I am always trying new ways to prepare this wonderful vegetable! This recipe is SO quick, easy and delicious that you will be wishing you had made more 😉 Enjoy!

  • 1 Bunch Asparagus (If you love Asparagus as much as we do, you may want to make 2 bunches)
  • 1-2 Tbsp Olive Oil
  • Kosher Salt (as much or as little as you desire)
  • Ground Pepper (as much or as little as you desire)
  • 2 tsp Garlic, chopped (I use the already prepared chopped Garlic in the jar)
  • 2-4 Tbsp Grated or shredded Parmesan (I use both – Grated for mixing with the Garlic and Shredded for topping before serving)
  1. Preheat oven to 400 degrees.
  2. Gather the ingredients.
  3. Line a baking sheet with foil and spray with non-stick cooking spray. Set aside.
  4. Rinse Asparagus in cold water and pat dry with paper towels.
  5. Spread the Asparagus onto the prepared baking sheet in a single layer. Drizzle or brush (I brush to coat more evenly) the Olive Oil over the Asparagus. Sprinkle with Kosher Salt and Pepper, coating evenly.
  6. Bake the Asparagus for about 8-10 minutes on the middle rack.
  7. While the Asparagus is baking, mix the Garlic and Grated Parmesan together in a small bowl.
  8. Sprinkle the Garlic-Parmesan mixture evenly over the Asparagus. Bake for another 5-7 minutes, or until Parmesan Cheese is melted.
  9. Sprinkle more Shredded or Grated Parmesan over the Asparagus and serve with your favorite dish! Yummy 🙂
Appetizers, Dinner, Hors d’Oeuvres, Lunch, Main Dish, Side Dish


Honey-Ginger Pork Tenderloin

Honey-Ginger Pork Tenderloin

This wonderful dish has quickly become one of our regular Favorite meals! It turns out tender and very flavorful every time 🙂 It’s SO easy to prepare and goes well with just about any side dish. I usually marinate two tenderloins at a time – one for that day’s meal and one to freeze for later (perfect for those days when you just don’t feel like cooking). A HUGE “Thank You” to www.thechunkychef.com for sharing this incredible recipe 🙂

  • 1 Pork Tenderloin (trimmed, rinsed and patted dry with paper towels)
  • 1/2 Cup Honey
  • 1 1/2 Tbsp Fresh Ginger, grated
  • 2 Tbsp Fresh Lemon Juice (or bottled)
  • 2 1/2 Tbsp Soy Sauce (I use the Low-sodium variety)
  • 2 tsp Garlic, minced (I use the all-ready minced Garlic in the jar)
  • Pinch Cayenne Pepper
  • Kosher Salt (to taste)
  • Ground Black Pepper (to taste)
  • 1-2 Tbsp Olive Oil (for searing)
  • Fresh, Chopped Parsley (garnish)
  1. Gather the ingredients.
  2. Place the trimmed, rinsed and patted dry Pork Tenderloin into a large Ziploc baggie. Set aside.
  3. In a small/medium bowl, combine the Honey, Ginger, Lemon Juice, Soy Sauce, Garlic and spices. Whisk/mix until well combined.
  4. Pour half of the marinade into the baggie with the Pork and seal. Let marinate in refrigerator for 4-24 hours. Reserve the other half in an airtight container in the refrigerator for later.
  5. When ready to bake the pork, preheat oven to 400 degrees.
  6. Line a baking sheet with foil and set aside.
  7. Remove the reserved marinade from refrigerator and set aside.
  8. In a large skillet, heat the Olive Oil over Medium to Medium-High heat.
  9. Once the oil is heated, remove the Pork Tenderloin from the marinade and place into the heated oil/pan. Sear all sides of the tenderloin until a light golden brown.
  10. Place the seared Pork onto the prepared baking sheet and bake for about 15 minutes, or until inside temperature of Pork reaches 132-134 degrees.
  11. Evenly brush the Pork with the reserved marinade and continue baking for 5-7 more minutes, or until inside temperature reaches 140 degrees. Note: you may broil the Pork on High for a couple of minutes instead of continuing to bake, if desired.
  12. Remove the Pork from the oven and cover loosely with foil. Let rest for about 5 minutes – pork will continue to cook and should register 145 degrees with light pink insides (see photo).
  13. Brush the Pork with run-off marinade from baking sheet and sprinkle the top with the Fresh, Chopped Parsley. Slice into desired thickness and serve with your favorite sides and veggies. Enjoy!

Note: If you’re preparing 2 Tenderloins, simply double all ingredients.

Dinner, Lunch, Main Dish
American, Asian