Copycat Cheez-It Cheddar Cheese Crackers ~ Gluten Free

Copycat Cheez-It Cheddar Cheese Crackers ~ Gluten Free

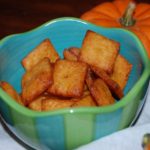
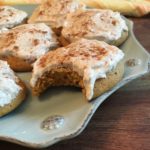
These are the yummiest Gluten-Free Cheese Crackers I have EVER tasted!!! They taste just like Cheez-It crackers! Plus, they are SO easy to make and only 6 ingredients are needed 🙂 I love them with my Roasted Red Pepper and Tomato soup…or just by themselves! A big bag of these yummy crackers would make a perfect treat for anyone.
*This recipe was adapted from a Ree Drummond (aka: “The Pioneer Woman”) recipe (“Homemade Cheddar Crackers”)…of course! Thank you SO much for sharing!

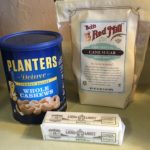
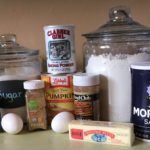
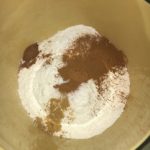
  • 2 Cups Sharp Cheddar Cheese (Shredded)
  • 1 Cup Gluten Free All-Purpose Flour Blend (I use Caputo brand – it’s a little more expensive, but well worth it – it performs like “regular” flour and is not gritty)
  • 4 Tbsp Salted Butter (Kept cold & cut into small pieces)
  • 1/2 tsp Kosher Salt
  • 1/2 tsp Seasoned Salt (I use Season-All)
  • 3 Tbsp Ice Water
  1. Place all of the ingredients, except for the Ice Water, into a Food Processor and pulse until the mixture looks like sand.
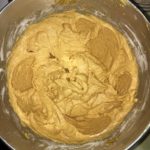
  2. With the Food Processor running, slowly add the Ice Water, one Tablespoon at a time, through the shoot until the dough forms a ball.
  3. Wrap the Cheese-dough ball in plastic and refrigerate for 1 hour.
  4. When ready to bake, preheat oven to 350 degrees.
  5. Line 1-2 baking sheets with silicone baking mats or parchment paper; set aside.
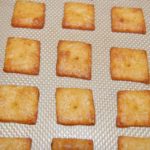
  6. Roll out the dough to 1/4″ thickness and cut into desired-size squares using a pizza cutter ~ I use a straight-edge ruler and usually cut my dough into 1″ x 1″ squares.
  7. Place the squares onto the lined baking sheets.
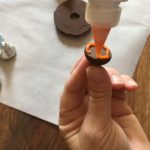
  8. Using the smaller end of a chop stick or wooden skewer, poke a small hole into the center of each square.
    Note: If desired, you can sprinkle the crackers with a little kosher salt at this stage, but they really do not need it 😉
  9. Bake the crackers for 15-18 minutes or until golden brown; I bake mine for the maximum amount of time since I prefer mine on the more crispy side.
  10. Allow to cool completely to fully develop the flavors and desired crispiness.
  11. Enjoy with your favorite soup, salad or all on their own 🙂
  12. Note: if your crackers get soft, simply toss them onto a baking sheet and re-heat in a 275 degree oven for about 8-10 minutes.
Appetizers, Hors d’Oeuvres, Lunch, Snacks, Soup


Frosted Pumpkin Spice Cookies ~ Gluten Free

Frosted Pumpkin Spice Cookies ~ Gluten Free

This is an updated version of my post from last year (2019), which was not a GF recipe. Fear not….this IS a Gluten Free recipe for soft, sweet and delicious Frosted Pumpkin Cookies. These wonderful little treats are mildly flavored with a blend of spices that you can adjust to satisfy your personal taste. Please let me know what you think 🙂

The Cookie:

  • 3 1/2 Cups Gluten Free All-Purpose Flour Blend (I used Better Batter brand)
  • 1 tsp Baking Powder, GF
  • 1 tsp Baking Soda
  • 1/2 tsp Table Salt
  • 2 1/2 tsp Cinnamon (increase to 3 tsp if you want a spicier taste)
  • 1/2 tsp Nutmeg (increase to 3/4 – 1 tsp for a spicier taste)
  • 1/4 tsp Ground Ginger (increase to 1/2 tsp for a spicier taste)
  • 1 Cup Dixie Crystals Extra Fine Granulated Sugar
  • 1 Cup Light Brown Sugar (packed)
  • 1 Cup Vegetable Oil (I use Canola Oil)
  • 2 Cups Canned Pumpkin Puree
  • 2 Large Eggs (lightly beaten)
  • 1 tsp Vanilla Extract (GF)

The Frosting:

  • 1 Cup Cream Cheese, softened (I use Philadelphia Cream Cheese (full fat))
  • 1/2 Cup Salted Butter, Softened
  • 3 tsp Vanilla Extract (GF)
  • 4 Cups Powdered Sugar
  • 1 tsp Ground Cinnamon

Making the Cookies:

  1. Line cookie sheet/sheets with parchment paper or silicone baking mats; set aside.
  2. Gather the ingredients.
  3. In a Large mixing bowl, sift together the GF Flour, Baking Powder, Baking Soda, Salt and Spices; Mix well; Set aside.
  4. In another Large mixing bowl, combine the Sugars, Oil, Pumpkin, Eggs and Vanilla Extract until completely blended.
  5. Gradually add the dry ingredients, one cup at a time, to the wet ingredients and mix until smooth.
  6. Cover bowl with plastic wrap or dish cloth and let rest for 30 minutes. This allows the GF Flour to absorb the moisture from the wet ingredients which reduces (hopefully, eliminates!) the grainy texture.
  7. When ready to bake the cookies, place oven rack in the middle position and preheat oven to 350 degrees.
  8. Using a Small cookie scoop (or medium, if you want larger cookies) scoop out the cookie dough onto the prepared baking sheets.
  9. Spray the back of a spoon with non-stick cooking spray and use the spoon to flatten the cookie mounds (re-apply spray as often as needed).
  10. Bake for 10-12 minutes.
  11. Let cookies cool on cookie sheet for 1-2 minutes before transferring to a wire rack to cool completely before frosting.

Making the Frosting:

  1. While the cookies are baking and cooling start making the frosting…
  2. Using a Handheld or Stand Mixer, beat the softened Butter, Cream Cheese and Vanilla Extract until well-blended.
  3. Gradually add the Powdered Sugar, one cup at a time, mixing until completely blended and creamy.
  4. Add the Ground Cinnamon and Mix thoroughly.
  5. You’re ready to frost the cookies and enjoy!

Note: The original recipe that I posted in 2019 was from “Two Sisters Crafting,” which I have updated so it is now GF, thanks in large part to “amyin the kitchen.com 🙂 I just love converting and joining recipes to see what the end results will be! Thanks so much for sharing your wonderful recipes!!!

Desserts, Snacks
American


Gluten Free Monster Cookies

Gluten Free Monster Cookies

Inspired by Ree Drummond’s “Monster Cookies” recipe! To make these incredibly delicious cookies Gluten Free and Allergy-Friendly for my family, I just swapped out a few of the ingredients, decreased the oven temperature and baking time and voila! These are the BEST Gluten Free cookies that I have converted from a “regular” recipe 🙂 They are just the right blend of sweet, savory, chewy AND crunchy!
A HUMONGOUS “Thank You” to Ree Drummond (aka: The Pioneer Woman) for sharing her “Monster Cookies” recipe!!!

  • 2 Sticks Salted Butter, Softened ((16 Tbsps) I used “Land O Lakes”)
  • 1/2 Cup Granulated Sugar
  • 1 1/2 Cups Light Brown Sugar (Firmly packed)
  • 2 Large Eggs
  • 1 Tbsp Vanilla Extract
  • 1 1/2 Cups All-Purpose Gluten Free Flour, Sifted (I used “King Arthur” Brand)
  • 1 1/2 tsp Salt
  • 1 tsp Gluten Free Baking Powder (I use “Clabber Girl” brand)
  • 1/2 tsp Baking Soda
  • 1 1/2 Cups Oats (I used “Quaker” Old Fashioned Oats)
  • 1 Cup Chocolate Coated Candies (I used “M&M’s”)
  • 3/4 Cup Mini Chocolate Morsels (I used “Enjoy Life” semi-sweet mini chips)
  • 2 1/4 Cups Rice Cereal (I used “Rice Krispies” cereal)
  • 1/2 Cup Chopped Pecans ((Optional) I did not include these due to allergies)
  1. Preheat oven to 350 degrees.
  2. Line cookie sheet with a Silpat Baking Pad or parchment paper. Set aside.
  3. Using a Stand Mixer fitted with the Paddle attachment, cream together the Butter and Sugars until light and fluffy (about 2 minutes).
  4. Add the eggs, one at a time, mixing well. Add the vanilla and continue mixing until all is blended, scraping down sides of bowl as needed.
  5. In a separate bowl, combine the Sifted GF Flour, Salt, Baking Powder and Baking Soda.
    Note: please be sure to sift the flour since it helps prevent grittiness.
  6. Add the Flour mixture to the Butter mixture. Mix until well-combined.
  7. Next, add the Oats and Chocolate Chips and mix until incorporated. Note: add the chopped nuts now if you’re including them.
  8. Lastly, add the M&M Candies and Rice Cereal and mix well using a large, sturdy spoon.
  9. Using a 2 Tbsp cookie scoop, drop dough balls at least 2″ apart onto the prepared cookie sheet. I only placed 8 cookie dough balls on each baking sheet.
  10. Bake in preheated oven for 10-14 minutes, rotating pan halfway through. Cookies are done when they turn a light golden brown.
  11. Let cookies cool for a couple of minutes on baking sheet, before transferring to a wire cooling rack.
  12. These cookies store well in an airtight container for 3-5 days, if they last that long! They also ship well…I send these cookies to one of my daughters, who states that they arrive looking like they were just baked 🙂

Desserts, Snacks


Easy 3-Ingredient Candied Cashews

Easy 3-Ingredient Candied Cashews

This is the easiest and yummiest recipe for Candied Cashews!!! Only 3 ingredients, about 15 minutes and these delicious morsels are ready to enjoy…..well, you have to wait a few minutes for them to cool before you pounce on them! These are perfect for snacking, giving as gifts or topping your favorite ice cream 🙂
A BIG “Thank You” to www.saltandlavender.com for sharing this wonderful treat!!!

  • 2 Tbsp Salted Butter
  • 1 Cup Granulated Sugar
  • 2 Cups Cashews (I used Lightly Salted)
  1. Gather the ingredients.
  2. In a medium to large nonstick skillet, melt the butter over medium-low heat.
  3. Once the butter is melted, add the sugar and cashews.
  4. Cook over low to medium-low heat until sugar has completely melted, stirring often to completely coat the cashews and to prevent mixture from burning.
  5. Turn out onto a sheet of parchment paper to let cool.
  6. Enjoy as a snack, as a topping on ice cream or mixed in with your favorite yogurt…or give as a special gift!
Desserts, Snacks


Halloween Witch’s Hat Cookies

Halloween Witch’s Hat Cookies

These are the easiest Halloween Treats to make! You just need three ingredients, a decorating tip and a somewhat steady hand. I made these every year for each of my children’s classrooms and they were always a hit with the kids :).

  • 1 24-Pack Keebler Fudge Stripe Original Fudge Stripe Cookies
  • 24 Hershey Kisses (I used the Regular Milk Chocolate ones, but you may use any flavor you desire)
  • 1-2 4 oz Tubes Decorating Icing (I used Orange and Yellow, but again choose any colors you want)
  • 1-2 #2 Tiny Round Decorating Tip
  1. Gather the ingredients
  2. Pipe around the bottom of a Hershey Kiss with the decorating icing.
  3. Place the Hershey Kiss rightside up on top of solid chocolate side of the Fudge Stripe cookie and press gently to secure.
  4. Next, “draw” a bow with the decorating frosting on the Hershey Kiss and cookie (see photo).
  5. Repeat with the rest of the cookies and Kisses until done. I usually make enough for each child/adult to have 2 cookies.
  6. I hope you and your family enjoy these as much as we do!

Unfortunately, I injured my right hand…so my bows aren’t as neat as they used to be ;).

Desserts, Snacks


Frosted Pumpkin Spice Cookies

Frosted Pumpkin Spice Cookies ~ Gluten-Free

These cookies are amazing! Soft, sweet and spicy…just my kind of cookie :). Plus, they’re so easy to make and they freeze really well! Perfect Autumn treat! A HUGE “thank you” to “Two Sisters Crafting” for sharing this wonderful recipe!!! I did make a few changes to the recipe to make them Gluten-Free and allergy-friendly for my family 🙂

Pumpkin Spice Cookies

  • 1/2 Cup Butter, salted (Softened )
  • 1 Cup Granulated Sugar
  • 1 Cup Canned Pumpkin
  • 2 Large Eggs
  • 2 Cups All-Purpose Gluten-Free Flour ~ I used Krusteaz GF
  • 4 teaspoons Baking Powder
  • 1 teaspoon Salt
  • 2 1/2 teaspoons Cinnamon
  • 1/2 teaspoon Nutmeg
  • 1/4 teaspoon Ginger

Cream Cheese Frosting

  • 8 oz. Cream Cheese ((1 cup) softened)
  • 1/2 Cup Butter, salted (softened)
  • 3 teaspoons Vanilla Extract
  • 4 Cups Powdered Sugar
  • 1 teaspoon Cinnamon

Making the Pumpkin Spice Cookies

  1. Preheat oven to 350 degrees.
    Gather the ingredients.
  2. Line a cookie sheet with parchment paper or use a silicone mat. Set aside.
  3. Using a Handheld or Stand Mixer, combine the softened butter and sugar. Mix until light and fluffy.
  4. Add eggs and pumpkin. Mix thoroughly.
  5. In a separate bowl, combine the flour, baking powder and spices. Mix thoroughly.
  6. Gradually add the flour mixture to the pumpkin mixture and blend well.
  7. Using a spoon or a Medium-sized scoop (makes 2″ size balls), drop cookie batter onto the prepared cookie sheet.
  8. Bake for 12-15 minutes (cooking time varies by oven). Cool on pan for 1-2 minutes before transferring to a cooling rack to cool completely before adding the frosting.

Making the Cream Cheese Frosting

  1. Using a Handheld or Stand mixer, beat the butter, cream cheese and vanilla until well-blended.
  2. Gradually add the powdered sugar 1 cup at a time, mixing until well-blended and creamy.
  3. Add the Cinnamon and mix thoroughly.
  4. Frost the cooled cookies and enjoy!

These cookies freeze really well – I placed about a dozen in a plastic container and froze them. They thaw out perfectly for midmorning snacks and school lunches!

Desserts, Snacks