Instant Pot Turkey Chili

Instant Pot Turkey Chili

I don’t think that there is anything better than a hot bowl of Chili and fresh Corn Bread on a cold afternoon! Plus, making it in an Instant Pot brings this delicious Chili to fruition in about 30 minutes (prep and cook time!) I hope you enjoy this yummy Turkey Chili as much as we do 🙂
A HUGE “Thank You” to Olena @ ifoodreal.com for sharing the original version of this wonderful recipe – due to multiple food allergies I had to make some changes and omissions to her recipe.
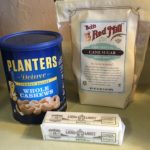
  • 1-2 Tbsp Canola Oil
  • 2 lbs Ground Turkey
  • 2 Cups Beef Broth (you can use any other broth desired)
  • 3 tsp Garlic, minced (I use the garlic in a jar, found in the produce section)
  • 1/2 Large Vidalia Onion, chopped
  • 1 15 oz. Can Corn (If you like Corn, use 2 cans)
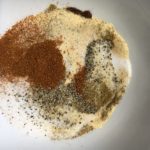
  • 4 Tbsp Chili Powder
  • 2 tsp Ground Cumin
  • 2 tsp Dried Oregano, Chopped
  • 1 tsp Paprika
  • 1 tsp Salt
  • 2 15 oz. Can Tomato Sauce
  • 1 12 oz. Can Tomato Paste (add more if you like a really thick chili)
  1. Gather all ingredients.
  2. In a 6-qt (or 8-qt) Instant Pot, add the 1-2 Tbsp Canola Oil and put in the “Saute” mode until the oil starts to shimmer.
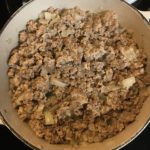
  3. Swirl the Oil around to coat the bottom of the pot and add the Ground Turkey, breaking it up into smaller pieces; cook for 4-5 minutes (it does not have to cook completely at this stage).
  4. Add the Broth and press the “Cancel” button to turn the Instant Pot off.
  5. Next, add the Garlic, Onion, Corn, all of the Spices, Tomato Sauce and Tomato Paste: do NOT stir! (the bottom will Burn if you stir).
  6. Place the lid on the Instant Pot and seal; press the “Pressure Cook” button and make sure it’s on “High” – set for 15 minutes.
  7. After the 15 minutes cook time is up, release the pressure by turning or pressing down the Quick Release valve (this will take about 2-3 minutes)
  8. Once the Instant Pot has de-pressurized, remove the lid and stir thoroughly.
  9. Serve hot with your favorite toppings and some fresh Corn Bread or crusty French Bread 🙂

Store any leftovers in a airtight container in the refrigerator for 4-5 days.

You can also freeze fully cooked and cooled chili in an airtight container for up to 3 months; thaw on the stovetop on Low.

Dinner, Lunch, Main Dish, Soup, Stew


Spicy Cheddar Cheese Crackers ~ Gluten Free (Just Like “Cheese Straws”)

Spicy Cheddar Cheese Crackers ~ Gluten Free (Just Like “Cheese Straws”)

Do you remember those wonderful “Cheese Straws” that were always around in abundance during the Holidays? Well, these little “Spicy Cheddar Cheese Crackers” will take you right back to your childhood! And, if you’re Gluten-Free, fear not, these are not only Gluten-Free, but are so easy to make and only require 7 ingredients (if you include water) 😉 I chose to cut my dough into leaf shapes for the Autumn season, but any shape will do (Christmas Trees, Snowmen, Wreaths, Holly Leaves, etc.) These make the perfect little Holiday Gifts 🙂
Enjoy!!!
Note: The original non-GF recipe can be found in just about every cookbook out there, but I want to give credit to Ree Drummond (aka: “The Pioneer Woman”) for her non-gf version of this recipe that I adapted to “fit” our family (please see the “Copycat Cheez-It” version for the GF and non-spicy recipe for these same crackers) 😉

  • 2 Cups Sharp Cheddar Cheese
  • 1 Cup GF All-Purpose Flour (I use “Caputo” brand – it makes an incredible dough to work with)
  • 4 Tbsp Salted Butter (cold and cut into small pieces)
  • 1/2 tsp Kosher Salt
  • 1/2 tsp Seasoned Salt (I use “Season All”)
  • 1/8-1/4 tsp Cayenned Pepper (I use 1/4 tsp for a little more “kick”)
  • 3 Tbsp Ice Water
  1. Place all of the ingredients, except for the Water, into a Food Processor and pulse until the mixture looks like “sand.”
  2. With the Food Processor running, slowly add the Ice-Cold Water, one Tbsp at a time, through the shoot until the dough forms a large ball.
  3. Wrap the Cheese dough ball in plastic and refrigerate for 1 hour.
  4. When ready to bake, preheat oven to 350 degrees.
  5. Line 1-2 baking sheets with Parchment Paper or Silicone Baking Mats; set aside.
  6. Roll the dough out to 1/4″ thickness on a lightly floured surface, cut into desired shapes and place on the prepared baking sheets.
  7. Bake for 15-18 minutes or until golden brown.
    *See notes for “crisping” up crackers if they turn soft.
  8. Allow the crackers to cool completely on a wire rack to develop the flavors and desired crispness.
  9. Enjoy 🙂

*Note: if your crackers get a little soft, simply toss them onto a baking sheet and re-heat in a 275 degree oven for about 8-10 minutes. Let cool and gobble them up!

Appetizers, Hors d’Oeuvres, Snacks


“Instant Pot” Beef Pot Roast

“Instant Pot” Beef Pot Roast

This recipe takes me right back to my childhood! I LOVED Pot Roast…and still do, but I don’t care for the taste of the pre-packaged Pot Roast seasoning mixes, nor do I like the LOOOONG wait while cooking in my slow cooker. Enter the Instant Pot! I hate to admit that a small Kitchen appliance could intimidate me, but the Instant Pot did. However, thanks to Tiffany @ lecremedelacrumb, I put my big girl pants on and broke out last year’s Christmas gift…the Instant Pot! Her recipe for “Instant Pot” Pot Roast is out of this world AND it’s ready in a little over 1 hour (depending on the size of your roast). I am ready to conquer many more recipes using my Instant Pot (my family also thanks you, Tiffany!)
I hope those of you who are afraid of your Instant Pots will try this recipe and see exactly what I mean 🙂

The Roast:

  • 3-5 lb Beef Chuck Roast
  • 1-2 Tbsp Canola Oil
  • 1 tsp Salt
  • 1 tsp Onion Powder
  • 1 tsp Garlic Powder
  • 1/2 tsp Ground Black Pepper
  • 1/2 tsp Paprika
  • 1 lb Baby Yukon Potatoes (or Baby Red Potatoes, Idaho (cut into bit-size pieces))
  • 4 Large Carrots (cut into bite-size pieces or Baby Carrots)
  • 1 Large Vidalia Onion (or Red, Yellow; cut into large chunks)
  • 4 Cups Beef Broth (Regular or Reduced Sodium; a 32 oz (2 lb) box)
  • 2 Tbsp Worcestershire sauce

The Slurry to make Gravy:

  • 1/4 Cup Water
  • 2 Tbsp GF Corn Starch
  1. In a small bowl, combine the spices (salt, onion and garlic powders, black pepper and paprika) and rub all over the Chuck Roast; set aside.
  2. Set your Instant Pot to “Saute” and drizzle in the Canola Oil; let heat for about 30 seconds, then place the Roast into the Instant Pot – do not disturb for 3-4 minutes until that side is browned; using tongs and a long meat fork, turn the Roast onto the next side and let “saute” for 3-4 minutes without disturbing; repeat this process until all sides are browned/seared.
  3. Once all sides of Roast are browned (to seal in the juices), turn the Instant Pot to “Pressure Cook” on “high” for 60-80 minutes (60 minutes for a 3 lb. Roast; 70 minutes for 4 lbs and 80 minutes for 5 lbs).
  4. Add the Onion, Beef Broth and Worcestershire Sauce to the Instant Pot and place lid on top, turning to the “locked” position.
  5. When the pressure cooking time is finished for the Roast, allow the Instant Pot to do a natural release for 10 minutes (it will start counting up in minutes – do not disturb the pot and allow it to de-pressurize); after the 10 minutes, press the vent down (or turn to the release position, depending on your make of Instant Pot) and allow all of the steam to release until the float valve drops down, indicating that the pot is de-pressurized and it’s safe to remove the lid.
  6. Next, add the Baby Potatoes and Carrots and, once again, set to “pressure cook” for 10 minutes.
    *Note: if you put the potatoes and carrots in at the beginning of the cooking process (along with the Roast and onions), they will be VERY mushy.
  7. Once the 10 minutes are up, press or turn the vent to the release position to allow steam to release again.
  8. Once the Instant Pot has de-pressurized and the float valve has dropped, remove the lid and carefully transfer the Roast, Potatoes, Carrots and Onions to a serving platter; shred the roast with two forks; set aside.
  9. Using a slotted spoon or handheld strainer, remove any bits from the broth in the Instant Pot; turn setting to the “Soup/Stew” position and let broth come to a boil.
  10. Meanwhile, make a “slurry” out of mixing the Water and Corn Starch thoroughly together in a small bowl.
  11. Once the broth in the Instant Pot is boiling, add the “slurry” and whisk until the liquid thickens to form a gravy; add salt, pepper and onion powder, if needed.
  12. Drizzle desired amount of the gravy over the shredded Pot Roast and Veggies; Garnish with fresh Thyme or Parsley.
    Yummy! 🙂

Notes: if using a frozen Roast, skip the searing step and just rub the spices over the Roast and add 20-30 minutes to the initial “Pressure-cooking” time. Proceed with the remaining steps.

Dinner, Lunch, Main Dish
American


Buffalo Chicken Dip

Buffalo Chicken Dip

This is our middle daughter’s favorite food…I seriously think she would eat it for Breakfast, Lunch and Dinner EVERY day of her life if others didn’t step in and insist on some variety in her diet 😉
It really IS delicious, though! Our family doesn’t just eat it as an appetizer or hors d’oeuvres, but as a meal with fresh bread/rolls and a big salad 🙂 A definite 5-Stars in this household!

  • 4-6 Large Boneless, Skinless Chicken Breasts (about 3 lbs.; boiled and shredded)
  • 1 1/4 Cup Hot Sauce (I use Sweet Baby Ray’s Buffalo Wing Sauce because it’s Gluten Free and SO yummy!)
  • 2 Cups Ranch Dressing (I make my own using Hidden Valley Ranch Powder, but store-bought in the bottle is just fine ;))
  • 2 Blocks Cream Cheese ((16 oz) I use full fat Philadelphia Cream Cheese)
  • 3 Cups Shredded Cheddar Cheese (You can also use half Cheddar and half Monterey Jack)
  1. Preheat oven to 350 degrees.
  2. In a 9″ x 13″ (or 4 quart) baking dish dish, mix together the Chicken, the Hot Sauce and 1 1/2 Cups Shredded Cheese until thoroughly blended; Spread out evenly in the pan and set aside.
  3. In a medium saucepan, heat the Ranch Dressing and the Cream Cheese over Low heat until the Cream Cheese has completely melted and the mixture is smooth. Pour this mixture evenly over the Chicken mixture in the baking dish.
  4. Top with the remaining Shredded Cheese.
  5. Bake uncovered for approximately 30-35 minutes, or until edges are bubbly and the top is lightly brown.
  6. Serve with your favorite chips, pita chips, bread, etc. Enjoy 🙂
Appetizers, Dinner, Hors d’Oeuvres, Lunch, Main Dish, Side Dish, Snacks
American


Oven Baked Barbecue Spare Ribs

Oven Baked Barbecue Spare Ribs

These Barbecue Ribs are a perfect combination of sweet with a touch of heat and the meat literally falls off the bones! I could eat the entire rack!!! I have always LOVED Barbecue Spare Ribs, but have never attempted to make them myself…until now 😉 This wonderful recipe comes from cafedelites.com ~ Thank You for sharing! Also, a HUGE “Thank You” to “Cooking with Ry” for sharing “How to Easily Remove the Membrane From Your Ribs” on his YouTube Channel 🙂

The Rub:

  • 2 tsp Garlic Powder
  • 2 tsp Paprika
  • 2 tsp Table Salt
  • 1 tsp Onion Powder
  • 1 tsp Ground Black Pepper
  • 1 tsp Cayenne Powder
  • 1/2 tsp Ground Cumin
  • 2 Tbsp olive oil
  • 4 lbs Pork Ribs (Baby Back or St. Louis Cut)

The Barbecue Sauce:

  • 2 Cups Barbecue Sauce (I use Sweet Baby Ray’s Original, but use your favorite)
  • 3 Tbsp minced garlic
  • 2 Tbsp olive oil
  • 1 Tbsp Worcestershire sauce
  • 1 tsp Table Salt
  1. Preheat oven to 350 degrees. Place rack in center position of oven.
  2. Line a baking tray with foil and spray with non-stick cooking spray. Set aside.
  3. Remove the membrane from the underside of the ribs and place on the prepared baking sheet. Note: If you have never done this before, go to “Cooking With Ry” on YouTube and search for “How to Easily Remove The Membrane From Your Ribs” – his instructions are very easy to follow and all you need is a dinner knife and some paper towels 😉

Making the Rub:

  1. In a small jar or bowl, combine all of the seasonings for the rub and mix well.
  2. Sprinkle the Rub over the Ribs; then drizzle with the Olive Oil. Rub the seasonings and Oil thoroughly over both sides of the Ribs.
  3. Cover the entire baking sheet with foil.
  4. Bake for 2 hours.

Making the Barbecue Sauce:

  1. While the Ribs are baking, combine the sauce ingredients in a medium bowl until thoroughly blended. Set aside.

Putting it All Together:

  1. Once the Ribs have finished baking, remove them from the oven and take the foil off of the top.
  2. Increase oven temperature to 460 degrees.
  3. While the oven temperature is rising, thoroughly coat the tops of the Ribs with the Barbecue Sauce, reserving some for serving with the Ribs.
  4. Return the Ribs, uncovered, to the oven and bake for 10 minutes.
  5. To caramelize the edges of the Ribs, change the oven setting to Broil, leaving the rack in the center position, and broil for about 3 minutes.
  6. Remove Ribs from the oven and let rest for 10 minutes before slicing.
  7. I hope you enjoy this as much as we did!
Dinner, Main Dish
American


Easy 3-Ingredient Candied Cashews

Easy 3-Ingredient Candied Cashews

This is the easiest and yummiest recipe for Candied Cashews!!! Only 3 ingredients, about 15 minutes and these delicious morsels are ready to enjoy…..well, you have to wait a few minutes for them to cool before you pounce on them! These are perfect for snacking, giving as gifts or topping your favorite ice cream 🙂
A BIG “Thank You” to www.saltandlavender.com for sharing this wonderful treat!!!

  • 2 Tbsp Salted Butter
  • 1 Cup Granulated Sugar
  • 2 Cups Cashews (I used Lightly Salted)
  1. Gather the ingredients.
  2. In a medium to large nonstick skillet, melt the butter over medium-low heat.
  3. Once the butter is melted, add the sugar and cashews.
  4. Cook over low to medium-low heat until sugar has completely melted, stirring often to completely coat the cashews and to prevent mixture from burning.
  5. Turn out onto a sheet of parchment paper to let cool.
  6. Enjoy as a snack, as a topping on ice cream or mixed in with your favorite yogurt…or give as a special gift!
Desserts, Snacks


Mexican Chicken & Rice Soup

Mexican Chicken & Rice Soup

This soup is warm, hearty and filling…making it perfect for these cold Winter days! I particularly like this soup because it’s not only wonderful on Day 1, but also gets tastier and thicker as time goes by. Top with your favorite toppings, such as avocados, sour cream, shredded cheese, chopped onions, lime, etc. Enjoy 🙂

Soup

  • 2 Tbsp Olive Oil
  • 1-2 Garlic Cloves (Finely Chopped)
  • 1 tsp Ground Coriander
  • 1 tsp Ground Cumin
  • 1 tsp Chile Powder
  • 1 Can (14.5 oz) Crushed Tomatoes
  • 6 Cups Chicken Broth
  • 2-3 Boneless Skinless Chicken Breasts
  • 1 Cup Rice, uncooked (I use Basmati or Jasmine)
  • Salt (to taste (optional))
  • Pepper (to taste)

Toppings (The Sky is the Limit!)

  • Avocados (Cut into bite-size pieces)
  • Chopped Onions (Green or White…any variety)
  • Shredded Cheese
  • Sour Cream
  • Croutons
  • Lime Juice
  1. Gather the ingredients.
  2. In a large Stock Pot (or Dutch Oven), heat the Olive Oil over medium-low. Add the Garlic and cook for 2-3 minutes or until Garlic starts to turn a light golden brown.
  3. Add the spices (Coriander, Cumin and Chile Powder) and cook for 1-2 minutes.
  4. Next, add the Chicken Broth and Tomatoes. Increase the temperature to medium-high or high and bring to a simmer, stirring constantly.
  5. Once the mixture starts to bubble, decrease the temperature back to medium-low and add the Chicken Breasts. Cook for about 10-12 minutes, stirring often and turning the Chicken Breasts over halfway through to evenly cook.
  6. Remove the Chicken Breasts from the pot, placing on a cutting board to be shredded once it’s cool enough to handle.
  7. While Chicken is cooling a little, add the Rice, Ground Pepper and Salt (if adding). Continue cooking over medium-low heat while you shred the chicken.
  8. Add the shredded Chicken back into the stock pot and continue cooking until the Rice is thoroughly cooked (about 15-20 minutes, depending on the type of Rice you use).
  9. Serve the soup with the assortment of toppings.
    Yummy!
Lunch, Main Dish
Mexican


Easy Homemade Beef & Chicken Chili (No Beans; Gluten-Free & Keto Friendly)

Easy Homemade Beef & Chicken Chili (No Beans; Gluten-Free & Keto Friendly)

There is nothing better than a huge pot of Homemade Chili simmering on the stove! I make this Beef & Chicken Chili just about every other weekend throughout the Fall and Winter seasons. It’s so easy to make and the mix of chili spices is delectable! And, it’s Gluten-Free and Keto Friendly! Enjoy 🙂

  • 2 lbs Lean Ground Beef
  • 2 lbs Lean Ground Chicken
  • 1 Large Onion, diced (I use Vidalia)
  • 1 Tablespoon Olive Oil
  • 5 Tablespoons Chili Powder
  • 4 Tablespoons Ground Cumin
  • 2 Tablespoons Garlic Powder
  • 2 teaspoons Salt
  • 1 teaspoon Ground Pepper
  • 1/2 teaspoon Cayenne Pepper (Increase by 1/8 teaspoon at a time of you want a spicier chili)
  • 1 12 oz. Canned Tomato Paste
  • 1 Cup Beef or Chicken Broth (I usually use Beef Broth)
  • 1 Large Fresh Tomato, diced (Or canned (Otional))
  • Shredded Cheddar Cheese (Topping)
  • Sour Cream (Topping)
  • Green Onions (Topping)

The Meats

  1. Gather Ingredients
  2. In a large pot, heat the oil over medium to medium-high heat for about 2-3 minutes. Add the chopped onions and cook until translucent, about 5 minutes.
  3. Add the ground meats to the pot and cook until browned (about 8-10 minutes). Lower temperature to medium-low.

The Spices

  1. In a medium sized bowl, add all of the spices and blend well.
  2. Next, add the blended spices to the meat mixture. Mix well.

The Broth and Tomato

  1. Add the tomato paste, diced tomato and broth to the pot. Mix well.
  2. Cook for 20-30 minutes, stirring occasionally.
  3. Serve with shredded cheddar cheese, sour cream, onions, etc.
Lunch, Main Dish
Mexican