Fresh Avocado Salsa

Fresh Avocado Salsa

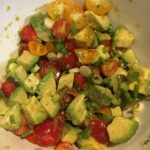
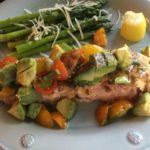
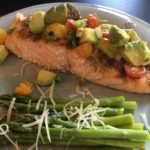
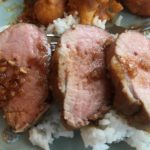
This Avocado Salsa is amazing! It’s so fresh, healthy, easy to make and it pairs well with just about any meal…fish, turkey, chicken, pork, beef, potatoes, etc. It is SO yummy on top of Salmon, Turkey Burgers and Baked Potatoes! The possibilities are endless!!! Enjoy 🙂

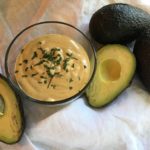
  • 1 Large Avocado (Peeled, Pitted and cut into bite-size pieces)
  • 1 Green Onion (Chopped; use both green and white parts)
  • 1/2 Cup Tomatoes (Cut into bite-size pieces; I use Red, Orange and Yellow Cherry tomatoes, cut in half or into quarters)
  • 1 Large Lemon (Use Zest and Juice)
  1. In a medium bowl, gently combine all of the ingredients until well mixed. Refrigerate until ready to serve.
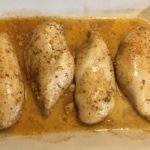
  2. Serve on top of your favorite meat or veggie. It is wonderful with Salmon, Turkey Burgers and Baked Potatoes!

Note: This recipe was inspired by a Keto-Friendly recipe that one of my daughters found…Thank you to Amy Ramos for sharing the original recipe for this yummy Salmon and Avocado dish!!! We are forever indebted to you 🙂

Appetizers, Dinner, Hors d’Oeuvres, Lunch, Main Dish, Salads, Side Dish


Salmon with Avocado Salsa

Salmon with Avocado Salsa

This Salmon dish is SO fresh and easy to make! Our family eats Salmon 1-2 times per week, so I am always looking for new ways to prepare it…this one is a definite winner! The Avocado Salsa is very versatile and is great paired with fish, chicken, pork, turkey, beef, pasta, baked potatoes, etc. It is wonderful on top of a Turkey Burger! I hope you and your family/friends enjoy it as much as we do 🙂

Avocado Salsa Ingredients:

  • 1 Large Ripe Avocado (Peeled, pitted and cubed)
  • 1 Green Onion (thinly chopped)
  • 1/2 Cup Tomatoes (Diced; I use red, orange and yellow cherry tomatoes)
  • 1 Large Lemon (Zest and Juice)

Salmon Ingredients:

  • 1 Pound Fresh Salmon (Rinsed and patted dry with paper towels)
  • 1 Tbsp Olive Oil
  • 1 tsp Ground Cumin
  • 1/2 tsp Ground Coriander
  • 1/2 tsp Onion Powder
  • 1/4 tsp Sea Salt
  • 1/8 tsp Ground Black Pepper
  • 1/8 tsp Ground Cayenne Pepper

Making the Salsa:

  1. In a small/medium bowl, gently mix the chopped Avocado, Green Onions, Tomatoes, Lemon Zest and Lemon Juice. Refrigerate while preparing the Salmon.

Making the Salmon:

  1. Preheat oven to 425 degrees.
  2. Line a baking sheet with foil, place salmon on the sheet and brush with the Olive Oil, being sure to completely coat the Salmon.
  3. In a small bowl, combine the spices and sprinkle evenly over the Salmon.
  4. Bake for 15-18 minutes.
  5. Serve topped with the fresh Avocado Salsa and your favorite veggies!

Note: This recipe was inspired by a Keto-Friendly recipe that one of my daughters found…Thank you to Amy Ramos for sharing the original recipe for this yummy Salmon and Avocado dish!!! We are forever indebted to you 🙂

Dinner, Lunch, Main Dish


Baked Turkey-Ranch Meatballs with Spicy Avocado Sauce (Gluten Free)

Baked Turkey-Ranch Meatballs with Spicy Avocado Sauce (Gluten Free)

Oh my goodness! These savory and slightly sweet meatballs paired with the spicy Avocado dipping sauce is out of this world!!! I always make a triple batch when I’m making any type of meatball, so I can freeze some for another busy night. However, after making a triple batch of these yummy meatballs, I didn’t have enough to freeze…my family LOVED them and not only went back for seconds, but thirds 🙂 I served this with a fresh salad, topped with cucumbers, strawberries and a store-bought Honey Poppy Seed dressing…delicious! I hope you enjoy 🙂

The Meatballs:

  • 3 lbs Ground Turkey
  • 2 Large Eggs
  • 1 Cup Gluten Free Seasoned Bread Crumbs
  • 1/8 Cup + 1 Tablespoon Worcestershire sauce
  • 2 Tablespoons (heaping) Ranch Dressing Powder Mix (I use Hidden Valley Ranch)
  • 1/4 Cup Light Brown Sugar (I do not pack this)
  • 2-3 Pinches Ground Black Pepper

The Spicy Avocado Sauce:

  • 1 Large Ripe Avocado (seed removed and sliced into smaller pieces)
  • 2/3 Cup Mayonnaise (I use Hellmann’s Mayonnaise)
  • 2/3 Cup Buttermilk or Buttermilk Substitute (Since Buttermilk is difficult to find right now, you can make your own: pour 1 Tablespoon White Vinegar (or Lemon Juice) in a 1 Cup measuring cup, then add milk of your choice to fill remaining cup (I used Plain Rice Milk))
  • 3-4 tsp Onion Powder
  • 3 tsp Garlic Powder
  • 1 tsp Kosher Salt
  • 1 tsp Paprika
  • 1/2 tsp Cayenne Pepper
  • 1/2 tsp Ground Black Pepper
  • Dried Parsley (for sprinkling on top)

Making the Meatballs:

  1. Gather the meatball ingredients.
  2. Preheat oven to 375 degrees.
  3. Line 2-3 baking sheets with parchment paper. Set aside.
  4. In a large mixing bowl, combine all of the Turkey Meatball ingredients and mix very well, either with a fork or your hands.
  5. Using a 2″ cookie scooper (or spoon), scoop turkey mixture onto the prepared baking sheets (16 meatballs per sheet). You may either form the meatballs using your hands or just drop meatballs directly onto sheet using the cookie scooper.
  6. Bake for 16-18 minutes, or until inside temperature measures 165 degrees (I usually cut the center-most meatball in half to check for any pinkness).

Making the Spicy Avocado Dipping Sauce:

  1. Gather the Avocado ingredients.
  2. While the meatballs are cooking, blend the Avocado ingredients (except for the Parsley) in a blender or food processor until smooth and creamy.
  3. Pour into serving bowl and top with dried Parsley. Refrigerate until ready to serve.
  4. Once the meatballs are cooked, drizzle some Spicy Avocado Sauce over the tops and serve with your favorite veggie! Yum!!!

*Thank you to californiaavocado.com for sharing the Spicy Avocado Ranch Dressing recipe…I made a few minor adjustments 😉

Appetizers, Dinner, Hors d’Oeuvres, Lunch, Main Dish
American


Stovetop Chicken in an Indian Curry Sauce

Stovetop Chicken in an Indian Curry Sauce

My mouth was watering just smelling this sweet and savory light Indian Curry Sauce simmering on the stove! The spices, cream and honey meld together perfectly into the most fragrant and delectable sauce that I have ever tasted 🙂 This yummy sauce pairs nicely with just about any vegetable, protein and/or starch. I hope you enjoy it!

The Curry Sauce:

  • 1/4 Cup Vegetable OIl (I used Canola Oil)
  • 1 Medium Onion, Finely Chopped (I used a Vidalia Onion)
  • 3 tsp Minced Garlic (I use the already minced Garlic in a jar)
  • 1/2 tsp Ground Ginger
  • 2 Tbsp Curry Powder (I used Madras Curry for a little bit more heat)
  • 3 1/2 Cups Chicken Broth
  • 1 Cup Heavy Cream (You can also use Half & Half or Whole MIlk)
  • 1 Tbsp Gluten Free Cornstarch
  • 2 heaping tsp Honey
  • 2-3 Pinches Salt
  • 2-3 Pinches Ground Black Pepper

The Chicken:

  • 4 Boneless, Skinless Chicken Breasts (Rinsed, trimmed and patted dry with a paper towel)
  • 1-2 Tbsp Salted Butter
  • 1-2 Tbsp Canola Oil
  • Salt & Pepper (Sprinkled over both sides of Chicken)

Making the Curry Sauce:

  1. Gather ingredients.
  2. In a medium-sized heavy saucepan, heat the Canola Oil over Medium heat.
  3. Add the finely chopped onion and cook for about 5 minutes, or until onion is translucent.
  4. Stir in the Garlic, Ginger and Curry and cook until fragrant (1-2 minutes).
  5. Add the Chicken Broth and stir well. Reduce heat to Low and simmer for about 20 minutes to reduce the mixture a little.
  6. While the broth is reducing, whisk the Cream, Cornstarch and Honey together in a small bowl until completely blended and smooth.
  7. Slowly whisk the Cream mixture into the Chicken Broth mixture, combining the ingredients completely. Simmer for about 5 minutes. Add a few pinches of Salt and Pepper to taste.
  8. Keep the sauce warm while cooking the chicken.

Cooking the Stovetop Chicken:

  1. In a large skillet, heat the Butter and Oil over medium-low heat until the butter is completely melted and bubbling.
  2. Add the Chicken Breasts, sprinkling with Salt & Pepper on both sides. Cook on each side for about 5-7 minutes per side, making sure that both sides are a light golden brown (internal temperature should be 165 degrees)
  3. Once the Chicken Breasts are nicely browned on both sides, use a ladle to spoon several scoops of sauce over the Chicken Breasts in the skillet. Turn the breasts over to thoroughly coat in the sauce.
  4. Serve the Chicken Breasts whole with your favorite side and vegetable and more sauce drizzled over the top…or cut up into bite-sized pieces and serve over Rice and with Steamed Broccoli and more yummy sauce!!!
    Enjoy!
Dinner, Main Dish
Indian


Salmon with Orange-Lime Glaze

Salmon with Orange-Lime Glaze

This quick and easy recipe for baked Salmon turns out tender and sweet, with just a touch of heat, every time. My family LOVES Salmon, so I am always trying out new ways to prepare it. Enjoy! 🙂

Salmon

  • 1 lb Fresh Salmon
  • 1/4-1/2 tsp Kosher Salt (I do not measure this, but I just use a couple of pinches)
  • 1/4 tsp Freshly Ground Pepper (Again, I do not usually measure this, but I grate a light coat of the Pepper over the Salmon)

Glaze

  • 1/2 Cup Orange Marmalade
  • 1 Lime Lime Zest (2 teaspoons)
  • 1 Lime Juice of 1 Lime (2-3 teaspoons)
  • Pinch Red Cayenne Pepper, powdered (I use a generous pinch for a little extra heat.)
  1. Preheat oven to 425 degrees.
  2. Line a baking sheet with foil and spray with non-stick cooking spray. Set aside.
  3. Gather the ingredients.
  4. Rinse and pat dry the Salmon. Place, skin side down, onto the prepared baking sheet. Evenly sprinkle with the Salt and Pepper. Set aside while you prepare the glaze.
  5. In a small bowl, combine the Orange Marmalade, Lime Zest, Lime Juice and Cayenne Pepper. Mix until completely blended. Taste to see if any adjustments are needed (Note: the heat of the Red Cayenne Pepper comes through as it cooks, so be careful adding too much 😉 ). Reserve 1/2 of this glaze for serving with cooked Salmon.
  6. Spread half of the Glaze over the top and sides of the Salmon, coating evenly.
  7. Bake for 15-18 minutes, depending on the thickness of the fillet.
  8. Serve with the reserved glaze and your favorite sides. Enjoy!

Note: I sometimes pan-sear the Salmon in a little bit of Olive Oil and Butter before adding the glaze and baking in the oven.

Dinner, Main Dish
American


Garlic-Parmesan Asparagus

Garlic-Parmesan Asparagus

We are BIG fans of Asparagus, so I am always trying new ways to prepare this wonderful vegetable! This recipe is SO quick, easy and delicious that you will be wishing you had made more 😉 Enjoy!

  • 1 Bunch Asparagus (If you love Asparagus as much as we do, you may want to make 2 bunches)
  • 1-2 Tbsp Olive Oil
  • Kosher Salt (as much or as little as you desire)
  • Ground Pepper (as much or as little as you desire)
  • 2 tsp Garlic, chopped (I use the already prepared chopped Garlic in the jar)
  • 2-4 Tbsp Grated or shredded Parmesan (I use both – Grated for mixing with the Garlic and Shredded for topping before serving)
  1. Preheat oven to 400 degrees.
  2. Gather the ingredients.
  3. Line a baking sheet with foil and spray with non-stick cooking spray. Set aside.
  4. Rinse Asparagus in cold water and pat dry with paper towels.
  5. Spread the Asparagus onto the prepared baking sheet in a single layer. Drizzle or brush (I brush to coat more evenly) the Olive Oil over the Asparagus. Sprinkle with Kosher Salt and Pepper, coating evenly.
  6. Bake the Asparagus for about 8-10 minutes on the middle rack.
  7. While the Asparagus is baking, mix the Garlic and Grated Parmesan together in a small bowl.
  8. Sprinkle the Garlic-Parmesan mixture evenly over the Asparagus. Bake for another 5-7 minutes, or until Parmesan Cheese is melted.
  9. Sprinkle more Shredded or Grated Parmesan over the Asparagus and serve with your favorite dish! Yummy 🙂
Appetizers, Dinner, Hors d’Oeuvres, Lunch, Main Dish, Side Dish


Honey-Ginger Pork Tenderloin

Honey-Ginger Pork Tenderloin

This wonderful dish has quickly become one of our regular Favorite meals! It turns out tender and very flavorful every time 🙂 It’s SO easy to prepare and goes well with just about any side dish. I usually marinate two tenderloins at a time – one for that day’s meal and one to freeze for later (perfect for those days when you just don’t feel like cooking). A HUGE “Thank You” to www.thechunkychef.com for sharing this incredible recipe 🙂

  • 1 Pork Tenderloin (trimmed, rinsed and patted dry with paper towels)
  • 1/2 Cup Honey
  • 1 1/2 Tbsp Fresh Ginger, grated
  • 2 Tbsp Fresh Lemon Juice (or bottled)
  • 2 1/2 Tbsp Soy Sauce (I use the Low-sodium variety)
  • 2 tsp Garlic, minced (I use the all-ready minced Garlic in the jar)
  • Pinch Cayenne Pepper
  • Kosher Salt (to taste)
  • Ground Black Pepper (to taste)
  • 1-2 Tbsp Olive Oil (for searing)
  • Fresh, Chopped Parsley (garnish)
  1. Gather the ingredients.
  2. Place the trimmed, rinsed and patted dry Pork Tenderloin into a large Ziploc baggie. Set aside.
  3. In a small/medium bowl, combine the Honey, Ginger, Lemon Juice, Soy Sauce, Garlic and spices. Whisk/mix until well combined.
  4. Pour half of the marinade into the baggie with the Pork and seal. Let marinate in refrigerator for 4-24 hours. Reserve the other half in an airtight container in the refrigerator for later.
  5. When ready to bake the pork, preheat oven to 400 degrees.
  6. Line a baking sheet with foil and set aside.
  7. Remove the reserved marinade from refrigerator and set aside.
  8. In a large skillet, heat the Olive Oil over Medium to Medium-High heat.
  9. Once the oil is heated, remove the Pork Tenderloin from the marinade and place into the heated oil/pan. Sear all sides of the tenderloin until a light golden brown.
  10. Place the seared Pork onto the prepared baking sheet and bake for about 15 minutes, or until inside temperature of Pork reaches 132-134 degrees.
  11. Evenly brush the Pork with the reserved marinade and continue baking for 5-7 more minutes, or until inside temperature reaches 140 degrees. Note: you may broil the Pork on High for a couple of minutes instead of continuing to bake, if desired.
  12. Remove the Pork from the oven and cover loosely with foil. Let rest for about 5 minutes – pork will continue to cook and should register 145 degrees with light pink insides (see photo).
  13. Brush the Pork with run-off marinade from baking sheet and sprinkle the top with the Fresh, Chopped Parsley. Slice into desired thickness and serve with your favorite sides and veggies. Enjoy!

Note: If you’re preparing 2 Tenderloins, simply double all ingredients.

Dinner, Lunch, Main Dish
American, Asian


Copycat Chipotle Chicken (Baked)

Copycat Chipotle Chicken (Baked)

I think my husband and children would eat this meal every day of their lives if I didn’t put my foot down and insist on some variety 😉 This recipe truly is delicious!!! And, it’s so easy to prepare…I always make 2 batches at a time, so we are sure to have enough for a couple of meals 🙂 Enjoy!

  • 4 Boneless, Skinless Chicken Breasts (Rinsed and dried)
  • 1/4 Cup Water
  • 1/4 Cup Distilled White Vinegar
  • 4 Tbsps Canola Oil
  • 2 teaspoons Minced Garlic
  • 1 teaspoon Ground Cumin
  • 1 teaspoon Dried Oregano
  • 1 teaspoon Kosher Salt
  • 2 teaspoons Chili Powder
  • 1/2 teaspoon Ground Black Pepper

Ingredients for Chipotle Chicken Bowl

  • 2 Cups Cooked Rice
  • 2-4 Cups Shredded or Chopped Lettuce
  • 4 Breasts Chopped Chipotle Chicken ((from the above recipe))
  • 1-2 Cups Shredded Cheese (any flavor you desire)
  • 1 Cup Pico de Gallo (I buy this pre-made in the produce section)
  • 1-2 Medium Chopped Tomatoes
  • 1-2 Avocados (Smushed)
  • Sour Cream (I use the Lite version)
  • 1-2 Green Onions (chopped)
  • Copycat Chipotle Honey Vinaigrette Dressing (*recipe in the “Sides & Salads” of the “All Recipes” section on my website)
  1. Gather the ingredients.
  2. Place the rinsed and dried Chicken into a Large Ziploc Baggie. Set aside.
  3. In a medium-sized bowl, combine the rest of the ingredients and whisk well.
  4. Pour the marinade over the Chicken in the baggie and seal securely, being sure to press air out of the bag. Squish the chicken around in the baggie to coat evenly.
  5. Place the sealed baggie with the marinating chicken in the baking dish that you will be using later. Refrigerate for at least 4 hours.
  6. When ready to bake, preheat oven to 400 degrees and place one of the racks in the center position.
  7. Meanwhile, remove the chicken from the marinade and place into the baking dish. Cover with foil.
  8. Bake for 20 minutes on the center rack. Remove foil and bake for another 5-7 minutes, or until inside temperature of chicken registers 165 degrees or no longer pink inside.
  9. Remove cooked chicken from oven and cut into bite-sized pieces.
  10. To make a Chipotle Chicken Bowl, layer Rice, Lettuce, Chicken, Cheese, Pico de Gallo, Guacamole (or just smushed Avocados), Chopped Tomatoes, Sour Cream and, of course, the Chipotle Honey Vinaigrette Dressing!
Dinner, Lunch, Main Dish, Salads
American, Mexican


Copycat Chipotle Honey Vinaigrette Salad Dressing

Copycat Chipotle Honey Vinaigrette Salad Dressing

Chipotle’s Honey Vinaigrette Salad Dressing is my husband’s all-time FAVORITE dressing/dip! But, now that we no longer live near a Chipotle restaurant, I decided to make it myself 😉 My husband stated that he likes it even better than Chipotle’s, because he can really taste the Honey! He uses it as a salad dressing, dip, sauce, potato topping, etc. I hope you enjoy it as much as he does 🙂

  • 2-3 Small Chipotle Peppers in Adobo Sauce
  • 3/8 Cup Vinegar (I use White Wine Vinegar for its milder taste, but you can use Red, Apple Cider, Balsamic or Rice Wine Vinegar)
  • 3/4 Cup Canola Oil
  • 1 tsp minced garlic (I use the Minced Garlic in a jar)
  • 3 heaping Tbsp Honey (I use 100% Pure Honey)
  • 1 1/2 tsp Salt
  • 1/2 tsp Ground Black Pepper
  • 1/2 tsp Dried Oregano
  1. Gather all the ingredients.
  2. Using a blender or food processor, dump all of the ingredients into the blender/food processor and puree until smooth.
  3. Pour dressing into desired container and serve. Refrigerate any leftovers. Enjoy 🙂
Appetizers, Dinner, Hors d’Oeuvres, Lunch, Main Dish, Salads
American, Mexican


Spicy Roasted Cauliflower (Gluten Free)

Spicy Roasted Cauliflower (Gluten Free)

I’m not a big fan of cauliflower, not because it tastes bad, but because it really doesn’t have much flavor at all. But, THIS recipe sold me on eating more cauliflower…it’s SO Spicy, Flavorful and Easy to make that I just can’t get enough!!! It’s even great cold the next day! Bon appetit! 🙂

  • 1 Head Cauliflower
  • 3/4 Cup Gluten Free All-Purpose Flour, sifted (I prefer King Arthur brand)
  • 1 tsp Paprika
  • 2 tsp Garlic Powder
  • 1/2 tsp Salt
  • 1/4 tsp Ground Pepper
  • 3/4 Cup Skim Milk (You can substitute with Rice Milk, Oat Milk, Coconut Milk or Soy Milk)

Spicy Sauce:

  • 1/4 Cup Hot Sauce or Buffalo Sauce (For a less-spicy version, use a mild Buffalo Sauce)
  • 2 Tbsps Canola Oil (You can substitute with Olive Oil, Coconut Oil, etc.)
  • 1 Tbsp Honey
  1. Preheat oven to 450 degrees.
  2. Line a baking sheet with parchment paper (or foil sprayed with non-stick cooking spray) and set aside.
  3. Cut up the Cauliflower into bite-size pieces and set aside.
  4. In a large bowl, whisk the GF Flour, Spices and Milk together until thoroughly blended. Add the Cauliflower pieces and stir to completely coat.
  5. Dump the coated Cauliflower pieces onto the prepared baking sheet and spread them out into a single layer.
  6. Bake for 20 minutes, stirring the pieces at the halfway point.
  7. While the Cauliflower is baking, thoroughly combine the Hot Sauce, Oil and Honey.
  8. After the first 20 minutes, brush or spoon the Hot Sauce mixture evenly over the Cauliflower pieces. Continue baking for another 20 minutes.
  9. Serve while hot or warm. The Sauce mixture becomes like a crusty cheese coating…it is SO yummy!

Thank you to Pierce Abernathy @ Tasty for sharing the original recipe…I just made a few minor changes to make it GF, lower in sodium and fat 😉

Appetizers, Dinner, Hors d’Oeuvres, Lunch, Main Dish, Side Dish, Snacks