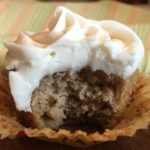
Apple Cider Cupcakes with Cream Cheese Frosting ~ Gluten-Free
Apple Cider Cupcakes with Cream Cheese Frosting ~ Gluten-Free
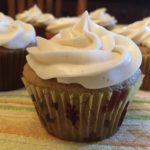
Oh my gosh! These Cupcakes are out of this world!!! I seriously could eat the entire batch 🙂 The Apple Cider adds a wonderful flavor and a bit of caramelized texture – they are delicious even without the frosting! You better double the batch like I did 😉
This recipe earned an instant 5-Star rating in our home!
Note: I adapted this wonderful recipe from forkinthekitchen.com to make it GF – Thank You for sharing!!!
Equipment
- Muffin Tin
- Cupcake Liners
- Stand or handheld Mixer
- Large Mixing Bowl
The Cupcake Ingredients:
- 2 1/2 Cups Better Batter All Purpose Gluten Free Flour Mix
- 1 tsp Baking Soda
- 1 tsp Baking Powder, GF
- 1 tsp Table Salt
- 2 tsp Ground Cinnamon
- 1 Cup Granulated Sugar (I use Dixie Crystal brand)
- 1/2 Cup Light Brown Sugar, packed
- 1 Cup Salted Butter, Softened (I use Land O’ Lakes brand)
- 2 tsp Vanilla Extract
- 4 Large Eggs (room temperature)
- 1 Cup + 4 Tbsp Apple Cider
The Cream Cheese Frosting Ingredients:
- 8 Oz. Cream Cheese, softened (I used Full Fat Philadelphia brand)
- 1/4 Cup Salted Butter, Softened
- 1/2 tsp Vanilla Extract
- 2 Tbsp Apple Cider
- 3 1/2 – 4 Cups Powdered Sugar
- Ground Cinnamon ((optional – to either mix in with the frosting or to sprinkle on the top))
Making the Cupcakes:
- Place oven rack in the middle position and preheat oven to 350 degrees.
- Line 1-2 muffin tins with cupcake liners; set aside.
- In a large mixing bowl, whisk together the GF Flour, Baking Soda, Baking Powder, Salt and Cinnamon until completely blended; Set aside.
- Using a Stand or Handheld Mixer, fitted with the paddle attachment, cream the Butter and Sugars until light and fluffy.
- Next, with the mixer set on low, add the Vanilla Extract and the Eggs, one at a time; Continue mixing until thoroughly blended.
- With the mixer still set on Low, alternate adding the GF Flour mixture (1/2 cup at a time) and the Apple Cider (a couple of Tablespoons at a time) to the Butter-Sugar mixture, blending until just combined after each addition.
- Scoop the Cupcake Batter into the lined muffin tin/tins, filling each about 2/3 full.
- Bake for approximately 17-20 minutes, or until toothpick inserted into the center comes out clean.
- Let cool in the pan for about 5-10 minutes and then transfer to a wire cooling rack to cool completely before frosting.
Making the Frosting:
- Using a Stand or Handheld Mixer, fitted with the paddle attachment, cream the softened Cream Cheese and Butter until light and fluffy.
- Slowly add the Vanilla Extract and Apple Cider, blending thoroughly.
- Next, with the mixer set on low, add the Powdered Sugar, 1/2 cup at a time, beating well between each addition. I usually add between 3 1/2 to 4 cups of Powdered Sugar for the right consistency. Note: If you’re adding Ground Cinnamon into the Frosting, do so now (I usually add several pinches).
- Spread or pipe the Frosting onto each cooled cupcake and top with a little Ground Cinnamon, if desired.

- Enjoy!