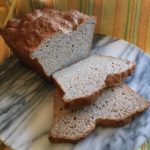
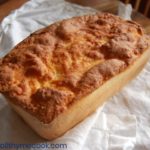
Italian Sandwich Bread (Gluten Free)
Italian Sandwich Bread (Gluten Free)

I panicked when I found out that I was allergic to Gluten…that meant NO BREAD!!! 🙁 I tried the frozen GF Breads in the grocery store, but they all tasted wrong! And the texture was well, also wrong!! So, I decided to hit the internet and cookbooks for a good GF Bread Recipe. I had tried SO many different recipes and was just about to give up when I discovered a wonderful GF Bread Flour Blend by Kim (“letthemeatgfcake”). Everyone in my family couldn’t believe that it was Gluten Free…it tasted JUST like “regular” gluten bread 🙂 I bake at least one loaf per day…sometimes 2….yes, it’s THAT great!!! Now, I can have my GF Bread and eat it, too 🙂
A HUGE “Thank You” to Kim @ “letthemeatgfcake.com” for sharing this delicious recipe!
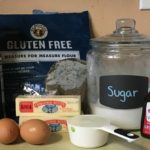
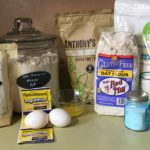
- 3 Cups + 3 Tbsp (453 g) GF Bread Flour Blend (recipe in the notes*)
- 2 Tbsp + 1 tsp Granulated Sugar
- 2 tsp Kosher Salt
- 2 tsp Quick Rise Yeast (Instant)
- 2 Cups Milk (You can use Whole, 2%, 1%, Skim, Rice Milk, Cashew Milk, Oat Milk, etc.)
- 4 Tbsp Unsalted Butter (melted; You can also use a dairy-free butter, such as “Earth Balance”)
- Thoroughly coat the bread pan/pans with shortening and then a dusting of GF Flour, being sure to bang the pan to get rid of any extra flour. Set aside.
- In a small microwave-proof bowl, melt the butter and set aside.
- Using a stand mixer, combine (on Low) the GF Flour Blend, Sugar, Salt and Yeast until completely mixed (about 1 minute).
- In another microwave-proof bowl, heat the milk for 45-60 seconds or until just slightly warm.
Note: I use a 2-Cup Glass measuring cup with a pour spout to make it easier to add to the flour mixture. - Pour the melted butter into the luke-warm milk.
- Turn the mixer on to Low and slowly pour the Milk/Butter mixture into the Flour blend until completely combined.
- Scrape down the sides of bowl and increase the speed to Medium-High and beat for 5 minutes.
- Using a rubber spatula, scrape the bread dough into the prepared bread pan and spread dough out evenly.
- Cover the pan with plastic wrap and place in a warm spot to rise for about 1 1/2 – 2 hours or until it has doubled in size.
Note: I place my breads on top of our cable box since it is nice and warm 🙂 - Once the bread dough is ready to bake, place one oven rack in the lowest position and the other rack in the middle position of your oven. Next, place an oven-proof baking pan/dish on the bottom rack (off to one side, so it isn’t directly underneath where the bread will be baking – you don’t want to block heat to the bread above it); add about 1 cup of water to the pan (this is for producing steam for the baking bread).
- Preheat oven to 425 degrees.
- Remove plastic covering from bread loaf and bake for 35-40 minutes. Bread is done with it starts pulling away from the sides and it makes a hollow thud sound when you thump it lightly.
Note: if bread starts to get too dark on the top, cover with foil – start checking at about 15 minutes. - Remove from oven and place on a cooling rack while still in the pan for about 10 minutes. Then, remove bread from pan and continue cooling on the wire rack.
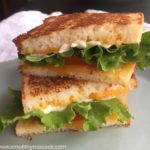
- Enjoy with butter and honey or fresh strawberry jam or with your favorite sandwich fixings 🙂
Before I start with the recipe for the Gluten Free Bread Flour blend, I need to point out a few things:
1st, kitchen scales would be very helpful since the ingredients in this recipe have to be weighed (in grams).
2nd, weigh each ingredient separately and then add to the storage container or ziploc baggie used to keep the flour fresh.
3rd, I have found that it is much easier to store my flours and flour blends in large plastic containers with tight-fitting tops – easy to scoop from 😉
GF Bread Flour Blend Recipe (makes 5 Cups):
- Potato Starch – 280 grams
- Superfine White Rice Flour – 245 grams
- Tapioca Starch/Flour – 75 grams
- Whey Protein Isolate (unflavored) – 75 grams
- Xanthan Gum – 15 grams