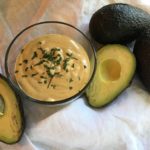
Barbecue-Ranch Dip/Salad Dressing

Barbecue-Ranch Dip/Salad Dressing
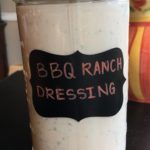
This Dressing/Dip is definitely one of my family’s favorites! I make sure to keep a fresh batch made at all times…my husband loves it as a dip for veggies and tortilla chips 🙂 And, my children love it as a salad dressing, baked potato topper and a dip for French Fries and Chicken Bites! It’s so easy to make and can be easily personalized to suit your family’s tastes by adding different herbs and spices 😉
Of course, a BIG “Thank You” to Ree Drummond (aka: “The Pioneer Woman”) for sharing the original version of this recipe!!! It’s a 5-Star recipe in our house!

  • 1 Cup Mayonnaise (I use Hellmann’s)
  • 1/2 Cup Sour Cream (I use Daisy Lite, but full-fat is fine, too)
  • 1/4 Cup Barbecue Sauce (I use Sweet Baby Ray’s, but you can use whatever bbq sauce you have on hand)
  • 3 Tbsp Dried Parsley Flakes
  • 1/2 tsp Garlic, minced (I use the already-minced garlic in a jar (usually found in the produce section))
  • 1/4-1/2 Cup Buttermilk (*usually only needed if you’re making a Salad Dressing; I make my own by adding 1 Cup Milk to 1 Tbsp Lemon Juice or White Vinegar; gently stir and let sit for 5 minutes)
  • 1/4-1/2 tsp Kosher Salt (optional)
  1. Gather the ingredients.
  2. Note: If using Buttermilk (usually only needed for the Salad Dressing version of this recipe; if you’re making this recipe as a dip, the Buttermilk is usually not needed) and you’re making your own, do so now by pouring 1 Tablespoon of White Vinegar or Lemon Juice into a 1-Cup measuring cup; then add milk (I use Whole Milk, but any fat % Milk is fine) to the Vinegar/Lemon Juice to almost fill the 1-cup measuring cup; gently stir and let sit for 5 minutes while preparing the remaining ingredients.
  3. While the Buttermilk is forming, place all of the remaining ingredients into a large bowl and whisk until thoroughly combined.
  4. To dilute/thin the dressing, add some Buttermilk, a little bit at a time, until you reach the desired consistency.
  5. Pour into a jar/vessel, cover with lid or plastic wrap and refrigerate until ready to use.
  6. Enjoy!
Appetizers, Hors d’Oeuvres, Salads, Side Dish, Snacks


Chopped Salad with Barbecue Ranch Dressing

Chopped Salad with Barbecue Ranch Dressing

Oh my gosh! I could eat this salad every day! The combination of the fresh, crunchy lettuce, the salty bacon pieces and the slightly sweet BBQ Ranch Dressing is something that words just cannot accurately describe!! I am forever indebted to Ree Drummond (aka: “The Pioneer Woman”) for sharing the original recipe of this awesome salad (“Cowboy Chopped Salad”), which I have made a few minor adjustments to to make it allergy-friendly and GF for my family 🙂 Enjoy!!!

The Bacon:

  • 12-15 Slices Thick or Regular Bacon (Cooked and chopped into bite-size pieces)

The Barbecue Ranch Dressing:

  • 1 Cup Mayonnaise (I use Hellmann’s)
  • 1/2 Cup Lite or Regular Sour Cream (I use Daisy Lite Sour Cream)
  • 1/4 Cup Barbecue Sauce (I use Sweet Baby Ray’s )
  • 3 Tbsp Dried Parsley
  • 1/2 tsp Garlic, chopped
  • 1 pinch Kosher Salt (to taste)
  • 1 pinch Ground Black Pepper (to taste)
  • 1/2 – 3/4 Cup Buttermilk (I make my own by pouring 1 Tbsp White Vinegar into a 1 Cup measuring cup and adding enough Whole Milk to fill the rest; gently stir and let rest for 5 minutes.)

The Salad:

  • 1 Large Head of Lettuce (I use Romaine Lettuce, but Iceburg, Green or Red Leaf Lettuce, etc. is great, too)
  • 1 Cup Grape Tomatoes (halved)
  • 1-2 Chopped Green Onions/Scallions (I use both the green and white parts)
  • 3 Cups Shredded Cheddar Cheese
  • Pico de Gallo (Topping; I use store-bought once my garden has gone dormant)
  1. While the bacon is cooking, begin making the BBQ Ranch Dressing.

The BBQ Ranch Dressing:

  1. In a medium-size bowl, whisk together all of the dressing ingredients, except for the Buttermilk.
  2. Once all of the ingredients are thoroughly combined, add the Buttermilk 1/4 cup at a time until desired consistency is reached. Reserve any leftover Buttermilk in the refrigerator to add to the dressing later, as it will thicken over time.
  3. Cover and refrigerate the dressing until ready to use.

The Salad:

  1. In a very large bowl, place all of the salad ingredients, except for the Pico de Gallo, and gently toss to mix (reserve some of the Cheese and Onions for toppings).

Putting it All Together:

  1. To serve the salad, you can set up a station with the large salad bowl as center stage with the Bacon served in a side bowl (for non-bacon-eaters), as well as the Pico de Gallo and any other toppings that you want to serve separately. You can also serve the BBQ Ranch Dressing separately or sparingly toss on the salad, so individuals can add more if desired 😉
Dinner, Lunch, Main Dish, Salads, Side Dish, Snacks


Baked Turkey-Ranch Meatballs with Spicy Avocado Sauce (Gluten Free)

Baked Turkey-Ranch Meatballs with Spicy Avocado Sauce (Gluten Free)

Oh my goodness! These savory and slightly sweet meatballs paired with the spicy Avocado dipping sauce is out of this world!!! I always make a triple batch when I’m making any type of meatball, so I can freeze some for another busy night. However, after making a triple batch of these yummy meatballs, I didn’t have enough to freeze…my family LOVED them and not only went back for seconds, but thirds 🙂 I served this with a fresh salad, topped with cucumbers, strawberries and a store-bought Honey Poppy Seed dressing…delicious! I hope you enjoy 🙂

The Meatballs:

  • 3 lbs Ground Turkey
  • 2 Large Eggs
  • 1 Cup Gluten Free Seasoned Bread Crumbs
  • 1/8 Cup + 1 Tablespoon Worcestershire sauce
  • 2 Tablespoons (heaping) Ranch Dressing Powder Mix (I use Hidden Valley Ranch)
  • 1/4 Cup Light Brown Sugar (I do not pack this)
  • 2-3 Pinches Ground Black Pepper

The Spicy Avocado Sauce:

  • 1 Large Ripe Avocado (seed removed and sliced into smaller pieces)
  • 2/3 Cup Mayonnaise (I use Hellmann’s Mayonnaise)
  • 2/3 Cup Buttermilk or Buttermilk Substitute (Since Buttermilk is difficult to find right now, you can make your own: pour 1 Tablespoon White Vinegar (or Lemon Juice) in a 1 Cup measuring cup, then add milk of your choice to fill remaining cup (I used Plain Rice Milk))
  • 3-4 tsp Onion Powder
  • 3 tsp Garlic Powder
  • 1 tsp Kosher Salt
  • 1 tsp Paprika
  • 1/2 tsp Cayenne Pepper
  • 1/2 tsp Ground Black Pepper
  • Dried Parsley (for sprinkling on top)

Making the Meatballs:

  1. Gather the meatball ingredients.
  2. Preheat oven to 375 degrees.
  3. Line 2-3 baking sheets with parchment paper. Set aside.
  4. In a large mixing bowl, combine all of the Turkey Meatball ingredients and mix very well, either with a fork or your hands.
  5. Using a 2″ cookie scooper (or spoon), scoop turkey mixture onto the prepared baking sheets (16 meatballs per sheet). You may either form the meatballs using your hands or just drop meatballs directly onto sheet using the cookie scooper.
  6. Bake for 16-18 minutes, or until inside temperature measures 165 degrees (I usually cut the center-most meatball in half to check for any pinkness).

Making the Spicy Avocado Dipping Sauce:

  1. Gather the Avocado ingredients.
  2. While the meatballs are cooking, blend the Avocado ingredients (except for the Parsley) in a blender or food processor until smooth and creamy.
  3. Pour into serving bowl and top with dried Parsley. Refrigerate until ready to serve.
  4. Once the meatballs are cooked, drizzle some Spicy Avocado Sauce over the tops and serve with your favorite veggie! Yum!!!

*Thank you to californiaavocado.com for sharing the Spicy Avocado Ranch Dressing recipe…I made a few minor adjustments 😉

Appetizers, Dinner, Hors d’Oeuvres, Lunch, Main Dish
American


Gluten Free Chocolate Brownie-Cream Sandwiches

Gluten Free Chocolate Brownie & Cream Sandwiches

These little treats are sinfully rich, moist and delicious 🙂 They are certain to please any Gluten-Free Chocoholic! I converted this recipe from The Pioneer Woman’s (aka: Ree Drummond) “Chocolate Devils,” which were intended to be a cake-like consistency, but to our delight the Gluten-Free version turned out to be a moist, brownie-like consistency. A 5-Star hit in our household 🙂

Brownie Ingredients:

  • 2 Cups Gluten Free All-Purpose Flour, sifted (must be sifted to reduce grittiness)
  • 2 Cups Granulated Sugar
  • 1/4 tsp Salt
  • 1 Cup Butter, salted (2 sticks)
  • 4 Tbsp Cocoa (heaping Tbsps)
  • 1 Cup Boiling Water
  • 1/2 Cup Buttermilk
  • 1 tsp Baking Soda
  • 1 tsp Vanilla Extract
  • 2 Large Eggs

The Cream-Filling Ingredients:

  • 5 Tbsps All-Purpose Gluten Free Flour, Sifted (again, must be sifted to reduce grittiness)
  • 1 Cup Whole Milk
  • 1 tsp Vanilla Extract
  • 1 Cup Salted Butter, Softened ((2 sticks))
  • 1 Cup Granulated Sugar

The Ganache Ingredients:

  • 3 Cups Heavy Cream
  • 2 tsp Vanilla Extract
  • 4 Cups Semi-Sweet Chocolate Chips

Making the Gluten-Free Brownies

  1. Preheat Oven to 350 degrees.
  2. Gather the ingredients.
  3. Spray a cookie sheet with non-stick cooking spray. Line the cookie sheet with parchment paper and spray the paper as well. Set aside.
  4. In a stand mixer, combine the Flour, Sugar and Salt on low. Set aside while moving to the next step.
  5. In a small or medium saucepan, melt the butter. Add the Cocoa Powder and mix until completely combined. Add 1 Cup boiling water to the saucepan, mixing well and bring to a boil. Let boil for about 30 seconds. Add this mixture to the Flour mixture and blend on low until combined. Let cool slightly.
  6. In a medium-sized bowl, whisk the Buttermilk, Baking Soda, Vanilla and Eggs until thoroughly combined. Pour this into the Flour-Butter mixture and blend on low until completely combined.
  7. Scrape the Brownie mixture into the prepared cookie sheet, spreading evenly over the parchment paper.
  8. Bake for 20-25 minutes, or until toothpick inserted into the center comes out clean. Cool completely! This is very important – if brownies are not cooled all the way, the cream filling will just melt and turn to goop 🙁 If I have the time, I let mine cool overnight.
  9. Once completely cooled, cut the brownies into 2″ squares and place on a wire rack on another cookie sheet (you can use a square cookie cutter if you have one). Set in a cool spot while you prepare the cream filling.

Making the Cream Filling:

  1. In a small saucepan, whisk the GF Flour and Milk together and heat over medium-low heat, stirring constantly, until very thick (like pancake batter). Remove and cool completely. Add the Vanilla and blend thoroughly.
  2. Meanwhile, in a stand mixer fitted with the paddle attachment, cream the softened Butter and Sugar until VERY light, smooth and fluffy.
  3. Next, add the completely cooled Flour-Milk-Vanilla mixture to the Butter-Sugar mixture and beat on medium to medium-high for about 5-7 minutes – you want it to look like whipped cream.
  4. Using a pastry bag or plastic freezer (these are thicker and sturdier than regular ones) baggie fitted with a large star tip, fill the bag with the Cream Filling and pipe onto one of the cooled brownies. Place another brownie on top and press down gently. Repeat with the remaining brownies, reserving a small amount of the cream for the tops of the brownies. Set aside while you prepare the Ganache.

Making the Ganache:

  1. In a large saucepan, heat the Heavy Cream over medium-low until VERY hot. Add the Vanilla and Chocolate Morsels and stir until all of the chocolate is melted and blended completely.
  2. Remove Ganache from the heat and ladle over each Brownie Sandwich. Chill in the refrigerator for at least 1 hour.
  3. When ready to serve, top each Brownie Sandwich with some of the Cream and perhaps a cherry or raspberry 🙂
  4. Enjoy!

I know that there are a lot of steps involved, but believe me it’s well worth it!!!

Desserts, Snacks