Easy Creamy Broccoli & Cheddar Soup ~ Gluten Free

This quick & easy recipe reminds me of my favorite Broccoli-Cheddar Soup from Panera Bread, but without the Gluten 🙂 It’s so fresh and flavorful that I can’t stop at just one bowl! I owe a HUGE “Thank You” to Holly Nilsson @ spendwithpennies.com for sharing the original version of this yummy soup!! I made a few adjustments in order to make it Gluten-Free and allergy-friendly for my family.

Easy Creamy Broccoli & Cheddar Soup ~ Gluten Free

  • 1 Tbsp Butter (unsalted)
  • 1 Small Onion (Chopped)
  • 1/2 Cup Carrots (Diced)
  • 1/2 teaspoon Garlic (minced)
  • 1 Large Head Broccoli (Chopped (about 3 Cups))
  • 2 Cups Chicken Broth (Low Sodium or Regular)
  • 1/2 teaspoon Dried Thyme
  • Salt & Pepper (to taste)
  • 2 Tbsp All-Purpose Gluten Free Flour (I use Bob’s Red Mill 1-to-1 GF Flour)
  • 3/4 Cup Whole Milk
  • 3/4 Cup Skim Milk
  • 1 Cup Sharp Cheddar Cheese (Shredded)
  1. In a large saucepan, melt the Butter over medium-low heat. Once Butter is melted, add the Onions, Carrots and Garlic; cook until the Onions are translucent and soft (about 3-5 minutes).
  2. Add the Broccoli, Chicken Broth and Seasonings to the Onion mixture and cook over low heat until the Broccoli has softened ~ about 15 minutes.
  3. Next, using either an Immersion Blender, Regular Blender or Food Processor, thoroughly blend the cooked Vegetable/Broth mixture; set aside in the large saucepan over Low heat.
  4. Meanwhile, in a small/medium bowl, combine the GF Flour blend and Milks using a whisk to thoroughly blend; Add this mixture to the Vegetable/Broth mixture in the large saucepan.
  5. Increase the temperature to Medium/Medium-Low and bring to a boil, while whisking continuously; once the mixture has thickened (about 5 minutes), remove from heat and add the Shredded Cheddar.
  6. Serve with your favorite GF Bread and Enjoy!
Appetizers, Dinner, Hors d’Oeuvres, Lunch, Main Dish, Snacks, Soup
American


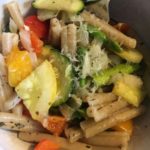
Pasta Primavera in a Lemon-Butter Sauce ~ Gluten Free

Pasta Primavera in a Lemon-Butter Sauce ~ Gluten Free

What better way to celebrate Spring than making “Pasta Primavera,” a healthy Spring Vegetable & Pasta dish…after all, “primavera” means ‘spring style’ in Italian 😉 I love this easy and very versatile recipe….I use as many veggies that I can find in my refrigerator before they go bad. Asparagus, squash, broccoli, bell peppers, carrots, zucchini, onions, snow peas…the possibilities are endless! And, the light lemony-butter sauce makes this recipe irresistible 🙂
*The original version of this recipe came from evolvingtable.com – thank you SO much for sharing! I have adjusted the original recipe in order to make it gluten-free and allergy-friendly for my family.

The Pasta:

  • 4 Cups Gluten-Free Pasta, dry (any style is fine)

The Vegetables:

  • 1 lb Asparagus (trim ends and cut into 2″ pieces)
  • 1 large Yellow Squash (quartered lengthwise & cut into bite-size pieces)
  • 1 large Zucchini (quartered lengthwise & cut into bite-size pieces)
  • 2 large Bell Peppers, any color (cut into bite-size pieces)
  • 1 large Vidalia Onion (cut into bite-size pieces)
  • 2-3 Tbsp Olive Oil
  • 1/2-1 tsp Kosher Salt
  • 1/4-1/2 tsp Ground Black Pepper
  • 1 tsp Dried Oregano
  • 1/2 tsp Dried Thyme
  • 1/2 tsp Dried Marjoram
  • 1/2 tsp Dried Basil

The Lemon-Butter Sauce:

  • 4 Tbsp Butter, salted ((1/2 stick))
  • 1 Large Lemon (Zest and juice)
  • 1 1/2 tsp Garlic, minced (I use the already-minced Garlic in a jar)
  • 1/2 Cup Water (reserved from the pasta water)
  • 1 Tbsp Dried Basil (or 1/4 Cup fresh, chopped)
  • 1/2-3/4 Cup Parmesan, grated (fresh is best)
  • 1/2-1 tsp Salt (to taste)

The Pasta:

  1. In a large pot, cook the pasta according to the package instructions for al dente; reserve 1/2 cup pasta water for the sauce before draining the rest of the water; set the pasta aside in a colander & keep the large pot available for cooking the sauce, etc.

The Vegetables:

  1. Preheat oven to 425 degrees.
  2. Line a large baking sheet with foil and lightly spray with non-stick cooking spray; set aside.
  3. While the Pasta is cooking, cut up all of the vegetables into bite-size pieces and place them into a large bowl. *This step can be done ahead of time, if desired (just keep veggies refrigerated until ready to use).
  4. Add the Olive Oil and spices to the vegetables in the bowl and toss to thoroughly coat; spread the veggies evenly onto the prepared baking sheet and bake for 15-18 minutes or until veggies are tender.

The Lemon-Butter Sauce:

  1. Using the same pot that you used to cook the pasta, add the butter, lemon zest, lemon juice and garlic; cook over medium-low heat until the butter is completely melted and the garlic becomes fragrant (about 2 minutes).
  2. Add the cooked Pasta, the reserved Pasta Water and the roasted vegetables to the Lemon-Butter mixture, tossing until thoroughly coated.
  3. Next, add the Basil, 1/2 cup Parmesan and Salt (to taste); toss to combine.
  4. Serve with freshly-grated Parmesan and fresh chopped Basil, if desired.
  5. Oh, so yummy! Enjoy 🙂
Dinner, Lunch, Main Dish
American, Italian


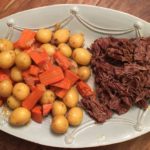
“Instant Pot” Beef Pot Roast

“Instant Pot” Beef Pot Roast

This recipe takes me right back to my childhood! I LOVED Pot Roast…and still do, but I don’t care for the taste of the pre-packaged Pot Roast seasoning mixes, nor do I like the LOOOONG wait while cooking in my slow cooker. Enter the Instant Pot! I hate to admit that a small Kitchen appliance could intimidate me, but the Instant Pot did. However, thanks to Tiffany @ lecremedelacrumb, I put my big girl pants on and broke out last year’s Christmas gift…the Instant Pot! Her recipe for “Instant Pot” Pot Roast is out of this world AND it’s ready in a little over 1 hour (depending on the size of your roast). I am ready to conquer many more recipes using my Instant Pot (my family also thanks you, Tiffany!)
I hope those of you who are afraid of your Instant Pots will try this recipe and see exactly what I mean 🙂

The Roast:

  • 3-5 lb Beef Chuck Roast
  • 1-2 Tbsp Canola Oil
  • 1 tsp Salt
  • 1 tsp Onion Powder
  • 1 tsp Garlic Powder
  • 1/2 tsp Ground Black Pepper
  • 1/2 tsp Paprika
  • 1 lb Baby Yukon Potatoes (or Baby Red Potatoes, Idaho (cut into bit-size pieces))
  • 4 Large Carrots (cut into bite-size pieces or Baby Carrots)
  • 1 Large Vidalia Onion (or Red, Yellow; cut into large chunks)
  • 4 Cups Beef Broth (Regular or Reduced Sodium; a 32 oz (2 lb) box)
  • 2 Tbsp Worcestershire sauce

The Slurry to make Gravy:

  • 1/4 Cup Water
  • 2 Tbsp GF Corn Starch
  1. In a small bowl, combine the spices (salt, onion and garlic powders, black pepper and paprika) and rub all over the Chuck Roast; set aside.
  2. Set your Instant Pot to “Saute” and drizzle in the Canola Oil; let heat for about 30 seconds, then place the Roast into the Instant Pot – do not disturb for 3-4 minutes until that side is browned; using tongs and a long meat fork, turn the Roast onto the next side and let “saute” for 3-4 minutes without disturbing; repeat this process until all sides are browned/seared.
  3. Once all sides of Roast are browned (to seal in the juices), turn the Instant Pot to “Pressure Cook” on “high” for 60-80 minutes (60 minutes for a 3 lb. Roast; 70 minutes for 4 lbs and 80 minutes for 5 lbs).
  4. Add the Onion, Beef Broth and Worcestershire Sauce to the Instant Pot and place lid on top, turning to the “locked” position.
  5. When the pressure cooking time is finished for the Roast, allow the Instant Pot to do a natural release for 10 minutes (it will start counting up in minutes – do not disturb the pot and allow it to de-pressurize); after the 10 minutes, press the vent down (or turn to the release position, depending on your make of Instant Pot) and allow all of the steam to release until the float valve drops down, indicating that the pot is de-pressurized and it’s safe to remove the lid.
  6. Next, add the Baby Potatoes and Carrots and, once again, set to “pressure cook” for 10 minutes.
    *Note: if you put the potatoes and carrots in at the beginning of the cooking process (along with the Roast and onions), they will be VERY mushy.
  7. Once the 10 minutes are up, press or turn the vent to the release position to allow steam to release again.
  8. Once the Instant Pot has de-pressurized and the float valve has dropped, remove the lid and carefully transfer the Roast, Potatoes, Carrots and Onions to a serving platter; shred the roast with two forks; set aside.
  9. Using a slotted spoon or handheld strainer, remove any bits from the broth in the Instant Pot; turn setting to the “Soup/Stew” position and let broth come to a boil.
  10. Meanwhile, make a “slurry” out of mixing the Water and Corn Starch thoroughly together in a small bowl.
  11. Once the broth in the Instant Pot is boiling, add the “slurry” and whisk until the liquid thickens to form a gravy; add salt, pepper and onion powder, if needed.
  12. Drizzle desired amount of the gravy over the shredded Pot Roast and Veggies; Garnish with fresh Thyme or Parsley.
    Yummy! 🙂

Notes: if using a frozen Roast, skip the searing step and just rub the spices over the Roast and add 20-30 minutes to the initial “Pressure-cooking” time. Proceed with the remaining steps.

Dinner, Lunch, Main Dish
American