Frosted Pumpkin Spice Cookies ~ Gluten Free

Frosted Pumpkin Spice Cookies ~ Gluten Free

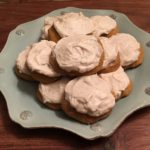
This is an updated version of my post from last year (2019), which was not a GF recipe. Fear not….this IS a Gluten Free recipe for soft, sweet and delicious Frosted Pumpkin Cookies. These wonderful little treats are mildly flavored with a blend of spices that you can adjust to satisfy your personal taste. Please let me know what you think 🙂

The Cookie:

  • 3 1/2 Cups Gluten Free All-Purpose Flour Blend (I used Better Batter brand)
  • 1 tsp Baking Powder, GF
  • 1 tsp Baking Soda
  • 1/2 tsp Table Salt
  • 2 1/2 tsp Cinnamon (increase to 3 tsp if you want a spicier taste)
  • 1/2 tsp Nutmeg (increase to 3/4 – 1 tsp for a spicier taste)
  • 1/4 tsp Ground Ginger (increase to 1/2 tsp for a spicier taste)
  • 1 Cup Dixie Crystals Extra Fine Granulated Sugar
  • 1 Cup Light Brown Sugar (packed)
  • 1 Cup Vegetable Oil (I use Canola Oil)
  • 2 Cups Canned Pumpkin Puree
  • 2 Large Eggs (lightly beaten)
  • 1 tsp Vanilla Extract (GF)

The Frosting:

  • 1 Cup Cream Cheese, softened (I use Philadelphia Cream Cheese (full fat))
  • 1/2 Cup Salted Butter, Softened
  • 3 tsp Vanilla Extract (GF)
  • 4 Cups Powdered Sugar
  • 1 tsp Ground Cinnamon

Making the Cookies:

  1. Line cookie sheet/sheets with parchment paper or silicone baking mats; set aside.
  2. Gather the ingredients.
  3. In a Large mixing bowl, sift together the GF Flour, Baking Powder, Baking Soda, Salt and Spices; Mix well; Set aside.
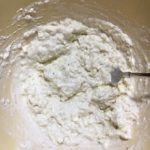
  4. In another Large mixing bowl, combine the Sugars, Oil, Pumpkin, Eggs and Vanilla Extract until completely blended.
  5. Gradually add the dry ingredients, one cup at a time, to the wet ingredients and mix until smooth.
  6. Cover bowl with plastic wrap or dish cloth and let rest for 30 minutes. This allows the GF Flour to absorb the moisture from the wet ingredients which reduces (hopefully, eliminates!) the grainy texture.
  7. When ready to bake the cookies, place oven rack in the middle position and preheat oven to 350 degrees.
  8. Using a Small cookie scoop (or medium, if you want larger cookies) scoop out the cookie dough onto the prepared baking sheets.
  9. Spray the back of a spoon with non-stick cooking spray and use the spoon to flatten the cookie mounds (re-apply spray as often as needed).
  10. Bake for 10-12 minutes.
  11. Let cookies cool on cookie sheet for 1-2 minutes before transferring to a wire rack to cool completely before frosting.

Making the Frosting:

  1. While the cookies are baking and cooling start making the frosting…
  2. Using a Handheld or Stand Mixer, beat the softened Butter, Cream Cheese and Vanilla Extract until well-blended.
  3. Gradually add the Powdered Sugar, one cup at a time, mixing until completely blended and creamy.
  4. Add the Ground Cinnamon and Mix thoroughly.
  5. You’re ready to frost the cookies and enjoy!

Note: The original recipe that I posted in 2019 was from “Two Sisters Crafting,” which I have updated so it is now GF, thanks in large part to “amyin the kitchen.com 🙂 I just love converting and joining recipes to see what the end results will be! Thanks so much for sharing your wonderful recipes!!!

Desserts, Snacks
American


Buffalo Chicken Dip

Buffalo Chicken Dip

This is our middle daughter’s favorite food…I seriously think she would eat it for Breakfast, Lunch and Dinner EVERY day of her life if others didn’t step in and insist on some variety in her diet 😉
It really IS delicious, though! Our family doesn’t just eat it as an appetizer or hors d’oeuvres, but as a meal with fresh bread/rolls and a big salad 🙂 A definite 5-Stars in this household!

  • 4-6 Large Boneless, Skinless Chicken Breasts (about 3 lbs.; boiled and shredded)
  • 1 1/4 Cup Hot Sauce (I use Sweet Baby Ray’s Buffalo Wing Sauce because it’s Gluten Free and SO yummy!)
  • 2 Cups Ranch Dressing (I make my own using Hidden Valley Ranch Powder, but store-bought in the bottle is just fine ;))
  • 2 Blocks Cream Cheese ((16 oz) I use full fat Philadelphia Cream Cheese)
  • 3 Cups Shredded Cheddar Cheese (You can also use half Cheddar and half Monterey Jack)
  1. Preheat oven to 350 degrees.
  2. In a 9″ x 13″ (or 4 quart) baking dish dish, mix together the Chicken, the Hot Sauce and 1 1/2 Cups Shredded Cheese until thoroughly blended; Spread out evenly in the pan and set aside.
  3. In a medium saucepan, heat the Ranch Dressing and the Cream Cheese over Low heat until the Cream Cheese has completely melted and the mixture is smooth. Pour this mixture evenly over the Chicken mixture in the baking dish.
  4. Top with the remaining Shredded Cheese.
  5. Bake uncovered for approximately 30-35 minutes, or until edges are bubbly and the top is lightly brown.
  6. Serve with your favorite chips, pita chips, bread, etc. Enjoy 🙂
Appetizers, Dinner, Hors d’Oeuvres, Lunch, Main Dish, Side Dish, Snacks
American


Apple Cider Cupcakes with Cream Cheese Frosting ~ Gluten-Free

Apple Cider Cupcakes with Cream Cheese Frosting ~ Gluten-Free

Oh my gosh! These Cupcakes are out of this world!!! I seriously could eat the entire batch 🙂 The Apple Cider adds a wonderful flavor and a bit of caramelized texture – they are delicious even without the frosting! You better double the batch like I did 😉
This recipe earned an instant 5-Star rating in our home!
Note: I adapted this wonderful recipe from forkinthekitchen.com to make it GF – Thank You for sharing!!!

Equipment

  • Muffin Tin
  • Cupcake Liners
  • Stand or handheld Mixer
  • Large Mixing Bowl

The Cupcake Ingredients:

  • 2 1/2 Cups Better Batter All Purpose Gluten Free Flour Mix
  • 1 tsp Baking Soda
  • 1 tsp Baking Powder, GF
  • 1 tsp Table Salt
  • 2 tsp Ground Cinnamon
  • 1 Cup Granulated Sugar (I use Dixie Crystal brand)
  • 1/2 Cup Light Brown Sugar, packed
  • 1 Cup Salted Butter, Softened (I use Land O’ Lakes brand)
  • 2 tsp Vanilla Extract
  • 4 Large Eggs (room temperature)
  • 1 Cup + 4 Tbsp Apple Cider

The Cream Cheese Frosting Ingredients:

  • 8 Oz. Cream Cheese, softened (I used Full Fat Philadelphia brand)
  • 1/4 Cup Salted Butter, Softened
  • 1/2 tsp Vanilla Extract
  • 2 Tbsp Apple Cider
  • 3 1/2 – 4 Cups Powdered Sugar
  • Ground Cinnamon ((optional – to either mix in with the frosting or to sprinkle on the top))

Making the Cupcakes:

  1. Place oven rack in the middle position and preheat oven to 350 degrees.
  2. Line 1-2 muffin tins with cupcake liners; set aside.
  3. In a large mixing bowl, whisk together the GF Flour, Baking Soda, Baking Powder, Salt and Cinnamon until completely blended; Set aside.
  4. Using a Stand or Handheld Mixer, fitted with the paddle attachment, cream the Butter and Sugars until light and fluffy.
  5. Next, with the mixer set on low, add the Vanilla Extract and the Eggs, one at a time; Continue mixing until thoroughly blended.
  6. With the mixer still set on Low, alternate adding the GF Flour mixture (1/2 cup at a time) and the Apple Cider (a couple of Tablespoons at a time) to the Butter-Sugar mixture, blending until just combined after each addition.
  7. Scoop the Cupcake Batter into the lined muffin tin/tins, filling each about 2/3 full.
  8. Bake for approximately 17-20 minutes, or until toothpick inserted into the center comes out clean.
  9. Let cool in the pan for about 5-10 minutes and then transfer to a wire cooling rack to cool completely before frosting.

Making the Frosting:

  1. Using a Stand or Handheld Mixer, fitted with the paddle attachment, cream the softened Cream Cheese and Butter until light and fluffy.
  2. Slowly add the Vanilla Extract and Apple Cider, blending thoroughly.
  3. Next, with the mixer set on low, add the Powdered Sugar, 1/2 cup at a time, beating well between each addition. I usually add between 3 1/2 to 4 cups of Powdered Sugar for the right consistency. Note: If you’re adding Ground Cinnamon into the Frosting, do so now (I usually add several pinches).
  4. Spread or pipe the Frosting onto each cooled cupcake and top with a little Ground Cinnamon, if desired.
  5. Enjoy!
Desserts, Snacks


Gluten Free Lemon Cookies with Lemon-Cream Cheese Frosting

Gluten Free Lemon Cookies with Lemon-Cream Cheese Frosting

Crispy Lemon-Butter Cookies accented with Fresh Lemon Zest and topped with a Creamy Lemon Frosting infused with more Fresh Lemon Zest make these cookies sinfully delicious! I have to make a double batch every time I make these, because my family gobbles them up so quickly 🙂 If you like Lemony desserts, you’ll LOVE these cookies!

The Lemon Cookies

  • 1 Cup Unsalted Butter, softened ((2 Sticks))
  • 1 Cup Powdered Sugar
  • 1/2 tsp Salt
  • 1/2 tsp Pure Vanilla Extract
  • 1 Tbsp Lemon Zest
  • 1 Tbsp Fresh Lemon Juice
  • 2 Cups Gluten Free All-Purpose Flour (Sifted)

The Creamy Lemon Frosting

  • 1/2 Cup Cream Cheese, softened
  • 1 1/2 Cups Powdered Sugar
  • 1 Tbsp Lemon Zest
  • 1 Tbsp Fresh Lemon Juice
  • 1/8 tsp Butter, Unsalted
  1. Gather the ingredients needed for the Lemon Cookie dough.
  2. Using a Stand Mixer fitted with the Paddle attachment, cream together the Butter, Powdered Sugar and Salt until light and fluffy.
  3. Add the Vanilla Extract, Lemon Zest and Lemon Juice to the Butter mixture, mixing until combined.
  4. Next, gradually add the GF Flour, 1/2 cup at a time, to the mixing bowl, blending thoroughly between each addition and scraping down the sides of the bowl as needed.
  5. Once the cookie dough has been thoroughly blended, turn the dough out onto a large cutting board and roll into a log about 9″-10″ in length. Wrap this log tightly in plastic wrap and place in freezer for at least 2 hours.
  6. When dough is chilled enough for slicing, preheat oven to 350 degrees and remove chilled dough from the freezer.
  7. Line a cookie sheet with a nonstick baking mat or Parchment paper. Set aside.
  8. Using a sharp knife, slice the dough log into 1/4″ thick sections and place each disc about 2″ apart onto the prepared cookie sheet.
  9. Bake for 12-15 minutes, or until edges turn a light golden-brown.
  10. Let cookies cool on pan for 1-2 minutes until removing to a wire cooling rack. Cool completely before applying the frosting.

Making the Creamy Lemon Frosting

  1. Using a Stand Mixer fitted with the Paddle attachment, cream together the softened Cream Cheese and Powdered Sugar until well-blended.
  2. Add the Lemon Zest, Lemon Juice and Salt to the Cream Cheese mixture. Continue beating until completely mixed.
  3. Transfer the Frosting to a piping bag, fitted with a large star tip. Please Note: this is optional, as you can apply the frosting either using a butter knife or a piping bag (or plastic storage bag) with the end snipped off.
  4. When the cookies are completely cooled, spread or pipe the desired amount of frosting onto each cookie. Enjoy 🙂

Note: I usually make the frosting while the cookies are baking, so I can place it into the refrigerator to set. If you find that the frosting gets too soft while piping, place it into the refrigerator for 10-15 minutes to harden a little.

Desserts, Snacks


Chicken Pillows

Chicken Pillows

If you like Crescent Rolls, Cream Cheese and Chicken, you will LOVE this recipe! One of our daughters discovered this delicious meal while on a sleepover and it quickly became one of the most requested meals in our household!!! Now, it’s a favorite with our children and their sleepover guests…who needs pizza, when you can have these yummy, easy-to-prepare Chicken Pillows?!? A must-have in every house 🙂 (Thanks for sharing this wonderful recipe, Jennifer!)

  • 4 Cups Chicken (Cooked and cubed or shredded)
  • 8 Oz. Cream Cheese (Softened)
  • 6 Tablespoons Salted Butter (Softened)
  • 2 teaspoons Emeril’s Chicken Rub (Or similar product)
  • 4 Tablespoons Skim Milk
  • 2 teaspoons Minced Dry Onion
  • 2 Packages/Tubes Crescent Rolls
  • 2 Tablespoons Salted Butter (Melted (for the topping))
  • 1/4 Cup Seasoned Bread Crumbs (I use Italian Style (for the topping))
  1. Preheat oven to 350 degrees. Gather the ingredients
  2. In a large bowl, cream together the softened Cream Cheese and Butter until you reach the consistency of cottage cheese.
  3. Add the cooked and cubed/shredded chicken, Emeril’s Chicken Rub, Milk and Dried Onions to the cream cheese mixture. Mix well and set aside.
  4. Cover a baking sheet with foil that is VERY lightly sprayed with non-stick cooking spray or a Silicone Baking pad. Set aside.
  5. Separate the Crescent Rolls into rectangles and press the diagonal perforations together to seal/close. You should have 8 rectangles (4 per package) when completed.
  6. Scoop 1/2 cup of the chicken mixture into the center of each rectangle.
  7. Next, gather up the four corners and twist/press them together lightly at the top of the “pillow” – see photo.
  8. Seal the sides by pressing dough together along the edges.
  9. Repeat with remaining dough and chicken mixture. Place on prepared baking sheet.
  10. Brush each “Pillow” with melted butter and sprinkle with the flavored bread crumbs.
  11. Bake for 20-25 minutes…until golden brown and the bottoms are no longer doughy.
  12. Serve with your favorite veggie and ENJOY!!! 🙂

Sometimes, I prepare this same dish, but in Casserole form by using 2 Crescent Dough Sheets. I simply layer the bottom of a lightly-sprayed deep 9″ x 13″ baking/casserole dish with one Crescent Sheet. Then, spread the chicken/cream cheese mixture evenly over the sheet. Place the 2nd Cresent Dough Sheet on top of this. Brush with the melted butter and sprinkle with the bread crubs. Bake for 20-25 minutes. Yummy 🙂

Main Dish


Easy Cream Cheesey Chicken (4 Ingredients)

Easy Cream Cheesey Chicken (4 Ingredients)

A friend shared this Easy Cream Cheesey Chicken recipe with me years ago, but I tucked it away in my recipe box and forgot about it…until last week! My family RAVED when they tasted it and asked when I was going to make it again!!! With just 4 ingredients, easy to make AND delicious, this recipe goes straight to the top of my “Go To” recipes :). I hope you and your family enjoy it as much as we do!

  • 3-4 Breasts Boneless, Skinless Chicken (Trimmed, rinsed and dried)
  • 4-6 Tablespoons Cream Cheese (I used about 2 Tablespoons per Chicken Breast, but you may increase or decrease as desired)
  • 2-3 Tablespoons Green Onions (Chopped, as many or as few as you want)
  • 3-4 Slices bacon (I used Thick Sliced Bacon)
  1. Lower oven rack to about 6″-8″ from the bottom. Turn oven to Broil and let heat up while you prepare the chicken.
  2. Line a baking sheet with foil and set aside. Gather the ingredients.
  3. Place a chicken breast between two sheets of wax paper and pound to desired thickness (I usually pound it to about 1/4-1/2 inch at the thickest part of chicken). Repeat with the other breasts. Set aside.
  4. Mix the cream cheese together with the chopped green onions, using a fork.
  5. Wrap each chicken breast around 1-2 tablespoons of the cream cheese and onion mix.
  6. Next, wrap one piece of bacon around each breast and secure with a toothpick.
  7. Place the rolled chicken in the foil-lined baking sheet and broil for 20-25 minutes. Let rest for about 5 minutes before serving.
  8. Serve with rice and your favorite veggie. Enjoy!
Main Dish