Raspberry-Lemon Scones ~ Gluten-Free

Raspberry-Lemon Scones ~ Gluten-Free

These delicious Scones are so easy to make and only require about 10 ingredients (including the usual staples – baking soda, baking powder, etc.) that we usually have in our kitchens. Plus, you can substitute whatever berries you have on hand 😉 A huge “Thank You” to Chris Scheuer of “thecafesucrefarine” for sharing the original version of this recipe – I made a few small changes to make it Gluten-Free and allergy-friendly for my family. 🙂

The Scones:

  • 1 Cup Heavy Cream
  • 8 Tbsp Unsalted Butter (melted)
  • 2 Cups All-Purpose Gluten Free Flour (I used Bob’s Red Mill GF “1 to 1 Baking Flour”)
  • 6 Tbsp Granulated Sugar
  • 1 Tbsp Baking Powder
  • 1/2 tsp Baking Soda
  • 1/4 tsp Salt
  • 1 Large Lemon (Zest (reserving the Juice for the glaze))
  • 1/2 Cup Fresh Raspberries, broken in half (or any other fresh berries that you have on-hand)

The Lemon Glaze:

  • 2 Cups Powdered Sugar
  • 3 Tbsp Half & Half (or whole milk)
  • Lemon Juice from 1 large lemon (from the Lemon used in the scone mix above)

Making the Scone Dough:

  1. Line a baking sheet with parchment paper or a silicone baking pad; set aside.
  2. Pour the 1 Cup of Heavy Cream in a freezer-proof container and freeze for 10-15 minutes.
  3. Next, melt the butter in a microwave-proof container (I do this in 30 second increments until butter is fully melted); set aside to cool a little while you prepare the rest of the dough.
  4. In a Large mixing bowl, whisk the GF Flour, Baking Powder and Soda, Sugar, Lemon Zest and Salt until thoroughly mixed.
  5. Once the Heavy Cream has been in the freezer for 10-15 minutes, combine it with the melted Butter and stir with a fork until clumps appear (looks kind of like curdled milk).
  6. Pour this Cream/Butter mix into the Flour mixture and stir with a rubber spatula until ingredients are well-combined.
  7. Gently fold the halved-raspberries into the Scone dough until the berries are evenly distributed.
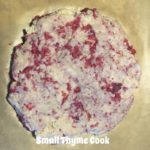
  8. Dump the dough onto the prepared baking sheet and form/pat it into a circle (about 12″-14″ in diameter); place in refrigerator for 15-45 minutes.
  9. Meanwhile, place oven rack in the middle position of your oven and Preheat oven to 400 degrees.
  10. Once the dough has been refrigerated for at least 15 minutes, remove from the freezer and cut into 6 or 8 “pie pieces” (triangles) – this works best with a really sharp knife that has been sprayed with a non-stick cooking oil; separate and place the triangles evenly on the sheet, leaving at least 2″ between each one.
  11. Bake for approximately 18-20 minutes (remember, all ovens heat and cook at different rates, so keep an eye on your scones) or until they are golden brown around the edges.
  12. Remove from oven and transfer to a cooling rack to cool completely before icing.

Making the Lemon Glaze:

  1. In a medium bowl, combine the Powdered Sugar, Half & Half and Lemon Juice; whisk until smooth and pourable (add more Powdered Sugar for a thicker consistency or add more Half & Half for a thinner consistency).
  2. Enjoy!
Breakfast, Desserts, Snacks
American, English, Irish, Scottish


Stovetop Chicken in an Indian Curry Sauce

Stovetop Chicken in an Indian Curry Sauce

My mouth was watering just smelling this sweet and savory light Indian Curry Sauce simmering on the stove! The spices, cream and honey meld together perfectly into the most fragrant and delectable sauce that I have ever tasted 🙂 This yummy sauce pairs nicely with just about any vegetable, protein and/or starch. I hope you enjoy it!

The Curry Sauce:

  • 1/4 Cup Vegetable OIl (I used Canola Oil)
  • 1 Medium Onion, Finely Chopped (I used a Vidalia Onion)
  • 3 tsp Minced Garlic (I use the already minced Garlic in a jar)
  • 1/2 tsp Ground Ginger
  • 2 Tbsp Curry Powder (I used Madras Curry for a little bit more heat)
  • 3 1/2 Cups Chicken Broth
  • 1 Cup Heavy Cream (You can also use Half & Half or Whole MIlk)
  • 1 Tbsp Gluten Free Cornstarch
  • 2 heaping tsp Honey
  • 2-3 Pinches Salt
  • 2-3 Pinches Ground Black Pepper

The Chicken:

  • 4 Boneless, Skinless Chicken Breasts (Rinsed, trimmed and patted dry with a paper towel)
  • 1-2 Tbsp Salted Butter
  • 1-2 Tbsp Canola Oil
  • Salt & Pepper (Sprinkled over both sides of Chicken)

Making the Curry Sauce:

  1. Gather ingredients.
  2. In a medium-sized heavy saucepan, heat the Canola Oil over Medium heat.
  3. Add the finely chopped onion and cook for about 5 minutes, or until onion is translucent.
  4. Stir in the Garlic, Ginger and Curry and cook until fragrant (1-2 minutes).
  5. Add the Chicken Broth and stir well. Reduce heat to Low and simmer for about 20 minutes to reduce the mixture a little.
  6. While the broth is reducing, whisk the Cream, Cornstarch and Honey together in a small bowl until completely blended and smooth.
  7. Slowly whisk the Cream mixture into the Chicken Broth mixture, combining the ingredients completely. Simmer for about 5 minutes. Add a few pinches of Salt and Pepper to taste.
  8. Keep the sauce warm while cooking the chicken.

Cooking the Stovetop Chicken:

  1. In a large skillet, heat the Butter and Oil over medium-low heat until the butter is completely melted and bubbling.
  2. Add the Chicken Breasts, sprinkling with Salt & Pepper on both sides. Cook on each side for about 5-7 minutes per side, making sure that both sides are a light golden brown (internal temperature should be 165 degrees)
  3. Once the Chicken Breasts are nicely browned on both sides, use a ladle to spoon several scoops of sauce over the Chicken Breasts in the skillet. Turn the breasts over to thoroughly coat in the sauce.
  4. Serve the Chicken Breasts whole with your favorite side and vegetable and more sauce drizzled over the top…or cut up into bite-sized pieces and serve over Rice and with Steamed Broccoli and more yummy sauce!!!
    Enjoy!
Dinner, Main Dish
Indian


Gluten Free Chocolate Brownie-Cream Sandwiches

Gluten Free Chocolate Brownie & Cream Sandwiches

These little treats are sinfully rich, moist and delicious 🙂 They are certain to please any Gluten-Free Chocoholic! I converted this recipe from The Pioneer Woman’s (aka: Ree Drummond) “Chocolate Devils,” which were intended to be a cake-like consistency, but to our delight the Gluten-Free version turned out to be a moist, brownie-like consistency. A 5-Star hit in our household 🙂

Brownie Ingredients:

  • 2 Cups Gluten Free All-Purpose Flour, sifted (must be sifted to reduce grittiness)
  • 2 Cups Granulated Sugar
  • 1/4 tsp Salt
  • 1 Cup Butter, salted (2 sticks)
  • 4 Tbsp Cocoa (heaping Tbsps)
  • 1 Cup Boiling Water
  • 1/2 Cup Buttermilk
  • 1 tsp Baking Soda
  • 1 tsp Vanilla Extract
  • 2 Large Eggs

The Cream-Filling Ingredients:

  • 5 Tbsps All-Purpose Gluten Free Flour, Sifted (again, must be sifted to reduce grittiness)
  • 1 Cup Whole Milk
  • 1 tsp Vanilla Extract
  • 1 Cup Salted Butter, Softened ((2 sticks))
  • 1 Cup Granulated Sugar

The Ganache Ingredients:

  • 3 Cups Heavy Cream
  • 2 tsp Vanilla Extract
  • 4 Cups Semi-Sweet Chocolate Chips

Making the Gluten-Free Brownies

  1. Preheat Oven to 350 degrees.
  2. Gather the ingredients.
  3. Spray a cookie sheet with non-stick cooking spray. Line the cookie sheet with parchment paper and spray the paper as well. Set aside.
  4. In a stand mixer, combine the Flour, Sugar and Salt on low. Set aside while moving to the next step.
  5. In a small or medium saucepan, melt the butter. Add the Cocoa Powder and mix until completely combined. Add 1 Cup boiling water to the saucepan, mixing well and bring to a boil. Let boil for about 30 seconds. Add this mixture to the Flour mixture and blend on low until combined. Let cool slightly.
  6. In a medium-sized bowl, whisk the Buttermilk, Baking Soda, Vanilla and Eggs until thoroughly combined. Pour this into the Flour-Butter mixture and blend on low until completely combined.
  7. Scrape the Brownie mixture into the prepared cookie sheet, spreading evenly over the parchment paper.
  8. Bake for 20-25 minutes, or until toothpick inserted into the center comes out clean. Cool completely! This is very important – if brownies are not cooled all the way, the cream filling will just melt and turn to goop 🙁 If I have the time, I let mine cool overnight.
  9. Once completely cooled, cut the brownies into 2″ squares and place on a wire rack on another cookie sheet (you can use a square cookie cutter if you have one). Set in a cool spot while you prepare the cream filling.

Making the Cream Filling:

  1. In a small saucepan, whisk the GF Flour and Milk together and heat over medium-low heat, stirring constantly, until very thick (like pancake batter). Remove and cool completely. Add the Vanilla and blend thoroughly.
  2. Meanwhile, in a stand mixer fitted with the paddle attachment, cream the softened Butter and Sugar until VERY light, smooth and fluffy.
  3. Next, add the completely cooled Flour-Milk-Vanilla mixture to the Butter-Sugar mixture and beat on medium to medium-high for about 5-7 minutes – you want it to look like whipped cream.
  4. Using a pastry bag or plastic freezer (these are thicker and sturdier than regular ones) baggie fitted with a large star tip, fill the bag with the Cream Filling and pipe onto one of the cooled brownies. Place another brownie on top and press down gently. Repeat with the remaining brownies, reserving a small amount of the cream for the tops of the brownies. Set aside while you prepare the Ganache.

Making the Ganache:

  1. In a large saucepan, heat the Heavy Cream over medium-low until VERY hot. Add the Vanilla and Chocolate Morsels and stir until all of the chocolate is melted and blended completely.
  2. Remove Ganache from the heat and ladle over each Brownie Sandwich. Chill in the refrigerator for at least 1 hour.
  3. When ready to serve, top each Brownie Sandwich with some of the Cream and perhaps a cherry or raspberry 🙂
  4. Enjoy!

I know that there are a lot of steps involved, but believe me it’s well worth it!!!

Desserts, Snacks