Chocolate Frosted Brownies ~ Gluten Free

Chocolate Frosted Brownies ~ Gluten Free

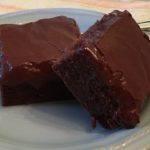
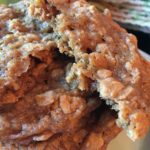
These GF Chocolate Frosted Brownies are incredibly fudgy, rich and delicious!!! I adapted this recipe from a very popular Brownie recipe from many peoples’ childhoods, called the “Lunch Lady Brownies” – the only changes that I made was to substitute the regular gluten-containing flour with GF All-Purpose Flour and they turned out perfect! My family had NO idea that they were Gluten Free 😉 Yummy!!!
A huge “Thank You” to Holly @ Life In The Lofthouse for sharing the original “Lunch Lady Brownies” recipe 🙂

Equipment:

  • 9″ x 13″ Baking Pan
  • Aluminum Foil
  • Non-Stick Cooking Spray
  • Stand or Handheld Mixer

The Brownie Ingredients:

  • 1 Cup (2 Sticks) Salted Butter (Melted)
  • 1/2 Cup Unsweetened Cocoa Powder
  • 2 Cups All-Purpose Gluten Free Flour (I used Better Batter)
  • 2 Cups Dixie Crystals Extra Fine Granulated Sugar (You may use your desired brand of granulated sugar)
  • 4 Large Eggs (I use Egglands Best, but any brand is fine)
  • 4 teaspoons Vanilla Extract

The Chocolate Frosting Ingredients:

  • 1/4 Cup (1/2 Stick) Salted Butter, softened (I use Land O Lakes brand)
  • 1/4 Cup Milk (I use Whole Milk, but 2% or 1% are fine, too)
  • 1/4 Cup Unsweetened Cocoa Powder
  • 3 Cups Powdered Sugar
  1. Preheat oven to 350 degrees.
  2. Line a 9″ x 13″ baking pan with foil and spray with non-stick cooking spray. Set aside.
  3. Using a Stand Mixer or Handheld mixer, fitted with the Paddle attachment, blend the Melted Butter and Cocoa Powder until smooth.
  4. Next, add the GF Flour and Granulated Sugar, mixing until blended…scraping the sides as needed.
  5. Add the eggs, one at a time, until just blended.
  6. Slowly mix in the Vanilla Extract, blending until just combined. The batter will be thick.
  7. Evenly spread the Brownie batter into the prepared Baking Dish.
  8. Bake for 25 to 30 minutes, or until a toothpick inserted into the center comes out clean.
  9. Remove from oven and allow to cool for 15 minutes while preparing the Chocolate Frosting. Note: You want the Brownies to still be warm when you apply the Frosting.

Making the Chocolate Frosting:

  1. Using a Stand Mixer or Handheld Mixer, fitted with the Paddle attachment, combine the Softened Butter, Milk and Cocoa until smooth and creamy.
  2. Gradually add the Powdered Sugar, 1/2 Cup at a time, starting on Low each time to avoid a HUGE powdery mess 😉
  3. Once all of the Powdered Sugar has been added, beat on Medium to Medium-High speed for about 2 minutes, or until light and creamy.
  4. Spread evenly over the top of the Brownies and let cool completely (I know it’s hard to do!!!) before slicing. Note: I remove the entire Brownie using the foil to lift it…and then I slice them 🙂
  5. Serve by themselves, with a glass of cold milk or your choice of Ice Cream! Enjoy!!!
Desserts, Snacks


Oven Baked Barbecue Spare Ribs

Oven Baked Barbecue Spare Ribs

These Barbecue Ribs are a perfect combination of sweet with a touch of heat and the meat literally falls off the bones! I could eat the entire rack!!! I have always LOVED Barbecue Spare Ribs, but have never attempted to make them myself…until now 😉 This wonderful recipe comes from cafedelites.com ~ Thank You for sharing! Also, a HUGE “Thank You” to “Cooking with Ry” for sharing “How to Easily Remove the Membrane From Your Ribs” on his YouTube Channel 🙂

The Rub:

  • 2 tsp Garlic Powder
  • 2 tsp Paprika
  • 2 tsp Table Salt
  • 1 tsp Onion Powder
  • 1 tsp Ground Black Pepper
  • 1 tsp Cayenne Powder
  • 1/2 tsp Ground Cumin
  • 2 Tbsp olive oil
  • 4 lbs Pork Ribs (Baby Back or St. Louis Cut)

The Barbecue Sauce:

  • 2 Cups Barbecue Sauce (I use Sweet Baby Ray’s Original, but use your favorite)
  • 3 Tbsp minced garlic
  • 2 Tbsp olive oil
  • 1 Tbsp Worcestershire sauce
  • 1 tsp Table Salt
  1. Preheat oven to 350 degrees. Place rack in center position of oven.
  2. Line a baking tray with foil and spray with non-stick cooking spray. Set aside.
  3. Remove the membrane from the underside of the ribs and place on the prepared baking sheet. Note: If you have never done this before, go to “Cooking With Ry” on YouTube and search for “How to Easily Remove The Membrane From Your Ribs” – his instructions are very easy to follow and all you need is a dinner knife and some paper towels 😉

Making the Rub:

  1. In a small jar or bowl, combine all of the seasonings for the rub and mix well.
  2. Sprinkle the Rub over the Ribs; then drizzle with the Olive Oil. Rub the seasonings and Oil thoroughly over both sides of the Ribs.
  3. Cover the entire baking sheet with foil.
  4. Bake for 2 hours.

Making the Barbecue Sauce:

  1. While the Ribs are baking, combine the sauce ingredients in a medium bowl until thoroughly blended. Set aside.

Putting it All Together:

  1. Once the Ribs have finished baking, remove them from the oven and take the foil off of the top.
  2. Increase oven temperature to 460 degrees.
  3. While the oven temperature is rising, thoroughly coat the tops of the Ribs with the Barbecue Sauce, reserving some for serving with the Ribs.
  4. Return the Ribs, uncovered, to the oven and bake for 10 minutes.
  5. To caramelize the edges of the Ribs, change the oven setting to Broil, leaving the rack in the center position, and broil for about 3 minutes.
  6. Remove Ribs from the oven and let rest for 10 minutes before slicing.
  7. I hope you enjoy this as much as we did!
Dinner, Main Dish
American


Honey-Sriracha Tofu Bites ~ Dairy-Free; Gluten-Free; Vegan

Honey-Sriracha Tofu Bites ~ Dairy-Free; Gluten-Free; Vegan

This quick & easy recipe is chock full of flavor. It’s sweet with a kick of heat and is ready in about 20 minutes! Serve over rice with your favorite veggie 🙂

  • 14 oz. Medium-Firm or Firm Tofu
  • 1 tsp Garlic, minced
  • 2 Tbsp Sriracha Sauce
  • 2 Tbsp Braggs Liquid Aminos (you may also use Soy Sauce)
  • 4 Tbsp Honey (I usually add 4 Heaping Tablespoons)
  • 2 Tbsp White Wine Vinegar (you may also use Rice Vinegar)
  • 3-4 Tbsp Potato Starch (or GF Corn Starch*)
  • 3 Tbsp Canola Oil
  • 1-2 Chopped Fresh Green Onions (optional for topping)
  1. Gather all ingredients.
  2. Drain the water off of the block of Tofu and set the tofu on several layers of paper towels for about 10 minutes, flipping over a few times (this step helps pull the water out of the tofu, so it won’t “sweat” and add a bunch of liquid to your dish while cooking).
  3. While the tofu is draining, whisk together the Garlic, Sriracha, Braggs Liquid Aminos, Honey and Vinegar until completely blended. Set aside.
  4. Next, cut up the tofu into cubes and place in a medium to large bowl.
  5. Sprinkle the Potato Starch (NOT Potato Flour) over the cubes of Tofu and gently toss to evenly coat. *You may use Corn Starch in place of the Potato Starch, but the end result will be a little different…more crispy and chewy when using the Corn Starch; the Potato Starch results in a softer outside and somewhat “gummy.” My family prefers the Potato Starch, but both end up tasting delicious 😉
  6. In a large non-stick skillet, heat the Canola Oil over Medium to Medium-High heat until it has a shimmer on the surface, which indicates that it’s ready.
  7. Carefully, add the coated Tofu cubes and spread them out evenly. Cook each side for about 2-3 minutes or until Tofu turns a light, golden brown.
  8. Add about 1/2 to 3/4 of the Honey-Sriracha Sauce (the reserve sauce is for topping) to the lightly-browned Tofu and gently stir to coat the Tofu.
  9. Lower the temperature to Low and continue cooking for another 2-3 minutes, or until the sauce has thickened.
  10. Serve over Rice, spooning a little bit of the reserve sauce over the top, and pair with your favorite vegetable. Yummy!

A BIG “Thank You” to pickledplum.com for sharing the original recipe 🙂 I made a few changes in order to make it allergy-friendly for my family.

Dinner, Lunch, Main Dish, Side Dish


Brown Sugar Oatmeal Cookies ~ Gluten-Free

Brown Sugar Oatmeal Cookies ~ Gluten-Free

These Oatmeal Cookies are so buttery and chewy that they melt in your mouth. I also love the fact that there are only 8 ingredients needed…all ingredients that we usually have on-hand.
Of course, a HUGE “Thank You” to Ree Drummond (aka: The Pioneer Woman) for sharing the original recipe for these wonderful cookies! The only thing that I changed was swapping out the regular flour with Gluten-Free Flour 😉 These cookies earned a 5-Star review in our house!

  • 2 Cups Dark Brown Sugar (firmly packed)
  • 1 Cup Salted Butter, Softened
  • 2 tsp Vanilla Extract
  • 2 Large Eggs
  • 1 1/2 Cups Better Batter All Purpose Gluten Free Flour Mix (you can use other brands, but make sure they contain Xanthan Gum – results will vary)
  • 1 tsp Salt (table)
  • 1/2 tsp Baking Soda
  • 3 Cups Gluten-Free Old Fashioned Oats (I use Quaker Brand)
  • 1/2 Cup Finely Chopped Nuts (optional ~ I did not include nuts due to nut allergies)
  1. Preheat oven to 350 degrees.
  2. Gather the ingredients.
  3. Line 1-2 cookie sheets with Parchment Paper or a baking pad. Set aside.
  4. Using a stand mixer, with the paddle attachment, combine the Brown Sugar and Softened Butter until light and fluffy.
  5. Next, add the Vanilla and the Eggs, one at a time, scraping down the sides of the bowl after adding each Egg.
  6. In a separate bowl, combine the GF Flour, Salt and Baking Soda until well-blended.
  7. Slowly add the Flour mixture to the Butter mixture, one cup at a time, mixing until just combined after each addition.
  8. Next, add the Oats (and Chopped Nuts, if using), one cup at a time, scraping the sides of the bowl after each addition. Mix until all Oats are blended (be sure to check the very bottom of the bowl for any dry oats).
  9. Using a cookie scoop or spoon of your desired size (I used a 2″ cookie scoop), drop cookie dough balls onto prepared cookie sheets several inches apart (they spread!)
  10. Bake for 12-14 minutes (longer if you want crispy cookies).
  11. Cool on the cookie sheets for about 2 minutes before transferring them to a wire cooling rack.
  12. Enjoy with a cold glass of milk or a bowl of Vanilla Ice Cream 🙂
Desserts, Snacks


Stove-Top Paprika Chicken Bites (Gluten Free)

Stove-Top Paprika Chicken Bites (Gluten Free)

These crispy, yet tender, Paprika Chicken Bites will have your friends and family asking for more! They are delicious served all by themselves or over GF Pasta and my oven roasted veggies! And, the Lemon really comes out when served cold, making this recipe perfect for a picnic lunch. Enjoy 🙂

The Marinade:

  • 1/4 Cup olive oil (or Canola Oil)
  • 1 Large Juice of Lemon (about 1/4 cup)
  • 1/4 Cup Parmesan Cheese, grated or shredded (I use shredded, because that is all we have in our area)
  • 1 tsp Dried Oregano
  • 1 tsp Salt
  • 1 tsp Ground Black Pepper

The Chicken:

  • 3-4 Medium Chicken Breasts (rinsed, patted dry and cut into bite-size pieces)

The Coating:

  • 1 Cup All-Purpose Gluten Free Flour (I use King Arthur brand)
  • 4 tsp Paprika
  • 1/2 tsp Ground Black Pepper
  • 1 Tbsp Parmesan Cheese, grated or shredded
  • 1/2 Cup Salted Butter (I use Land O Lakes)
  1. In a medium bowl, combine all of the Marinade Ingredients until completely blended.
  2. Place the prepared, bite-size pieces of chicken into a large resealable plastic bag.
  3. Pour the Marinade into the bag with the chicken and close bag securely. Smoosh the chicken around in the marinade to evenly coat. Refrigerate for at least 2 hours.
  4. While the chicken is marinating in the refrigerator, combine the GF Flour Blend, Paprika, Pepper and Parmesan Cheese in a Large bowl, mixing well.
  5. Once the chicken has finished marinating, melt the butter in a Large non-stick skillet over medium heat.
  6. Using a slotted spoon, transfer the chicken pieces from the marinade to the GF Flour mixture in the large bowl. Gently toss to evenly coat all of the chicken pieces.
  7. Once the chicken is ready to cook, transfer the pieces to the large skillet containing the melted butter. Do not move the chicken around for 1-2 minutes, allowing the pieces to turn golden and crispy. Gently flip the pieces over to cook all sides…you may have to reduce the temperature once things get going ;). Test a piece after about 5 minutes to see if it’s done (no longer pink inside). I usually cook mine for a total of 8-10 minutes.
  8. Serve with your favorite sides, over rice or pasta or just by themselves! They are FULL of flavor :). We serve ours over GF Pasta and my oven-roasted veggies…kind of a Chicken Alfredo Bowl!
Dinner, Main Dish


Pan Seared Salmon in a Blueberry-Orange Glaze

Pan Seared Salmon in a Blueberry-Orange Glaze

We received a version of this recipe years ago and I have been trying to replicate it ever since! I think this is as close as I’m going to get 😉 The savory flavor of the Pan-seared Salmon topped with the sweetness of the Blueberry Preserves and Orange juice and just a touch of heat from Cayenne Pepper make this dish unique and very flavorful! A 5-Star winner in our house 🙂

The Salmon:

  • 1 lb Salmon (cut into 4 fillets; skin removed, if desired)
  • 1 Tbsp Olive Oil
  • 1 Tbsp Salted Butter
  • 1-2 pinches Salt
  • 1-2 pinches Ground Black Pepper

The Blueberry-Orange Glaze:

  • 3/4-1 Cup Blueberry Preserves (I use Bonne Maman)
  • 1/4-1/2 Cup Orange Juice (start with 1/4 and add more if needed)
  • 2 tsp Fresh Orange Zest
  • 1-2 pinches Cayenne Pepper (start with 1 and add more, if desired, after the glaze has cooked for a few minutes)

Pan-Searing the Salmon:

  1. Rinse Salmon under cold water and pat dry with paper towels; season with salt and pepper; set aside.
  2. In a large non-stick frying pan, heat the Olive Oil and Butter over Medium heat until there is a sheen on the surface and the butter is completely melted.
  3. Place the Salmon fillets, skin side up, into the frying pan; do not move them around – this allows them to get that nice golden, crispy layer; cook for about 4-5 minutes, depending on the thickness of your fillets.
  4. After the first side is done, carefully flip the fillets over and cook for another 4-5 minutes. Reduce temperature to medium-low/low, if needed.
  5. Once the Salmon is done, carefully transfer the fillets to a warming dish, reserving any oil/butter in the pan; set fillets aside.

Making the Blueberry-Orange Glaze:

  1. Using the same skillet that you used to cook the Salmon, add the Blueberry Preserves, Orange Juice, Orange Zest and Cayenne Pepper, mixing well with a whisk. Cook over medium to medium-high heat until the mixture comes to a low boil. Taste to see of more Cayenne is needed. Reduce temperature and continue cooking for about 3-4 minutes, or until mixture begins to reduce and thicken.
  2. Add the Salmon back into the pan with the blueberry glaze for 1-2 minutes.
  3. Serve the Salmon with the Blueberry Glaze drizzled over the top. Yum!
Dinner, Lunch, Main Dish


Cheesy Yellow Squash Casserole (Gluten Free)

Cheesy Yellow Squash Casserole (Gluten Free)

This Yellow Summer Squash Casserole is SO easy and cheesy that it will quickly become one of your family’s favorites! It pairs nicely with a fresh green salad and your favorite protein…a perfect accompaniment for my Maple Glazed Salmon! Enjoy 🙂

  • 2-3 Large Yellow Summer Squash, thinly sliced ((or 5-6 Medium Squash))
  • 1 Tbsp Canola Oil
  • 1 Tbsp Salted Butter (I use Land O Lakes)
  • 1 Large Vidalia Onion, thinly sliced
  • 1/2 Cup Parmesan cheese, shredded
  • 1 Cup Shredded Cheddar Cheese (I used Medium Cheddar, but Mild or Sharp works, too!)
  • 1/2 Cup Lite Sour Cream
  • 1/2 tsp Salt
  • 1/4 tsp Ground Black Pepper
  • 1/2 – 3/4 Cup Gluten Free Italian Bread Crumbs
  1. Preheat oven to 375 degrees.
  2. Grease a 2-quart casserole dish; set aside.
  3. In a large skillet, heat the Oil and Butter over medium heat until the butter is melted.
  4. Saute the thinly sliced Squash and Onion until both are soft. Sprinkle with the Salt and Pepper.
  5. Transfer the Squash and Onion to the prepared casserole dish and add the Parmesan, Cheddar and Sour Cream. Mix gently until well combined.
  6. Sprinkle the Bread Crumbs evenly over the top.
  7. Bake for about 30 minutes or until bubbly and the top is a light golden brown.
  8. Serve with a fresh green salad and your favorite protein….pairs lovely with the Maple Glazed Salmon!
Side Dish


Maple Glazed Salmon (Gluten Free)

Maple Glazed Salmon (Gluten Free)

This recipe is great baked, grilled or pan-seared! The balance of sweetness from the Maple Syrup and the saltiness of the Bragg Liquid Aminos and minced Garlic is perfect! With only 4 ingredients, this recipe is wonderful for those nights when you just don’t feel like cooking a complicated recipe. As I have mentioned before, we eat A LOT of Salmon, so I am always trying new ways to prepare it. I have to admit that I prefer my salmon pan-seared, but usually end up baking it in the oven for ease and less mess 😉 I hope you enjoy this recipe as much as we do!

  • 1 lb. Salmon (Rinsed in cool water & lightly patted dry with paper towels)
  • 1/2 Cup 100% Pure Maple Syrup (not Pancake syrup)
  • 1/4 Cup Bragg Liquid Aminos (You can substitute with Soy Sauce)
  • 1 1/2 tsp Garlic, minced

Instructions for Baking (please see Cook’s Notes for Grilling & Pan-Searing Instructions):

  1. Place the Salmon into a large resealable plastic bag and set aside. *I usually place the plastic bag with the zipper part opened wide in a deep bowl while I rinse the Salmon…then I can plop the Salmon easily into the plastic bag without contaminating the outside of the bag with messy “fish hands” 😉 Set aside.
  2. In a small bowl, combine the Maple Syrup, the Bragg Liquid Aminos (or Soy Sauce) and Garlic. Mix well and pour over the Salmon in the plastic bag.
  3. Make certain that the bag is closed securely, then gently rotate the bag back-and-forth (or flip-flop) to evenly coat the Salmon with the Maple marinade. Place flat into a baking dish and refrigerate for at least 1 hour, flipping over halfway through the marinating time.
  4. Once you are ready to bake the Salmon, preheat the oven to 425 degrees.
  5. Dump the Salmon and the marinade into the baking dish.
  6. Bake for 15-18 minutes or until the Salmon flakes apart easily.
  7. Serve with your favorite sides! Enjoy!!!

Cook’s Notes:

Grilling: If you’re grilling the Salmon, discard the marinade before grilling (I usually make a separate half-batch of the marinade mixture for using as a dip/sauce to serve with the finished Salmon). I cover the grill with heavy-duty foil and spray liberally with non-stick cooking spray before placing the Salmon onto a Medium heated grill. Grill for about 5-7 minutes per side, depending on the thickness of your Salmon. Once the Salmon flakes apart easily, it is done.

Pan-Searing: Over medium to medium-high, heat 1 Tablespoon of Olive Oil and 1 Tablespoon of Salted Butter in a non-stick skillet until the surface shimmers and the butter is sizzling when you “swish” the liquid around in the pan. Place the marinated Salmon (discarding the marinade; Again, I usually make a separate half-batch of the marinade mixture for using as a dip/sauce to serve with the finished Salmon), skin side up, into the heated pan and cook, without moving the fillets, for about 4-5 minutes (you can reduce heat to medium if it’s “spitting”). Gently flip the Salmon fillets over and reduce the heat to medium or medium-low. Continue cooking for another 4-5 minutes. Salmon will still be slightly pink inside, but buttery and crispy outside. Enjoy!

Dinner, Main Dish


Sunshine Lemon Cooler Cookies (Gluten Free)

Sunshine Lemon Cooler Cookies (Gluten Free)

This copycat recipe for Sunshine Lemon Cooler cookies earned 5 Stars with our family! Growing up, these were my favorite cookies!!! I was SO sad when the Sunshine Company stopped making/selling them 🙁 I have tried many copycat recipes over the years, but this one from “Dixie Crystals” is by far the best (a HUGE “Thank You” to dixiecrystals.com). I simply swapped out the regular flour with “Better Batter All Purpose Gluten Free Flour Mix” and voila! the memories came flooding back as these crunchy, lemony morsels of Heaven dissolved in my mouth 🙂 Enjoy!

The Powdered Sugar Coating:

  • 1 Cup Powdered Sugar
  • 1 Envelope Kool-Aid Powdered Lemonade (about 1 1/2 teaspoons)

The Cookie:

  • 2 Cups Better Batter All Purpose Gluten Free Flour Mix (I find that this brand works best)
  • 2 teaspoons Gluten Free Baking Powder
  • 1/4 teaspoon Salt
  • 1/2 Cup Unsalted Butter, Room Temp (I use Land O Lakes)
  • 3/4 Cup Powdered Sugar
  • 1/3 Cup Dixie Crystals Extra Fine Granulated Sugar
  • 1 Large Egg (lightly beaten)
  • 1 teaspoon Vanilla Extract
  • 2 teaspoons Lemon Zest
  • 1 Tablespoon Lemon Juice

Directions for Making the Powdered Sugar Coating:

  1. In a large resealable plastic bag, combine the 1 Cup Powdered Sugar with the Kool-Aid Powdered Lemonade; set aside.

Directions for Making the Cookies:

  1. Preheat oven to 350 degrees.
  2. Line 1-2 cookie sheets with parchment paper; set aside.
  3. In a medium bowl, mix the GF Flour Mix, Baking Powder and Salt; set aside.
  4. Using a Stand Mixer, combine the Butter and Sugars until smooth and creamy.
  5. Next, add the Egg, Vanilla, Lemon Zest and Lemon Juice to the Butter-Sugar mixture, blending well.
  6. Add the Flour Mixture, 1/2 cup at a time, to the dough, mixing on the Low setting until just combined.
  7. Using a small cookie scoop (or spoon and rolling the dough into balls), scoop out the cookie dough onto the prepared cookie sheets, placing them 2″ apart. Using the palm of your hand or the bottom of a glass, slightly flatten each cookie to form disks.
  8. Bake for 12-15 minutes, depending on your oven. I bake mine for 14-15 minutes, because I prefer these cookies to be slightly crunchy, like the original Sunshine recipe.
  9. Let the cookies cool on the sheets for about 5 minutes.
  10. Carefully toss 3-4 cookies at a time in the powdered sugar mixture, coating each cookie well.
  11. Place the powdered cookies on a cooling rack to continue cooling.
  12. Enjoy!
Desserts, Snacks


Chocolate Pudding with Cookie Crumbles & Fresh Whipped Cream (Gluten Free)

Chocolate Pudding with Cookie Crumbles & Fresh Whipped Cream (Gluten Free)

Pudding is one of my favorite comfort foods. However, I must confess…I always made it from a box 😉 So, I decided to make it from scratch to see if there was a big difference and YES there is! Homemade chocolate pudding is definitely worth making 🙂 I added the chocolate cookie crumbles in the bottom after finding a wonderful recipe by Ree Drummond (thank you, Ree!) Let me know what you think…box or homemade?

Ingredients for the Cookie Crumble (optional):

  • 22-24 Gluten Free Chocolate Sandwich Cookies (if not GF, use Oreos)
  • 4 Tbsp Salted Butter, Melted (I use Land O Lakes)

Ingredients for the Pudding:

  • 1 1/2 Cups Granulated Sugar
  • 1/4 Cup All-Purpose Gluten Free Corn Starch
  • 1/4 tsp Salt
  • 3 Cups Skim Milk (You can substitute with 1%, 2%, Whole or any non-dairy milk)
  • 4 Large Egg Yolks
  • 6 1/2 ounces Bittersweet Chocolate
  • 2 Tbsp Butter, salted
  • 2 tsp Vanilla Extract

Ingredients for the Whipped Topping:

  • 1 Cup Heavy Whipping Cream (very cold)
  • 2-3 Tbsp Powdered Sugar
  • 1/2 tsp Vanilla Extract

Making the Cookie Crumble:

  1. In a food processor, pulse the melted Butter and Sandwich Cookies until finely crushed. Then spoon desired amount into the bottom of your serving dishes/cups (reserving some for garnish). Note: I spoon about 2 Tbsp into the bottom of each glass.

Making the Pudding:

  1. In a medium saucepan, whisk together the Sugar, Cornstarch and Salt until well-blended.
  2. Add the Milk and Egg Yolks to the Sugar mixture and whisk well.
  3. Heat this mixture over medium heat for about 8-10 minutes, stirring constantly so mixture doesn’t burn or clump. Immediately remove from the heat once it starts to thicken (like pudding ;))
  4. Add the Butter and Vanilla to the pudding mixture, stirring until butter is completely melted and blended.
  5. Pour the mixture into desired serving bowls/cups. Refrigerate for at least 2 hours.

Making the Whipped Cream:

  1. Just before serving the pudding, make the Whipped Cream by combining the Heavy Whipping Cream, Powdered Sugar (1 Tablespoon at a time) and Vanilla Extract using a Stand or Handheld Mixer. Beat on medium-high until stiff peaks form (about 4-5 minutes)
  2. Spoon desired amount on top of each pudding and add a few Cookie Crumbles for garnish. Yum!
Desserts, Snacks
American